Recently, Microsoft announced that they’re enabling the NFS protocol on top of blob storage. This is growing the strategy that started with ADLS gen 2, which put the HDFS protocol on top of blob storage.
I am working on a number of projects where this support would be helpful for customers. It’s still early days for the NFS support, so it’s not an immediate help, but I wanted to give it a try.
In this post, I’ll explain how to set it up, and then I’ll take you through some intensive performance testing I did. This blog post might be updated in the future,
Some technical details
NFS on blob uses the NFS v3 protocol. This has one impact: NFS v3 is not encrypted. The Azure storage team knows about this, and will – to protect users – only allow NFS access over either a service endpoint or private link.
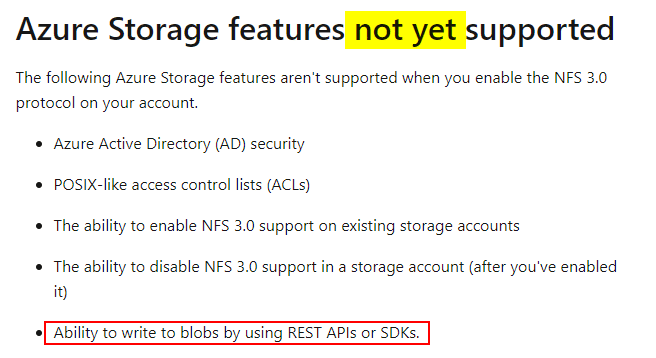
Right now, the access to NFS is either NFS or blob on a storage account. This means you can’t (like ADLS gen 2) use blob and NFS on the same account. Based on the Azure documentation, it seems like the plan is to support this multi-protocol write.
For now, it’s also important to note that you cannot enable/disable NFS on an existing storage account. Which means you’ll have to create a new one, dedicated to NFS.
During the preview, NFS 3.0 is available to BlockBlobStorage accounts with premium performance in the following regions: US East, US Central, and Canada Central. Support for GPV2 accounts with standard tier performance will be announced soon.
Pre-setup
Before we setup a new storage account, we need to register the feature. This requires three commands (using Azure PowerShell):
Register-AzProviderFeature -FeatureName AllowNFSV3 -ProviderNamespace Microsoft.Storage
Register-AzProviderFeature -FeatureName PremiumHns -ProviderNamespace Microsoft.Storage
Register-AzResourceProvider -ProviderNamespace Microsoft.Storage
This registration process will take a couple of minutes. I believe that in my case it took about 10 minutes to get the provider registered.
Since I have no resources in any of the preview regions, I decided to spin up a new VNET in East US with a Linux VM.
Creating an NFS blob storage account
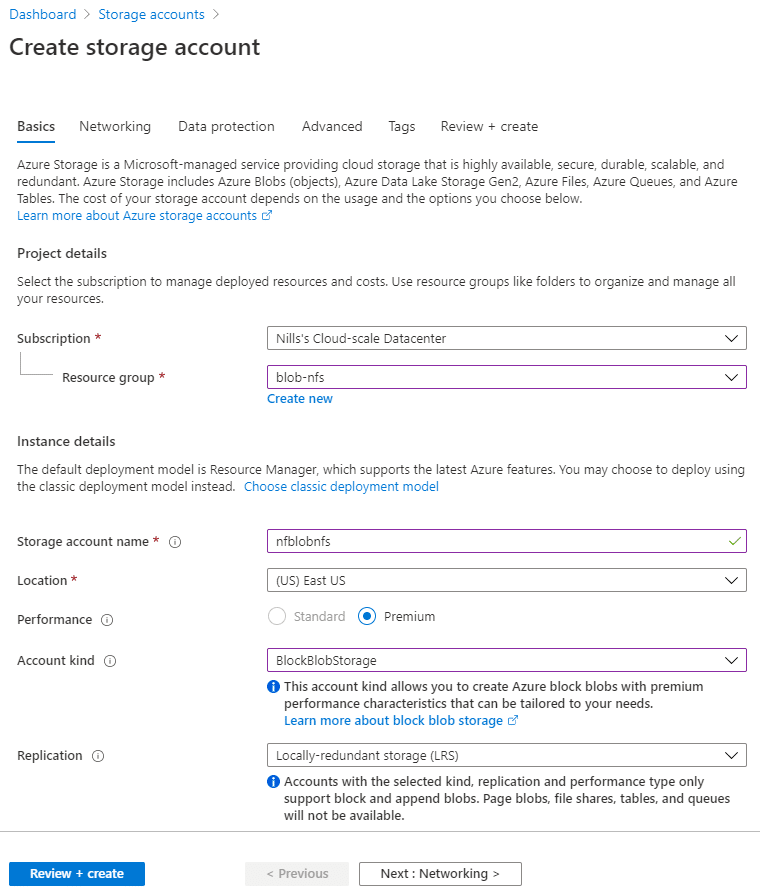
To create a new storage account, I’ll use the Azure portal. Since right now this is only support on BlockBlobStorage accounts with premium performance, we’ll create such a storage account.
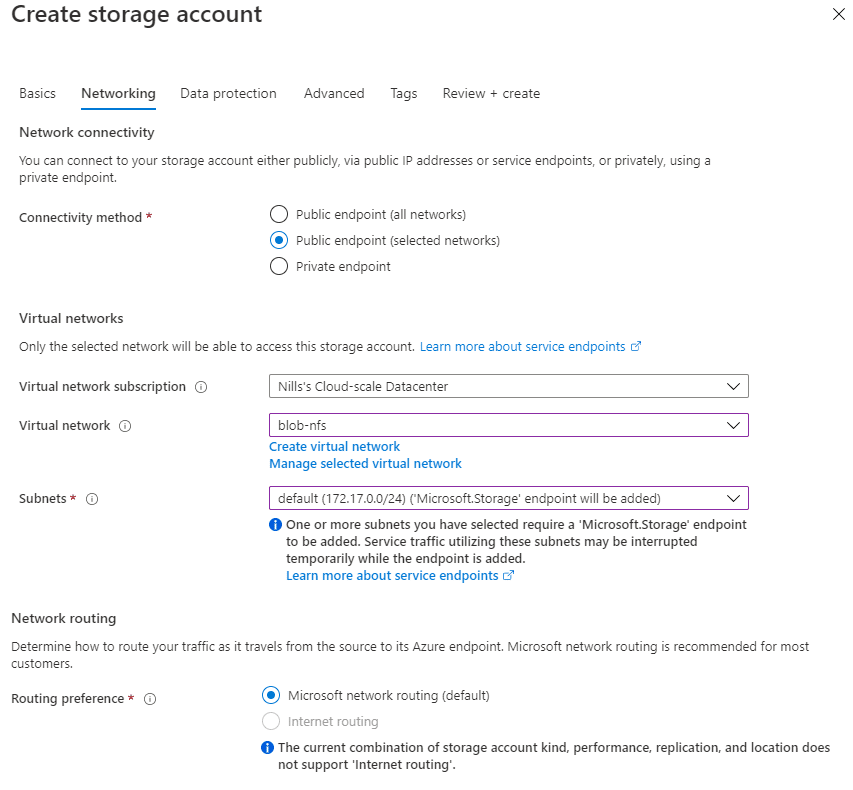
In terms of networking – remember, this is required for NFS – I’ll use regular public service endpoints. Private endpoints are also supported, but I decided to go with the public variant for my testing.
I skipped the data protection tab, and enabled the hierarchical namespace and NFS v3 support in the Advanced tab.

And with that, we can create the storage account.
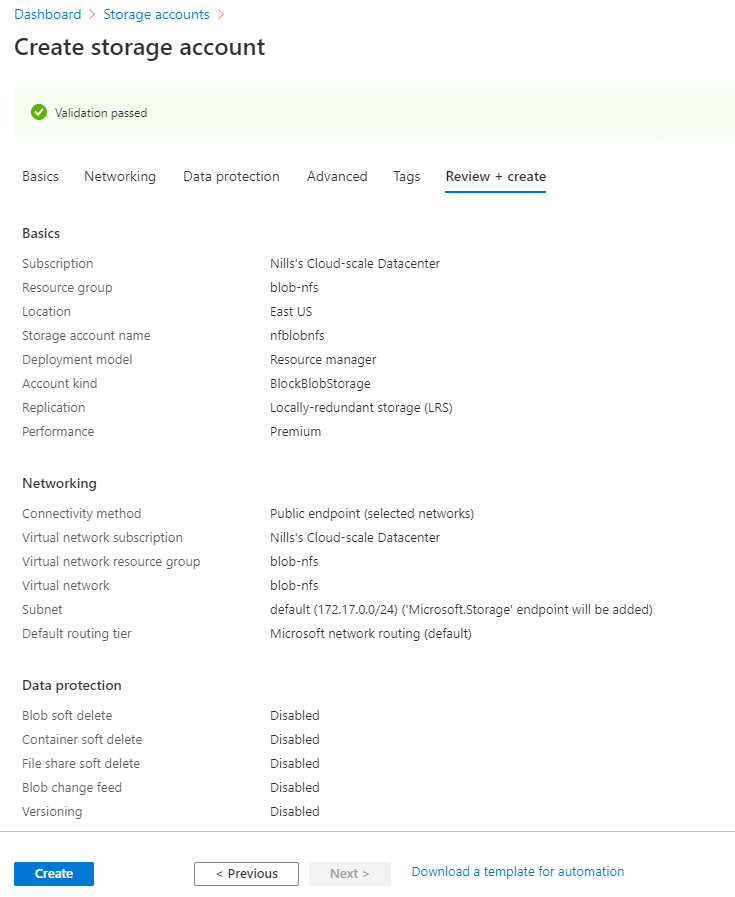
Finally, once the account is created, we’ll need to create a container on this account. I created a container called ‘nillstest’ on my account.
Mounting blob via NFS in a VM
Mounting blob via NFS in a VM was very easy. First step was to install nfs-common, second step was creating a directory to mount into, final step was mounting. That was it.
#install nfs-common
sudo apt-get update
sudo apt-get install nfs-common -y

#create mount point
sudo mkdir /mnt/blob

#mount
mount -o sec=sys,vers=3,nolock,proto=tcp nfblobnfs.blob.core.windows.net:/nfblobnfs/nillstest  /mnt/blob
And that seemed to do the job.
I wanted to also test the performance of this new feature, so that’s what we’ll cover next.
Testing performance
Using dd
Let’s start with a couple of rudimentary performance tests using the dd command. For reference, I’m running all of this on a Standard E16as_v4, which has 8Gbps of network throughput. I did a couple of regular dd tests first.
dd if=/dev/zero of=/tmp/test-1.img bs=1G count=1
dd if=/dev/zero of=/tmp/test-4.img bs=8k count=100k
Both commands resulted in performance that was all over the map, anywhere between 15MB/s and 250MB/s. Not sure what was causing this, whether it was caching or throttling. Some of the results of these tests:


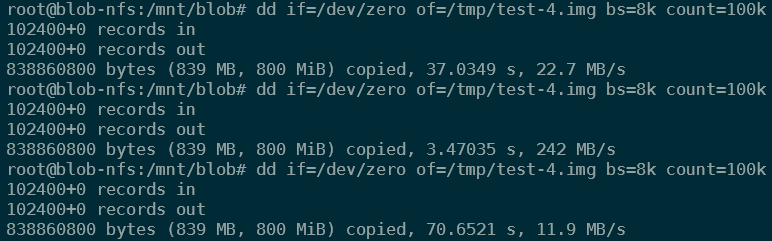
As you can see in the screenshots above, the performance was all over the place.
I’ve seen this before, dd isn’t the most reliable way to do disk performance testing. I’ve also used fio in the past, so I decided to give that a spin to get an idea of the performance.
Using fio
As I mentioned in the previous section, dd can deliver inconsistent test results. fio is a more full featured io testing tool. To install fio, you can run:
sudo apt-get install fio -yAnd we can then do a couple tests. First test is doing a sequential write test using synchronous IO (i.e. without OS level caching) with a 32k block size:
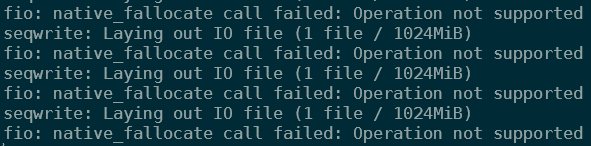
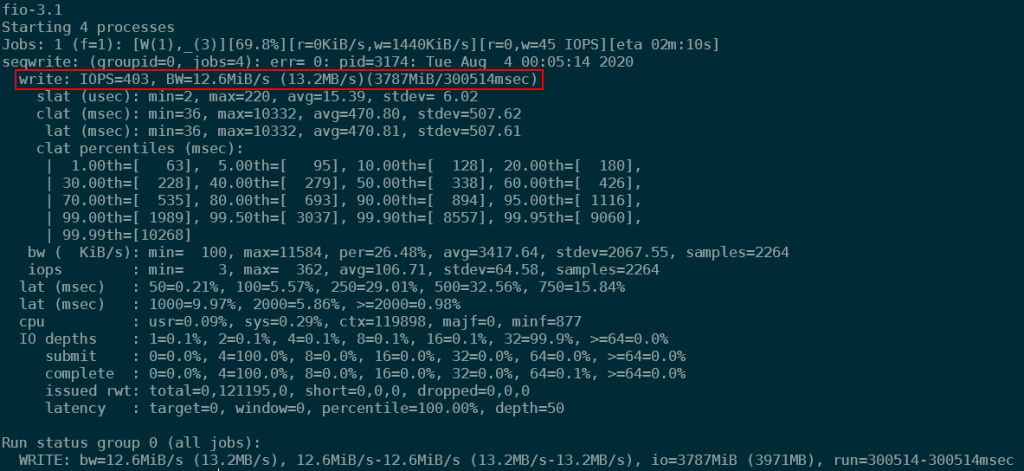
fio --name=seqwrite --rw=write --direct=1 --ioengine=libaio --bs=32k --numjobs=4 --size=1G --runtime=300 --group_reportingOne thing to notice when running fio is that I’m getting an IO error, which actually isn’t blocking the tests itself:
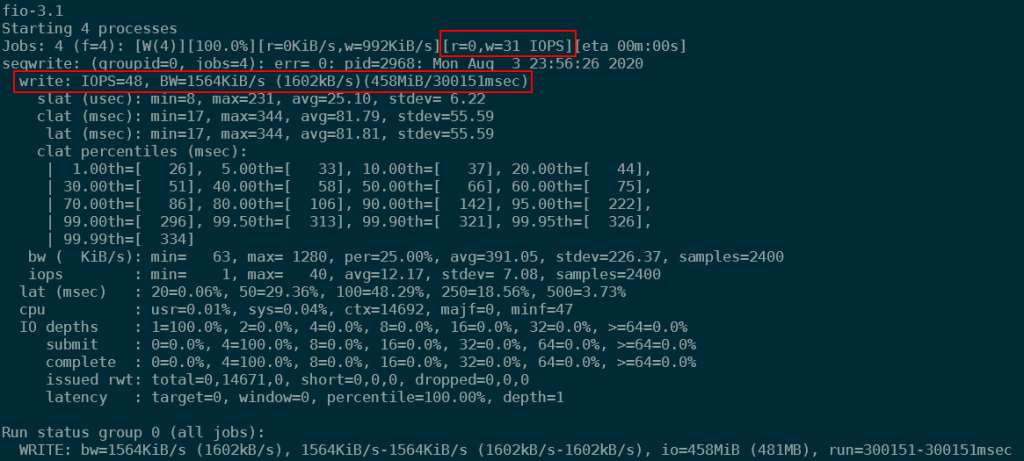
Ignoring that error and looking at the performance, I could see performance at about 70 to 90 IOPS initially, dropping to about 30 IOPS after about a minute. On average the IO performance was 48 write IOPS Certainly not spectacular:
This performance can be improved by adding the --iodepth parameter to fio. This means that fio would use more parallel writers to achieve better performance. Using –iodepth=50, I was able to achieve 403IOPS using this 32k block size sequential write test.
To offer some comparison, I ran the same fio tests on the temporary drive of the VM (also called ephemeral drive), and was able to achieve the following results:
- Direct IO, iodepth 1: 8170 write IOPS / BW=255 MiB/s (throttled by write BW of the VM, which is 255MiB/s
- Direct IO, iodepth 50: 8320 write IOPS / BW=273 MiB/s (throttled by write BW of the VM, which is 255MiB/s
So the limit here certainly is the NFS blob storage account. Let’s have a look at non-direct IO next.
Removing the --direct=1 option in fio increased performance tremendously. If direct=1, fio uses non-buffered I/O (usually O_DIRECT). This means that the system doesn’t use any of Linux built-in caching for IO. For more info on that, check out this blog post.
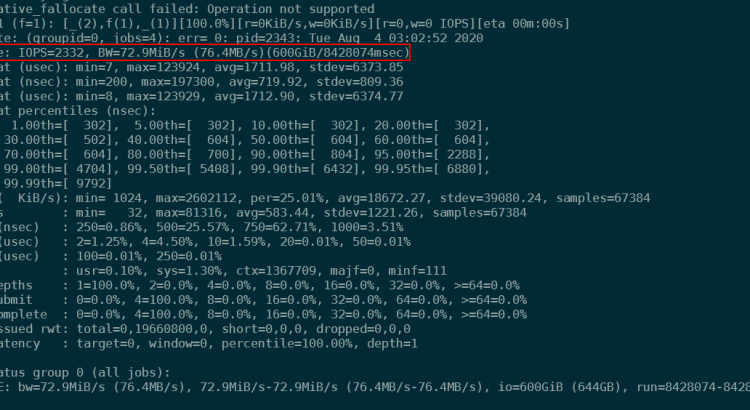
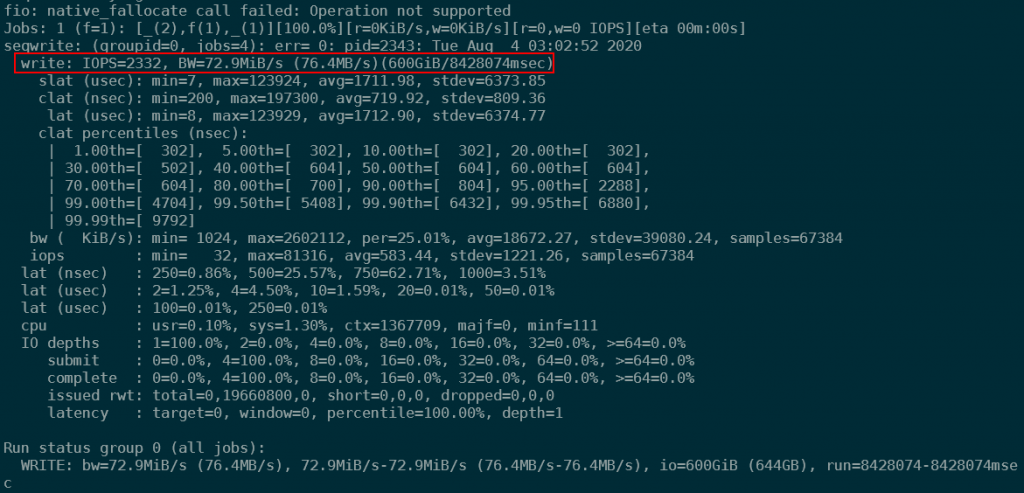
Without the direct=1 flag, we’ll use a bit of memory to optimize write performance. To get sort of relevant numbers, I decided to use a 150G file (memory of my VM was 128G), and see how long writing this using a single iodepth would take. The command was:
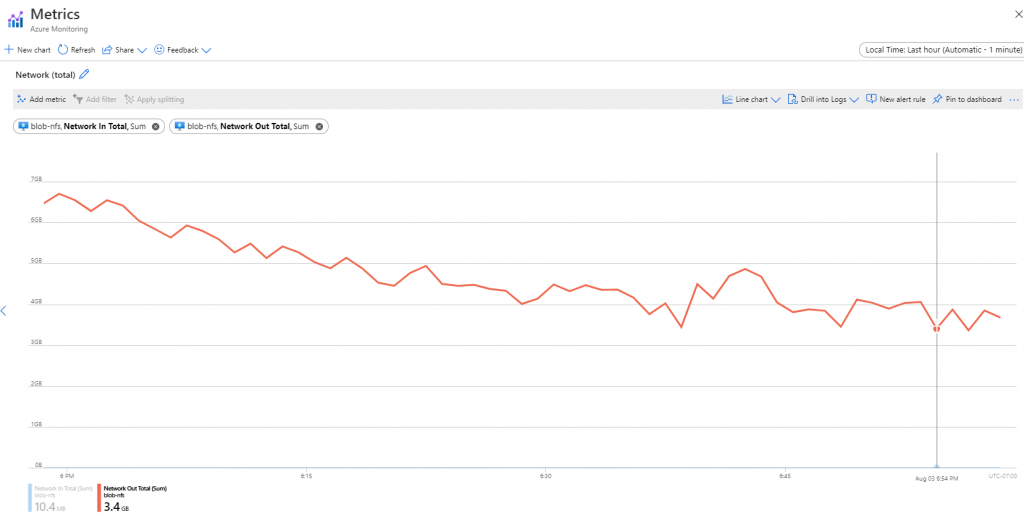
fio --name=seqwrite --rw=write --ioengine=libaio --bs=32k --numjobs=4 --size=150G --group_reportingInitially, performance was incredible at about 30k IOPS. This however decreased quickly to about 5k IOPS and 150 MiB/s. Throughout the test, IO was variable between 1k IOPS and 30MB/s and 6k IOPS an 200MB/s. Some of the variability is explained as well in the network out graph in the Azure portal. This shows at its lowest point 3.4GB written (per minute), which equates to 58MB/s. Overall, the job averaged 2332 IOPS and 73MB/s.
This performance was better than direct IO, but still not impressive. I did the same test with some different parameters, and never really got above the 80MB/s watermark (for these large files). As it might have been an artifact of the testing tool, I decided to do a real world test downloading a large file.
Using wget and downloading a file
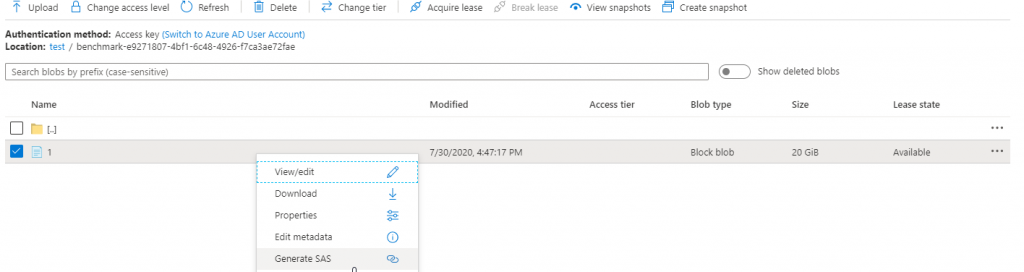
To do a more real-worldy type of test, I decided to create a 20G file on blob storage (in the same region, but different account. Can’t do NFS and blob on same account yet) and download that file.
To create a 20G file, I used azcopy bench:
azcopy bench "https://blobnfsdiag.blob.core.windows.net/test?*SAS TOKEN*" --file-count 1 --size-per-file 20G --delete-test-data=falseThis will create the 20G file as part of a azcopy bench test, and keep it there. I then went into the portal and got a SAS token to that file. I then did a simple wget to the url of the 20G file:
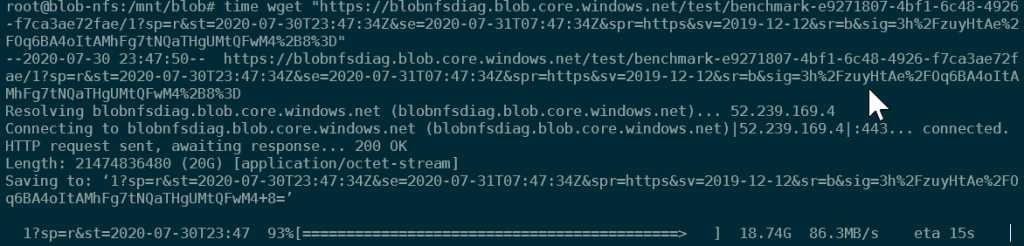
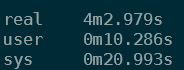
As you can see from the screenshot above, I was getting roughly 80 to 100MB/s in download speed, which was written directly to the blob/NFS directory. I used the time command the measure the time it took, and using that for reference, I had an overall average download speed of 84.29 MB/s.
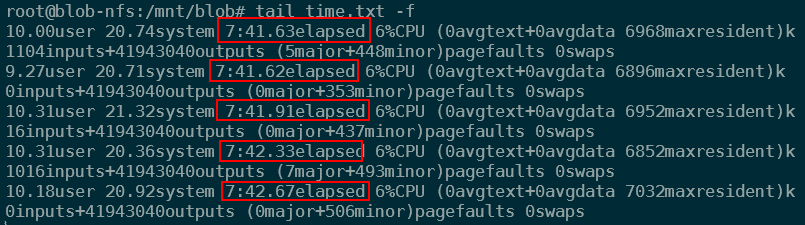
So, that confirmed that a single threaded write using wget could achieve about 85MB/s. Then I tried out multithreading this, by doing the same download 5 times. Why 5? 5 times downloading 80MB/s and writing 80MB/s over NFS comes close to the 8Gbps NIC limit on this VM.
I put the screenshot of the result below. Doing the math, this equates to an average download speed across the 5 files of 221.645MB/s.
File copying
Finally, I did some testing moving files around. First I tried moving files from the temporary drive to NFS. This moved at 240MB/s (throttled at the write throughput of the VM itself).

Then as a final test, I decided to do a simple copy to copy a file on blob NFS to blob NFS. This means reading and writing over that blob NFS connection at the same time. This moved at 119MB/s.

Summary
Mounting blob in a VM using NFS was super easy. Measuring the performance however was a bit of a mixed experience. Depending on how we measured experience, we saw experience be as low as a couple 10s of IOPS and kb of throughput (synchronous IO) to a couple thousand IOPS and about 100MB/s of throughput.
As an employee of Microsoft, I am passing that feedback to our product team, and trying to figure out if I should adapt my tests to better reflect the product truth. I’ll update this post when more info is available.