I’m studying to renew my CKA certification. Part of the CKA certification learning goals is setting up and managing a cluster with kubeadm. The goal of this post is to share how to setup a cluster with kubeadm using VMs running on Azure.
The steps that are required here are:
- Setup Azure infrastructure
- Setup first control node
- Setup second control node
- Setup worker nodes
- Run a small workload
Credit where credit is due, most of the steps here are taken from the Kubernetes documentation pages:
With that, let’s get going:
Setting up the required Azure infrastructure
We need a bit of Azure infrastructure to build a highly available Kubernetes cluster on Azure. What we’ll create:
- VNET
- Network Security Group
- 2 master VMs
- 2 worker VMs
- A load balancer for the master VMs
Let’s create all of this using the Azure CLI:
First up, all the networking elements (VNET and NSG)
az group create -n kubeadm -l westus2

az network vnet create \
    --resource-group kubeadm \
    --name kubeadm \
    --address-prefix 192.168.0.0/16 \
    --subnet-name kube \
    --subnet-prefix 192.168.0.0/16

az network nsg create \
    --resource-group kubeadm \
    --name kubeadm

az network nsg rule create \
    --resource-group kubeadm \
    --nsg-name kubeadm \
    --name kubeadmssh \
    --protocol tcp \
    --priority 1000 \
    --destination-port-range 22 \
    --access allow

az network nsg rule create \
    --resource-group kubeadm \
    --nsg-name kubeadm \
    --name kubeadmWeb \
    --protocol tcp \
    --priority 1001 \
    --destination-port-range 6443 \
    --access allow

az network vnet subnet update \
    -g kubeadm \
    -n kube \
    --vnet-name kubeadm \
    --network-security-group kubeadm
Then we can add the 4 virtual machines:
az vm create -n kube-master-1 -g kubeadm \
--image UbuntuLTS \
--vnet-name kubeadm --subnet kube \
--admin-username nilfranadmin \
--ssh-key-value @~/.ssh/id_rsa.pub \
--size Standard_D2ds_v4 \
--nsg kubeadm \
--public-ip-sku Standard --no-wait

az vm create -n kube-master-2 -g kubeadm \
--image UbuntuLTS \
--vnet-name kubeadm --subnet kube \
--admin-username nilfranadmin \
--ssh-key-value @~/.ssh/id_rsa.pub \
--size Standard_D2ds_v4 \
--nsg kubeadm \
--public-ip-sku Standard --no-wait

az vm create -n kube-worker-1 -g kubeadm \
--image UbuntuLTS \
--vnet-name kubeadm --subnet kube \
--admin-username nilfranadmin \
--ssh-key-value @~/.ssh/id_rsa.pub \
--size Standard_D2ds_v4 \
--nsg kubeadm \
--public-ip-sku Standard --no-wait

az vm create -n kube-worker-2 -g kubeadm \
--image UbuntuLTS \
--vnet-name kubeadm --subnet kube \
--admin-username nilfranadmin \
--ssh-key-value @~/.ssh/id_rsa.pub \
--size Standard_D2ds_v4 \
--nsg kubeadm \
--public-ip-sku Standard
And then finally, we can create the load balancer:
az network public-ip create \
    --resource-group kubeadm \
    --name controlplaneip \
    --sku Standard \
    --dns-name nilfrankubeadm

 az network lb create \
    --resource-group kubeadm \
    --name kubemaster \
    --sku Standard \
    --public-ip-address controlplaneip \
    --frontend-ip-name controlplaneip \
    --backend-pool-name masternodes

az network lb probe create \
    --resource-group kubeadm \
    --lb-name kubemaster \
    --name kubemasterweb \
    --protocol tcp \
    --port 6443

az network lb rule create \
    --resource-group kubeadm \
    --lb-name kubemaster \
    --name kubemaster \
    --protocol tcp \
    --frontend-port 6443 \
    --backend-port 6443 \
    --frontend-ip-name controlplaneip \
    --backend-pool-name masternodes \
    --probe-name kubemasterweb \
    --disable-outbound-snat true \
    --idle-timeout 15 \
    --enable-tcp-reset true

az network nic ip-config address-pool add \
    --address-pool masternodes \
    --ip-config-name ipconfigkube-master-1 \
    --nic-name kube-master-1VMNic \
    --resource-group kubeadm \
    --lb-name kubemaster

az network nic ip-config address-pool add \
    --address-pool masternodes \
    --ip-config-name ipconfigkube-master-2 \
    --nic-name kube-master-2VMNic \
    --resource-group kubeadm \
    --lb-name kubemaster
And then, let’s get the public IP of all the nodes so we can connect to them and set up what’s needed:
MASTER1IP=`az vm list-ip-addresses -g kubeadm -n kube-master-1 \
--query "[].virtualMachine.network.publicIpAddresses[0].ipAddress" --output tsv`
MASTER2IP=`az vm list-ip-addresses -g kubeadm -n kube-master-2 \
--query "[].virtualMachine.network.publicIpAddresses[0].ipAddress" --output tsv`
WORKER1IP=`az vm list-ip-addresses -g kubeadm -n kube-worker-1 \
--query "[].virtualMachine.network.publicIpAddresses[0].ipAddress" --output tsv`
WORKER2IP=`az vm list-ip-addresses -g kubeadm -n kube-worker-2 \
--query "[].virtualMachine.network.publicIpAddresses[0].ipAddress" --output tsv`
And now, we can setup the first master node:
Setup first master node
Now we can start setting up the first master node. Much of the configuration for the first master node will be repeated on the other nodes; as most of this is laying the plumbing for Kubernetes to work.
We need to do a couple things:
- Install the right tools, like kubeadm, kubectl and kubelet.
- Configure networking, container runtime.
- Use kubeadm to setup node.
- Setup a CNI.
Let’s start with the first step:
ssh nilfranadmin@$MASTER1IP

sudo apt update
sudo apt -y install curl apt-transport-https;

curl -s https://packages.cloud.google.com/apt/doc/apt-key.gpg | sudo apt-key add -
echo "deb https://apt.kubernetes.io/ kubernetes-xenial main" | sudo tee /etc/apt/sources.list.d/kubernetes.list

sudo apt update
sudo apt -y install vim git curl wget kubelet kubeadm kubectl containerd;

sudo apt-mark hold kubelet kubeadm kubectl

kubectl version --client && kubeadm version
That final command should confirm kubectl and kubeadm are installed and return something similar to the following screenshot:

Next up, let’s configure networking and containerd on the node:
cat <<EOF | sudo tee /etc/modules-load.d/containerd.conf
overlay
br_netfilter
EOF

sudo modprobe overlay
sudo modprobe br_netfilter

# Setup required sysctl params, these persist across reboots.
cat <<EOF | sudo tee /etc/sysctl.d/99-kubernetes-cri.conf
net.bridge.bridge-nf-call-iptables  = 1
net.ipv4.ip_forward                 = 1
net.bridge.bridge-nf-call-ip6tables = 1
EOF

# Apply sysctl params without reboot
sudo sysctl --system

sudo mkdir -p /etc/containerd
containerd config default | sudo tee /etc/containerd/config.toml

sudo systemctl restart containerd

cat <<EOF | sudo tee /etc/modules-load.d/k8s.conf
br_netfilter
EOF

cat <<EOF | sudo tee /etc/sysctl.d/k8s.conf
net.bridge.bridge-nf-call-ip6tables = 1
net.bridge.bridge-nf-call-iptables = 1
EOF
sudo sysctl --system
And with the node prepared, we can setup Kubernetes using kubeadm. Although all the steps to this point seemed like a ton of work; setting up Kubernetes using kubeadm is a single command:
sudo kubeadm init --control-plane-endpoint "nilfrankubeadm.westus2.cloudapp.azure.com:6443" --upload-certsThe output of this command will show you three things:
- Where to get the kubeconfig to configure kubectl to work with this cluster.
- How to join additional control plane nodes
- How to join worker nodes
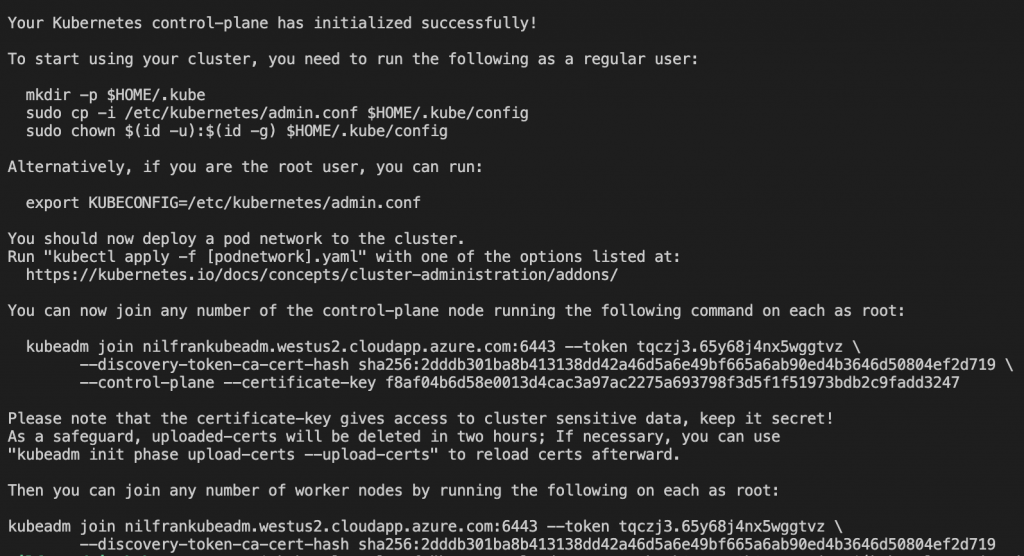
Make sure to copy the two kubeadm join commands, as we’ll need these to bootstrap the other nodes.
Let’s do the first command shown in the screenshot above to make the kubeconfig file available:
mkdir -p $HOME/.kube
sudo cp -i /etc/kubernetes/admin.conf $HOME/.kube/config
sudo chown $(id -u):$(id -g) $HOME/.kube/config
And then we can interact with the cluster, and e.g. execute a get nodes:

The node shows not ready, because a CNI wasn’t setup yet. We can do this using the following command:
kubectl apply -f "https://cloud.weave.works/k8s/net?k8s-version=$(kubectl version | base64 | tr -d '\n')"And if you wait a couple of seconds, you will see the node transition into a ready state:

Now that that’s done, we can exit out of this node since we need to configure the other nodes now.
Setting up the second control node
Now we have to prepare the second control node. Here, we’ll do a couple things:
- Get the kubeconfig from the master node locally, so we can use kubectl from our local machine (optional)
- Setup the node (like we did with the first control node)
- Join using kubeadm
For step 2, we won’t use SSH and execute the commands; we’ll rather execute the prep-node.sh script from my GitHub repo. Copy it locally if you are following along.
To get kubeconfig locally, you can use the following command. This will not overwrite the .config in your ~/.kube folder, as this might hold more permanent clusters.
scp nilfranadmin@$MASTER1IP:/home/nilfranadmin/.kube/config .config
export KUBECONFIG=`pwd`/.config
Verify that this works by doing kubectl get nodes:

Next, we’ll setup the second control plane node. We can do this using the following commands. The second command will not be exactly the same in your situation, since you will have different certs. This command was copy-pasted from the kubeadm init step on the first control node.
ssh nilfranadmin@$MASTER2IP -o "StrictHostKeyChecking no" 'bash -s' < prep-node.sh

ssh nilfranadmin@$MASTER2IP -o "StrictHostKeyChecking no" 'sudo kubeadm join nilfrankubeadm.westus2.cloudapp.azure.com:6443 --token tqczj3.65y68j4nx5wggtvz \
        --discovery-token-ca-cert-hash sha256:2dddb301ba8b413138dd42a46d5a6e49bf665a6ab90ed4b3646d50804ef2d719 \
        --control-plane --certificate-key f8af04b6d58e0013d4cac3a97ac2275a693798f3d5f1f51973bdb2c9fadd3247'
This will join the second control node to the cluster. If you check the nodes, you’ll see this node join the cluster and get ready once the CNI is setup:

And now we’re ready for the worker nodes:
Setting up the worker nodes
Setting up the worker nodes is very similar to setting up the second control plane node. The only difference is the command to join the cluster is slightly different, just make sure to copy-paste the right kubeadm output command.
ssh nilfranadmin@$WORKER1IP -o "StrictHostKeyChecking no" 'bash -s' < prep-node.sh
ssh nilfranadmin@$WORKER2IP -o "StrictHostKeyChecking no" 'bash -s' < prep-node.sh

ssh nilfranadmin@$WORKER1IP -o "StrictHostKeyChecking no" 'sudo kubeadm join nilfrankubeadm.westus2.cloudapp.azure.com:6443 --token tqczj3.65y68j4nx5wggtvz \
    --discovery-token-ca-cert-hash sha256:2dddb301ba8b413138dd42a46d5a6e49bf665a6ab90ed4b3646d50804ef2d719 '

ssh nilfranadmin@$WORKER2IP -o "StrictHostKeyChecking no" 'sudo kubeadm join nilfrankubeadm.westus2.cloudapp.azure.com:6443 --token tqczj3.65y68j4nx5wggtvz \
    --discovery-token-ca-cert-hash sha256:2dddb301ba8b413138dd42a46d5a6e49bf665a6ab90ed4b3646d50804ef2d719 '
Once these commands have successfully executed, you should be able to watch those worker nodes join your cluster:
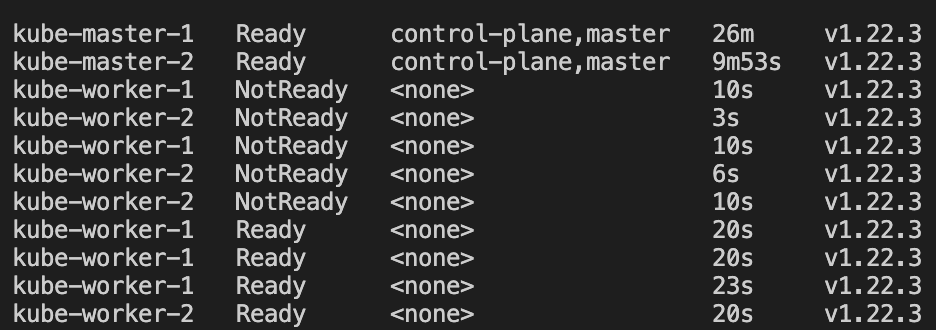
Let’s verify everything works fine my running a small sample workload on the cluster:
Running a small app on the cluster
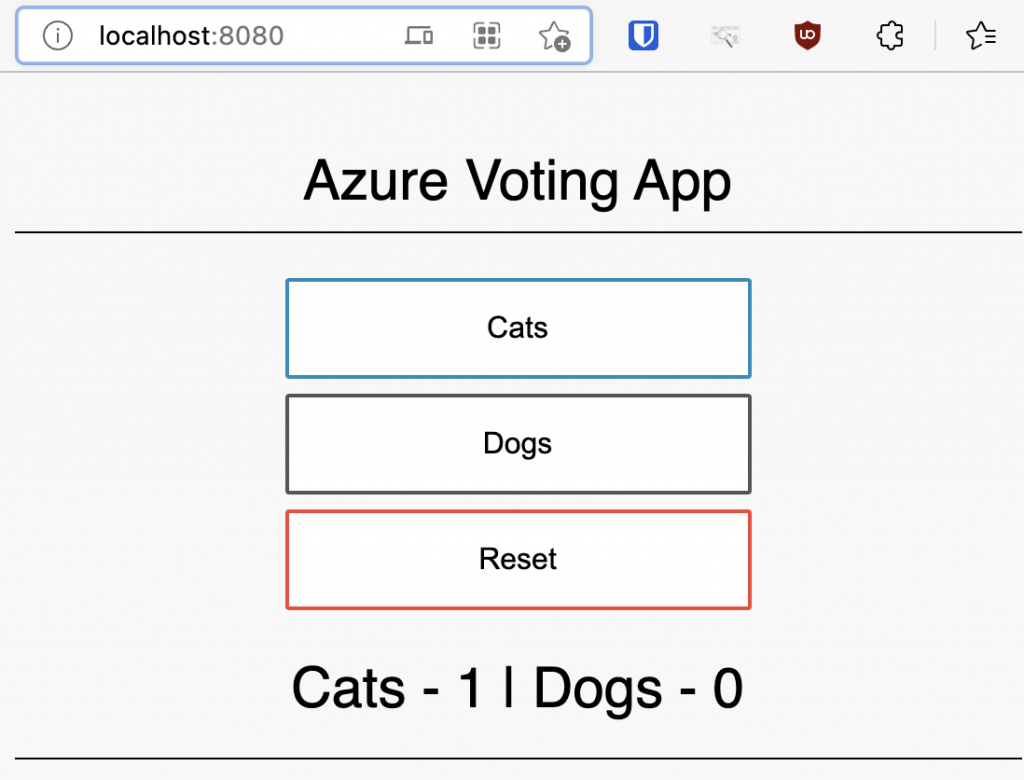
To verify everything works OK, let’s run a small little sample app on the cluster. In my case, I like to use the azure-vote application for this purpose. However, the default azure-vote uses a service of type LoadBalancer, which this cluster isn’t setup for yet. I changed this service type to type NodePort in this snippet on GitHub, which you can use as well to create the app:
kubectl create -f https://raw.githubusercontent.com/NillsF/blog/master/kubeadm/azure-vote.yml
kubectl port-forward service/azure-vote-front 8080:80
Give it a couple seconds for the pods to start, and then connect to localhost:8080 in your browser and you’ll see the azure-vote application running on your kubernetes cluster:
Clean-up
To clean up our deployment, we can simply delete the kubeadm resource group we created. This will take care of deleting all the resources:
az group delete -n kubeadm --yesConclusion
In this post we explored creating a Kubernetes cluster using kubeadm. Although kubeadm itself makes it super easy to spin up a cluster, there’s a number of things we have to make a cluster work. You have to create the infrastructure for the cluster, setup the nodes correctly and only then can you run kubeadm.
Going through this work has increased my appreciation for the work done by managed Kubernetes versions (EKS/GKE/AKS) or the cluster-api project that make it a lot easier to spin up a cluster.