
How often have you created a new Kubernetes cluster to ‘test something new’? How often have you created a new Kubernetes cluster to start learning about new functionalities? In my case, I do this pretty frequently. I very frequently spin up (and down) Azure Kubernetes clusters.
This approach comes with two downsides however: it takes about 5 minutes to spin up a cluster and clusters carry a cost. Although Microsoft pays for my Azure usage, I still need to be mindful of costs.
There are however different ways to create clusters that don’t carry a cost, and that could create clusters faster. One of those solutions is minikube. This is a VM based-solution that creates virtual machines to run nodes of a Kubernetes cluster locally.
Another solution is to run kind (Kubernetes in Docker), which will be the focus of this blog. By running kind, you won’t run Kubernetes nodes as a virtual machine, but you’ll run them as container. The biggest benefit of this approach is that it’ll be even easier and more lightweight to quickly create and destroy a Kubernetes cluster.
For the purpose of this blog, I’ll be installing kind on my WSL2 setup. The end goal is to deploy a web app and expose that web app to the host system. To make sure I’m capturing all steps, I created a brand new WSL environment running Ubuntu 18.04 for WSL2, with nothing installed.
Prerequisites
kind has 2 prerequisites: go (11+) and Docker. It’s also going to be useful to have kubectl installed. We can install these the following way:
sudo apt-get update
sudo apt-get install docker.io golang -y
curl -LO https://storage.googleapis.com/kubernetes-release/release/`curl -s https://storage.googleapis.com/kubernetes-release/release/stable.txt`/bin/linux/amd64/kubectl
chmod +x ./kubectl
sudo mv ./kubectl /usr/local/bin/kubectl
With that out of the way, you’ll have to start the Docker daemon. If you’re running this in WSL I highly recommend checking out this post I wrote last week about automatically starting the Docker daemon in WSL. If you’re not running on WSL, you can start the Docker daemon using the following command:
sudo systemctl start dockerInstalling kind
Installing kind is as simple as getting kubectl:
curl -Lo ./kind https://kind.sigs.k8s.io/dl/v0.8.1/kind-$(uname)-amd64
chmod +x ./kind
sudo mv ./kind /usr/local/bin/kind
Setting up a first cluster in kind
To setup a cluster in kind, you use the following command:
kind create cluster
This will create the cluster in Docker. It automatically stores the context to connect to it on the kube-config file. This means you can immediately interact with the cluster and run:
kubectl get nodesWhich will show you a single node:

Running a sample app on kind
To test things out, I’ll be running a sample app on kind. As an example I’ll pick the app we used in the 7th chapter of the Hands-on Kubernetes on Azure book. This is a good demo app since it uses configmaps, deployments and a service to connect to it. The code for this sample is available on Github.
git clone https://github.com/PacktPublishing/Hands-On-Kubernetes-on-Azure---Second-Edition.git
cd Hands-On-Kubernetes-on-Azure---Second-Edition/Chapter07
From that directory, we’ll first create the three configmaps:
kubectl create configmap server1 --from-file=index1.html
kubectl create configmap server2 --from-file=index2.html
kubectl create configmap healthy --from-file=healthy.html
And then create two deployments:
kubectl create -f webdeploy1.yaml
kubectl create -f webdeploy2.yaml
This will cause the deployment and pods to be created. It takes a couple seconds for them to become live, since the images need to be downloaded. Please note, since we’re running a single-node cluster, these pods will be run on the master node.

Next, we’ll need to deploy the actual service that load balances between server1 and server2. The demo app was built to run on AKS, with service type LoadBalancer. This is not available on kind, since there is no external load balancer to provision.
To solve this, we can change our service to be a service of type NodePort. That will solve the load balancer issue, but it won’t make traffic available from the host yet. To make traffic available from the host, we’ll have to map a port from our cluster to our host machine. And that’s what we’ll do next.
Making a service available in kind
In this section we’ll destroy our current cluster and create a new (multi-node) cluster that exposes port 80. Since we’ll be using a service of type NodePort, we’ll need to assign a high port number (between 30,000-32,767). We’ll use that port number for the NodePort, but have kind expose it on port 80 to our host.
To destroy our demo cluster, we can execute the following command:
kind delete clusterNext, we’ll create a custom cluster in kind. We’ll create a cluster with a single master node, 2 worker nodes and we’ll expose port 80 on the nodes.
To do this, we’ll create a kind cluster configuration file, which is a YAML file. The following YAML should do the trick:
kind: Cluster
apiVersion: kind.x-k8s.io/v1alpha4
nodes:
- role: control-plane
- role: worker
  extraPortMappings:
  - containerPort: 32345
    hostPort: 80
    listenAddress: "127.0.0.1"
- role: worker
We can then create a new cluster using the following command:
kind create cluster --config kind.yamlAnd then we need to recreate our application.
kubectl create configmap server1 --from-file=index1.html
kubectl create configmap server2 --from-file=index2.html
kubectl create configmap healthy --from-file=healthy.html

kubectl create -f webdeploy1.yaml
kubectl create -f webdeploy2.yaml
With the application deployed, we can also deploy our service. We’ll need to adapt the webservice.yaml file to allow for our NodePort service:
apiVersion: v1
kind: Service
metadata:
  name: web
spec:
  selector:
    app: web-server
  ports:
  - protocol: TCP
    port: 80
    nodePort: 32345
  type: NodePort
Which we can then create using:
kubectl create -f webservice.yamlAnd that will make our service available on localhost:80.
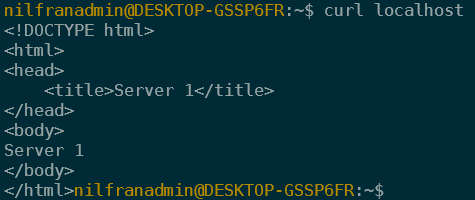
Which is exactly what I wanted to achieve.
Summary
In this post we looked into kind, a way to quickly run a Kubernetes cluster on a single machine. We deployed a single-node kind cluster and deployed an application to it. Afterwards, we created a new cluster, that allowed us to expose networking services.
I hope this helps you in cases where you quickly want/need a Kubernetes cluster to test something, without having to wait for an AKS cluster (and without having to pay for the resources).