Note: There’s a new post available combining CSI driver + AAD pod identity.
When you store secrets in a Kubernetes cluster, by default those are stored in the etcd database within the master nodes. The same is true for secrets stored in an AKS cluster on Azure. The best practice for storing secrets is to store your secrets in KeyVault. Up to now, there was an opensource project called KeyVault flexvolume, which was recently deprecated in favor of a CSI driver for secrets.
In this blog post, we’ll explore the CSI driver for Azure KeyVault, and build a quick demo for how to run it. If you want to follow along, I uploaded the source code for this to the blog’s git repo.
Exploring the Azure Key Vault Provider for Secret Store CSI Driver
There is a Kubernetes SIG that works on the Kubernetes Secrets Store CSI Driver. The work from that SIG had led to two implementation thus far, one for Azure Key Vault and one for Hashicorp Vault. We’ll be focusing today on the Azure Key Vault implementation.
What the CSI driver allows you to do is mount secrets stored in a vault to your pods. It is not a replacement for the default secrets store in Kubernetes. This means you cannot store actual Kubernetes secrets in Key Vault, but you access secrets in Key Vault through the CSI driver. The CSI driver mounts any secrets you need as a file in your pods.
To get this to work, you have to install a SecretProviderClass in your Kubernetes cluster. With that provider installed in your cluster, you can then mount volumes using a csi reference in the volume reference in your pod/deployment. We’ll look at what this looks like later on.
From a security perspective, the Azure Secret Store CSI driver has three ways to access your secrets in Key Vault:
- Using a Service Principal
- Using Pod Identity
- Using VMSS managed identity (system assigned is the only supported version for now)
And with that knowledge, let’s have a look at deploying this onto a cluster.
Setting up the prerequisites
To get this up and running, we’ll need:
- A Kubernetes cluster running 1.16 or higher.
- A Key Vault, and a way to authorize against it. For this demo, I’ll use the way using a Service Principal for the authorization.
Let’s start with the Kubernetes cluster. You can create one using your preferred tool, or use any cluster that runs Kubernetes 1.16 or higher. I created a new cluster for this demo called aks-secret. I will use Cloud Shell in the Azure portal to run commands against this cluster. The first one being getting the Kubernetes credentials loaded:
az aks get-credentials -n aks-secret -g aks-secretTo confirm that we are connected successfully, let’s run the following command:
kubectl get nodesWhich should return the nodes in your cluster:

Next up, we’ll create a Key Vault (or you can re-use an existing one). As I’m only going to be using this Key Vault for this demo, I’ll quickly create a new using the CLI:
az keyvault create -n aks-secret-nf -g aks-secretThis took about 30 seconds for me. Next up, we’ll create a service principal and give that service principal access to our Key Vault.
SP=`az ad sp create-for-rbac --skip-assignment`

APPID=`echo $SP | jq .appId`
APPID=`echo "${APPID//\"}"`

SECRET=`echo $SP | jq .password`
SECRET=`echo "${SECRET//\"}"`

az keyvault set-policy -n aks-secret-nf \
    --spn $APPID --secret-permissions get list
We’ll create a – regular – secret in Kubernetes to store the credentials for our service principal:
kubectl create secret generic secrets-store-creds \
    --from-literal clientid=$APPID \
    --from-literal clientsecret=$SECRET
Now, we can create a couple of secrets in our Key Vault:
az keyvault secret set --vault-name aks-secret-nf \
    --name secret1 --value superSecret1
az keyvault secret set --vault-name aks-secret-nf \
    --name secret2 --value verySuperSecret2
And that should do it for the prerequisites. Let’s now setup the CSI driver.
Setting up and using the CSI driver
First, we need to install the CSI driver. This can be done using helmv3, using the following commands:
helm repo add csi-secrets-store-provider-azure https://raw.githubusercontent.com/Azure/secrets-store-csi-driver-provider-azure/master/charts
helm install csi-secrets csi-secrets-store-provider-azure/csi-secrets-store-provider-azure
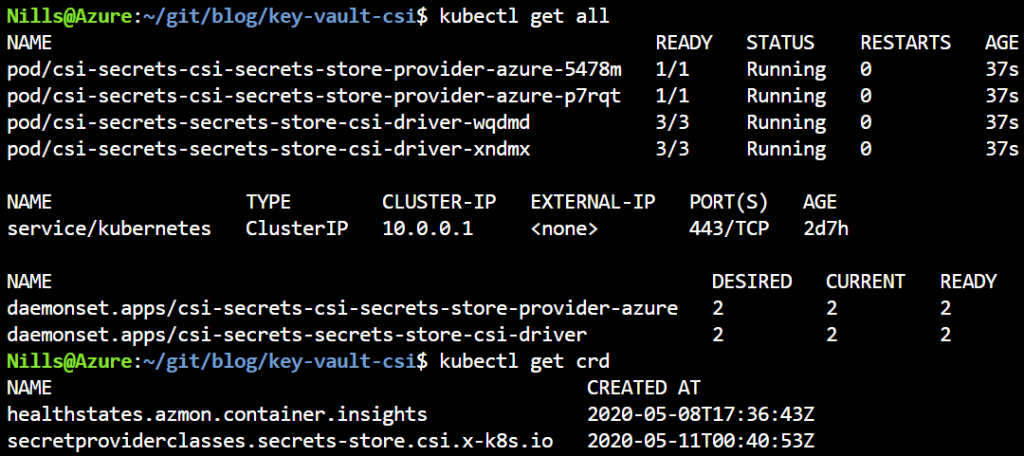
This will create 2 daemonsets and a CRD (custom resource definition) for you:

Next, we’ll need to configure the driver to give it access to Key Vault and point it to the secrets in Key Vault. We’ll create a YAML file for this:
apiVersion: secrets-store.csi.x-k8s.io/v1alpha1
kind: SecretProviderClass
metadata:
  name: aks-secret-nf
spec:
  provider: azure
  parameters:
    keyvaultName: "aks-secret-nf"
    objects:  |
      array:
        - |
          objectName: secret1
          objectType: secret
        - |
          objectName: secret2
          objectType: secret
    tenantId: "72f988bf-86f1-41af-91ab-2d7cd011db47"
And we can deploy this using:
kubectl apply -f secretProviderClass.yamlAnd then, we should be able to reference those secrets in a regular deployment. Let’s create this sample deployment:
apiVersion: apps/v1
kind: Deployment
metadata:
  name: nginx-secret
spec:
  replicas: 1
  selector:
    matchLabels:
        app: web-server
  template:
    metadata:
      labels:
        app: web-server
    spec:
      containers:
        - name: nginx
          image: nginx
          volumeMounts:
          - name: secrets
            mountPath: "/mnt/secrets"
            readOnly: true
      volumes:
        - name: secrets
          csi:
            driver: secrets-store.csi.k8s.io
            readOnly: true
            volumeAttributes:
              secretProviderClass: "aks-secret-nf"
            nodePublishSecretRef:
              name: secrets-store-creds
Which we can deploy using:
kubectl apply -f deployment.yamlAfter a couple of seconds, we should then see a running pod (kubectl get pods):

And we can get a list of the secrets mounted in our pod using the following command:
kubectl exec -it nginx-secret-59d7747b84-qwq2w ls /mnt/secretsWhich shows us our two secrets:

And we can see the secrets themselves as well, using
kubectl exec -it nginx-secret-59d7747b84-qwq2w cat /mnt/secrets/secret1
That’s it for basic functionality. This had me intrigued a bit, and I wanted to check two final things:
- What happens if we change a secret in Key Vault?
- What happens if we have more secrets in Key Vault than we specify in our SecretProviderClass?
Let’s find out:
What happens if we change a secret in Key Vault?
This one we can quickly find out. Let’s first change our first secret in Key Vault:
az keyvault secret set --vault-name aks-secret-nf \
    --name secret1 --value newSecret
And then list the secret in the pod:

This shows us that the secret in the file does not change. Which is actually not what I was expecting.
Let’s try to see if restarting the pod makes a new secret appear. To do this, I’ll delete the pod (kubectl delete pod nginx-secret-59d7747b84-qwq2w). This will cause the replicaSet to create a new one. I’ll then exec into the new one to see the secret.

This has mounted the new version of the secret.
This last step was as expected, but the overall behavior was not as expected. With typical Kubernetes secrets, mounted secrets update automatically. This appears not to be the case with the CSI-driver. I opened an issue to get more clarity about this.
What happens if we have more secrets in Key Vault than we specify in our SecretProviderClass?
My expectation for this question is that only the secrets you provide in the SecretProviderClass are loaded and mounted in the file system. Let’s try this out. To do this, let’s first delete the SecretProviderClass and the deployment:
kubectl delete -f secretProviderClass.yaml
kubectl delete -f deployment.yaml
Let’s now create a third secret, that we won’t put into the SecretProviderClass:
az keyvault secret set --vault-name aks-secret-nf \
    --name secret3notinclass --value verySecure
And let’s then recreate the secretProviderClass and the deployment:
kubectl create -f secretProviderClass.yaml
kubectl create -f deployment.yaml
We can get the list of secrets by doing an ls in the pod:
kubectl exec -it nginx-secret-59d7747b84-pv4xs ls /mnt/secretsAnd this shows – as expected – that the third secret was not loaded:

If we now update the secretProviderClass, I expect the new secret to not show up in the existing pod, but to show up if we were to recreate the pod. Let’s verify:
Let’s update the secretProviderClass.yaml to:
apiVersion: secrets-store.csi.x-k8s.io/v1alpha1
kind: SecretProviderClass
metadata:
  name: aks-secret-nf
spec:
  provider: azure
  parameters:
    keyvaultName: aks-secret-nf
    objects:  |
      array:
        - |
          objectName: secret1
          objectType: secret
        - |
          objectName: secret2
          objectType: secret
        - |
          objectName: secret3notinclass
          objectType: secret
    tenantId: "72f988bf-86f1-41af-91ab-2d7cd011db47"
And apply the changes:
kubectl apply -f secretProviderClass.yamlAnd if we check the running pod:

The new secret isn’t there yet. But let’s delete this pod and have the deployment create a new one:

Given the experience with the previous question, this behavior is more in the realm of expectations.
Summary
The CSI-driver provides a way to connect secrets, keys and certificates in Key Vault to deployments in Kubernetes. It’s pretty easy to setup, and straightforward to use. There’s one gotcha in my mind, which is that secrets that are updated in Key Vault, aren’t automatically updated in the pods they mounted into.
Overall, this CSI-driver provides a common interface to connect to secrets in a vault. I’d say it’s early days for this project, since there are only two implementations (Azure and Hashicorp Vault). I would hope other providers come along. Having a quick look online, shows me that other providers have some other implementations, such as kubernetes-external-secrets for AWS (developed by GoDaddy). Only time will tell if other providers will develop their own CSI driver.
