Tomorrow I’m joining the 425 show on Twitch for a discussion on AAD-managed pod identities and how to integrate them with Key Vault. This blog post is both a sneak preview of what we’ll be discussing tomorrow as well as a review of the episode if you want to study things more in-depth after it aired. Update: the video is now also available on YouTube.
So, in this post, I’ll introduce AAD-managed pod identities, and later on, show you how to integrate them with the Key Vault CSI driver for Kubernetes secrets. All the code for this blog post is hosted on GitHub:
Let’s start by explaining AAD-managed pod identities
AAD-managed pod identities
I discussed AAD-managed pod identities in a previous post already. You can check that out as well, but I’ll provide another overview here.
AAD-managed pod identities allow you to assign Azure managed identities to Pods in Kubernetes. From an Azure PoV, managed identities are assigned to “compute” resources, such VMs, Functions or even to a Data Factory. Azure itself is totally unaware of what runs on those VMs, and Azure doesn’t have the concept of a Pod.
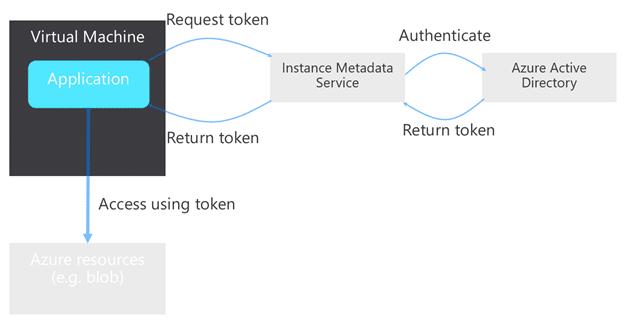
Managed identity works by allowing a compute resource (let’s say a VM) to get an Azure AD token without authenticating with a password or service principal by calling an internal endpoint. This endpoint will then call out to Azure AD and get the identity token.
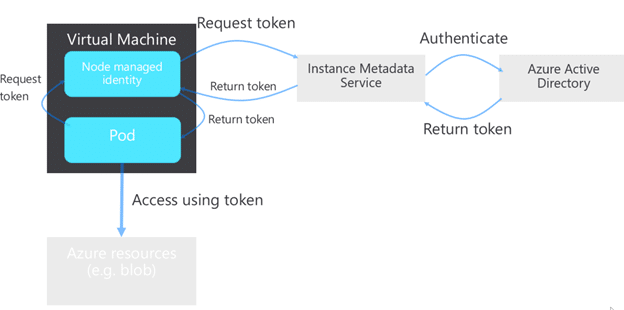
What this means in Kubernetes land (running in a VM) is that each Pod running on a VM can call the managed identity endpoint and get the identity token. This is typically not what you’d want, since you can be running multiple applications, managed by different teams on the same cluster.
This is where AAD-managed pod identity comes in. It provides two features: first, it influences the networking on your AKS cluster, intercepting all requests to the managed identity endpoint and sending those requests to a DaemonSet running on your cluster. This Daemonset (called Node Managed Identity or NMI for short) provides the second piece of functionality of AAD-managed pod identity, namely, it checks whether or not Pods should have access to certain identities. If they have access, the DaemonSet forwards those requests to the managed identity endpoint to get the token.
Finally, let’s do a little history lesson. AAD Pod identity originally was an open-source project, hosted on GitHub. You installed and maintained it on your cluster yourself, and it came with limited best-effort support. Recently, Microsoft made the same functionality available as a managed add-on on AKS, providing more stability and support for it.
OK. Theory covered, let’s see it in action!
AAD-managed pod identity in action
In this section, we’ll create a new AKS cluster, a new managed identity, a new blob storage account and we’ll configure everything in such a way that the managed identity is allowed to upload and download files from blob. To make things reproducible, I’ll provide you with the individual steps in AZ CLI, so it’s easy to rebuild (except for the preview registration which you see below).
First, you need to register for the preview. You can do so this way
az feature register --name EnablePodIdentityPreview  \
 --namespace Microsoft.ContainerService
az extension add --name aks-preview
Wait until the following command shows registered. It can take about 15 to 20 minutes.
az feature show --name EnablePodIdentityPreview \
  --namespace Microsoft.ContainerService -o table
Setting up the basics
Now you’re ready, let’s create a new cluster. The following AZ CLI can be used to create a new cluster using AAD managed pod identity:
RGNAME=425-aad-csi
AKSNAME=425-aad-csi
LOCATION=westus2

az group create -n $RGNAME -l $LOCATION
az aks create -g $RGNAME -n $AKSNAME \
  --enable-managed-identity --enable-pod-identity \
  --network-plugin azure --node-vm-size Standard_DS2_v2 \
  --node-count 2 --generate-ssh-keys
az aks get-credentials -n $AKSNAME -g $RGNAME
Then, we’ll create a new managed identity, and a new blob storage account. In that storage account we’ll create a new container, and give the managed identity permissions to upload/download files in the storage account:
az identity create --name 425-blob-access \
  --resource-group $RGNAME

STACC=425csiaadnf #needs to be unique
az storage account create \
  -n $STACC -g $RGNAME -l $LOCATION \
  --sku Standard_LRS
az storage container create --name testing \
  --account-name $STACC --resource-group $RGNAME

SCOPE=`az storage account show -n $STACC -g $RGNAME --query id -o tsv`
ASSIGNEE=`az identity show --name 425-blob-access \
  --resource-group $RGNAME --query clientId -o tsv`

az role assignment create --role "Storage Blob Data Contributor" \
--assignee $ASSIGNEE --scope $SCOPE
Now, we can link the managed identity to the AKS cluster as well.
RESOURCEID=`az identity show --name 425-blob-access \
  --resource-group $RGNAME --query id -o tsv`
az aks pod-identity add --resource-group $RGNAME \
  --cluster-name $AKSNAME --namespace default \
  --name access-blob \
  --identity-resource-id $RESOURCEID
Testing things out
To test things out, we’ll create a new Pod with the Azure-CLI installed. We’ll then use this Pod to test out if we can access that blob storage account.
apiVersion: apps/v1
kind: Deployment
metadata:
  name: access-blob
spec:
  selector:
    matchLabels:
      app: access-blob
  template:
    metadata:
      labels:
        app: access-blob
        aadpodidbinding: access-blob
    spec:
      containers:
      - name: azure-cli
        image: mcr.microsoft.com/azure-cli
        command: [ "/bin/bash", "-c", "sleep inf" ]
Notice the label here that contains aadpodidbinding: access-blob – which is the link between the Pods that get created and the actual identity.
Let’s create this using kubectl create -f deploy-with-id.yaml. Give it a couple seconds, then list the pods, and use the following commands to test things out:
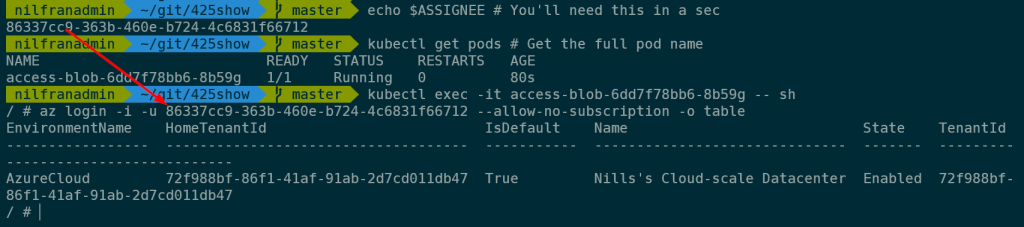
echo $ASSIGNEE # You'll need this in a sec
kubectl get pods # Get the full pod name
kubectl exec -it <pod-name> -- sh
az login -i -u <client-id> --allow-no-subscription -o table
This will lead to an output like this:
Now that you’re logged in, try to create and upload a file:
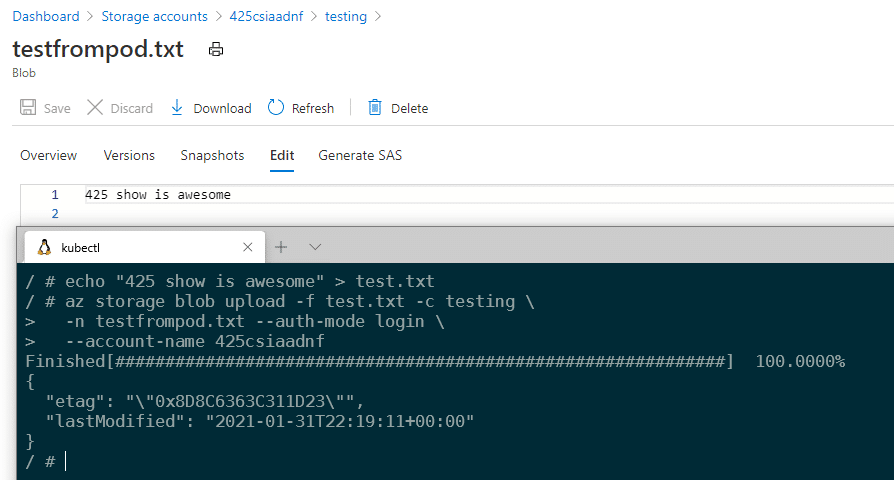
echo "425 show is awesome" > test.txt
az storage blob upload -f test.txt -c testing \
  -n testfrompod.txt --auth-mode login \
  --account-name 425csiaadnf
This will create the blob on your storage account, as you can see below:
Let’s now also try if this would work without the label. Let’s create this as a new file deploy-without-id.yaml.
apiVersion: apps/v1
kind: Deployment
metadata:
  name: no-access-blob
spec:
  selector:
    matchLabels:
      app: no-access-blob
  template:
    metadata:
      labels:
        app: no-access-blob
    spec:
      containers:
      - name: azure-cli
        image: mcr.microsoft.com/azure-cli
        command: [ "/bin/bash", "-c", "sleep inf" ]
Create this using kubectl create -f deploy-without-id.yaml.
You can try the same commands as earlier, which will fail with a message that the CLI didn’t get a token:
kubectl get pods # Get the full pod name
kubectl exec -it <pod-name> -- sh
az login -i --allow-no-subscription -o table
Which – as expected – threw an error:

OK, that covers how AAD-managed pod identities work. Let’s now see how we can get this to work with Key Vault and the CSI driver for Key Vault.
CSI driver for Key Vault
I also covered the CSI driver for Key Vault in the past, although without mentioning AAD-pod managed identity. Let’s start by discussing what the CSI driver for Key Vault does:
The CSI driver for Key Vault (Azure Key Vault Provider for Secrets Store CSI Driver in full) is a way for you to mount Key Vault secrets in Kubernetes Pods. It’s based on a Kubernetes CSI driver for secrets that supports more than Azure alone.
The way the driver works is by allowing you to mount Key Vault secrets as volumes in Pods. Optionally, you can also sync Key Vault secrets with Kubernetes Secret if you would which to do so.
Why are we discussing the CSI driver and AAD-managed pod identities in the same blob post? Let me explain: The CSI driver needs an identity to access key vault. It could use any identity, let it be a service principal or a managed identity. In AKS, with the support for pod-managed identities, why not link this to pod-managed identities!
So, with the final piece of theory out of the way, let’s build us a Key Vault and get rocking with the CSI driver for Key Vault:
Setting up the basics, a Key Vault, a secret and Key Vault permissions
OK, let’s go ahead and create what we need. Let’s start by creating a Key Vault
KVNAME=425nfcsi
az keyvault create --location $LOCATION \
--name $KVNAME --resource-group $RGNAME
Now, let’s create a secret:
az keyvault secret set --name secret-425 \
  --vault-name $KVNAME --value "super secret for 425 show"
And finally, our managed identity needs to get permissions to this secret. Let’s also set this up:
az keyvault set-policy -n $KVNAME \
--secret-permissions get list --spn $ASSIGNEE
That covers the basics, let’s now setup the CSI driver.
Setting up the CSI driver
You can install the CSI driver on your cluster using Helm. The installation is simple and straightforward:
helm repo add csi-secrets-store-provider-azure https://raw.githubusercontent.com/Azure/secrets-store-csi-driver-provider-azure/master/charts
helm install csi csi-secrets-store-provider-azure/csi-secrets-store-provider-azure
It literally is that simple. To confirm the install worked, check for the CRDs on your cluster and you should see the secretproviderclass CRDs using kubectl get crd.

OK, so now you’re ready to access the Secrets from Pods in Kubernetes!
Accessing Key Vault secrets from a Kubernetes Pod
To link a Key Vault secret to a Kubernetes Pod you need to create an object called a SecretProviderClass. Once you have created a SecretProviderClass, you can then mount it in a pod. Let’s start by creating a SecretProviderClass:
apiVersion: secrets-store.csi.x-k8s.io/v1alpha1
kind: SecretProviderClass
metadata:
  name: key-vault-secret
spec:
  provider: azure
  parameters:
    usePodIdentity: "true"
    keyvaultName: "nf425csi"
    objects:  |
      array:
        - |
          objectName: secret-425
          objectType: secret
    tenantId: "72f988bf-86f1-41af-91ab-2d7cd011db47"
  secretObjects:
  - secretName: key-vault-secret
    type: Opaque
    data:
    - objectName: secret-425
      key: secret-content
Couple of things to call out here:
- We tell this SecretProviderClass we need it to use PodIdentity.
- We give it the key vault name
- We then provide it an array of secrets to grab. A single SecretProviderClass could grab multiple secrets from the same vault.
- We then link this to a secret in Kubernetes. This is optional, but useful for some. Hence I included it in this demo.
Create this using kubectl create spc.yaml.
Now you’re ready to create the pod that will access this secret.
apiVersion: v1
kind: Pod
metadata:
  name: csi-demo
  labels:
    aadpodidbinding: access-blob
spec:
  containers:
  - name: nginx
    image: nginx
    env:
      - name: KEYVAULT_SECRET
        valueFrom:
          secretKeyRef:
            name: key-vault-secret
            key: secret-content
    volumeMounts:
      - name: keyvault
        mountPath: /mnt/secrets-store
        readOnly: true
  volumes:
    - name: keyvault
      csi:
        driver: secrets-store.csi.k8s.io
        readOnly: true
        volumeAttributes:
          secretProviderClass: key-vault-secret
Things to note here:
- We’re accessing the synced Secret here as well. In the env: section you’ll see how we’re doing this. This is exactly the same as with a regular kubernetes secret.
- Second, you’ll see we’re mounting the secrets in /mnt/secrets-store
- Finally, in the volumes section, you’ll see how we’re referring to the secretProviderClass created earlier.
Create this pod using: kubectl create -f pod-with-secret.yaml
Then, you can exec into this pod and get the secrets.
kubectl exec -it csi-demo -- sh
echo $KEYVAULT_SECRET
cat /mnt/secrets-store/secret-425
And that concludes the demo.
Summary
In this blog post, you learned how you can use AAD-managed pod identities and how you can integrate the CSI driver for Key Vault with those managed identities. This will allow you to securely managed and access secrets in Key Vault from Kubernetes.