Using managed identities in Azure is recommended when you’re connecting to other Azure services (and even your own services if you’re implementing authentication). In the Kubernetes world, Microsoft has maintained an open-source project called AAD-pod-identity.
Recently, a managed and supported version of AAD pod identity for AKS was released in public preview. In this post, we’re taking that for a test drive.
About pod identities
(my explanation below is a summary of the inner workings. For the details, please refer to this documentation)
The concept of AAD pod identity allows you to link a user-assigned managed identity to a pod in Kubernetes. A pod in Kubernetes can then access the regular endpoint to get access to a token from that user-assigned managed identity. An application in a pod can then use that token to access other resources such as blob storage or key vault.
AAD pod identity installs a controller on your cluster that intercepts network traffic to the API endpoint used for managed identities. The pod identity controller then checks which pod-identities have been assigned to the pod, and will then get the right identity token from the API endpoint. This is transparent for the application in the pod.
The managed version of AAD pod identity is an add-on to AKS. It requires less setup work and manages the assigning of the user-assigned managed identities to your node pools. To create the identity objects in Kubernetes, you can use the Azure API or Azure CLI. This will link the identity to your node pools and create the identity objects you can use in Kubernetes.
With the explanation out of the way, let’s get started with trying out pod identities in AKS:
Set up of the pod identity add-on in AKS
To enable the pod identity add-on, you can create a cluster using the Azure CLI. For now, you can only enable the pod identity managed add-on at cluster creation time.
To get started, you’ll need to install or update the aks-preview extension and register the preview feature.
#in case you need to install the extension:
az extension install--name aks-preview

#in case you need to update the extension:
az extension update --name aks-preview

az feature register --name EnablePodIdentityPreview --namespace Microsoft.ContainerService
Registering the preview feature can take some time. When it’s done, we can create a new cluster. This is how I created mine:
az group create -n aadpodaks -l westus2
az aks create -n aadpodaks -g aadpodaks -l westus2 --enable-managed-identity --enable-pod-identity --node-count 2 --node-osdisk-type ephemeral --network-plugin azure
az aks get-credentials -n aadpodaks -g aadpodaks
Now that we have a cluster, we need to configure an identity to use in the cluster. Let’s first create a managed identity – and then get the object_id and resource_id which we’ll need later:
az identity create --resource-group aadpodaks --name test-keyvault-access
export IDENTITY_OBJECT_ID="$(az identity show -g aadpodaks  -n test-keyvault-access --query principalId -otsv)"
export IDENTITY_RESOURCE_ID="$(az identity show -g aadpodaks  -n test-keyvault-access --query id -otsv)"
And now we can add this identity to our AKS cluster. This identity will be created in a namespace in the cluster (in my case in the default namespace for this test):
az aks pod-identity add --resource-group aadpodaks --cluster-name aadpodaks --namespace default --name test-keyvault-access --identity-resource-id $IDENTITY_RESOURCE_IDWe can then see the identity in the cluster using:
kubectl get azureidentity
And in the Azure portal, we can also see that this user-assigned managed identity is now linked to the VMSS supporting our cluster:
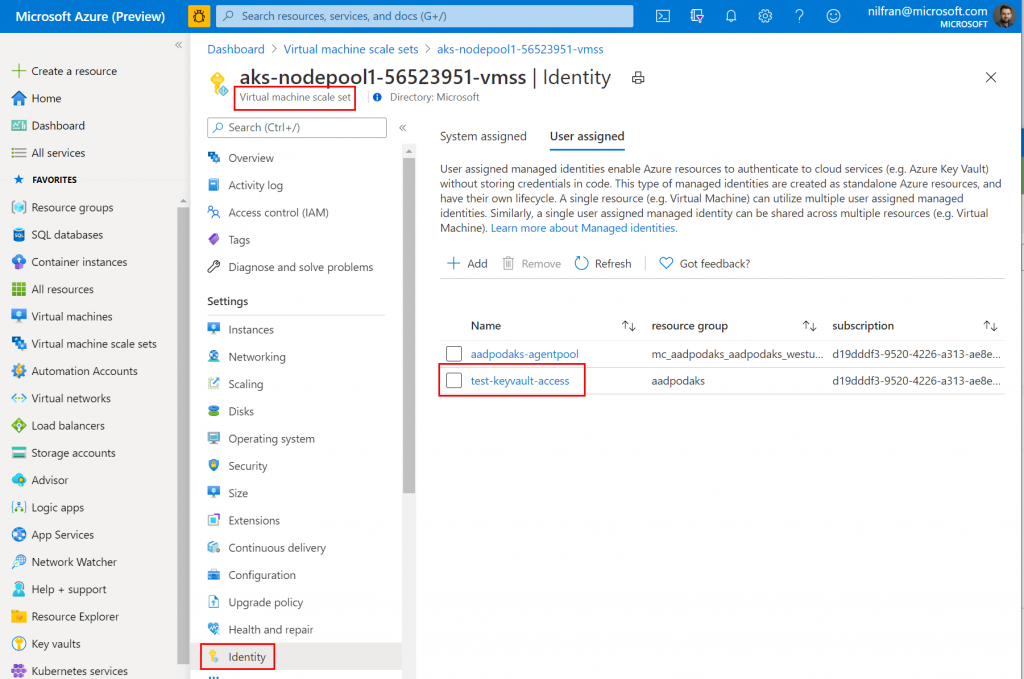
Let’s now go ahead and try out our new managed identity.
Testing out accessing key vault using the managed identity
To test out our new managed identity, let’s have a pod connect to key vault to retrieve a secret. To do this, we first need a key vault with a secret:
az keyvault create -n aadpodkv -g aadpodaks
az keyvault secret set --name secret-test --value SuperSecret123 --vault-name aadpodkv
With the secret created, we now need to give our user assigned identity permissions on the key vault. We’ll do this via the CLI as well:
az keyvault set-policy --name aadpodkv --secret-permissions get list --object-id $IDENTITY_OBJECT_IDNow that we have this, let’s create a pod with the identity binding. We’ll use the Azure CLI container image to create a pod. Notice how the identitybinding is created by adding a label to the pod:
apiVersion: v1
kind: Pod
metadata:
name: test-aadpod
labels:
aadpodidbinding: test-keyvault-access
spec:
containers:
- name: demo
image: mcr.microsoft.com/azure-cli
command:
- sleep
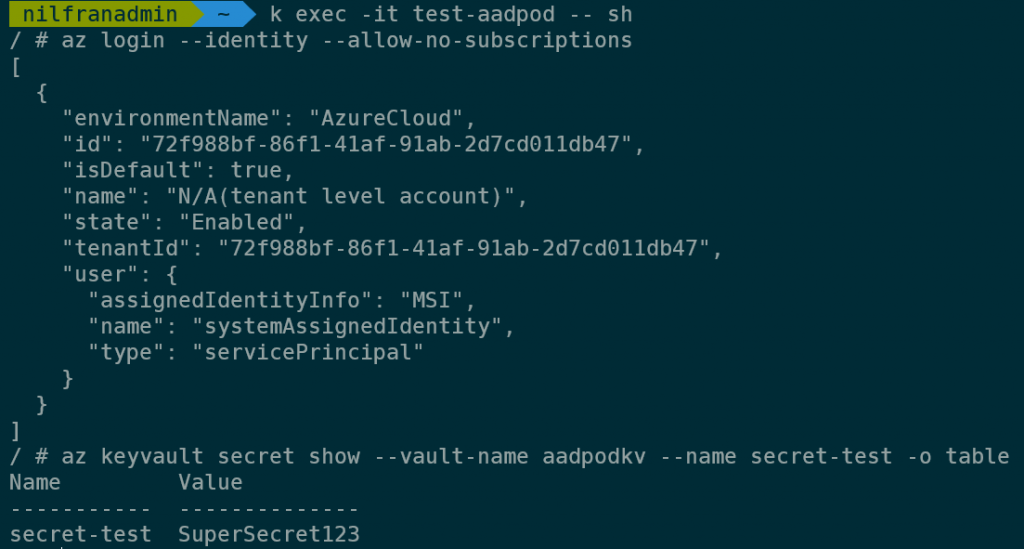
- "3600"Create the pod, and when it’s ready you can exec into the pod and get access to the keyvault secret using the azure cli:
k exec -it test-aadpod -- sh
az login --identity --allow-no-subscriptions
az keyvault secret show --vault-name aadpodkv --name secret-test -o table
And, as expected, you’ll see the value of the secret we created earlier.
And that’s how you can use the managed version of AAD pod identity!
Summary
In this blog post we explored the preview AKS add-on version of AAD pod identity. It was easy to set up an identity and get access to a secret in key vault. The managed add-on offers benefits over the open-source version, primarily by managing the assigning of the identities to all underlying nodepools.
One thing to keep in mind is that (for now) setting up aad-pod-identity has to be done at cluster creation time, and cannot be added to an existing cluster. I hope the product team addresses that before the feature reaches general availability. Given it’s a preview feature, I’m totally fine with it only working on new clusters.