For those who read my previous post, you might have read that my blog wasn’t served over HTTPS. In this day and age, you certainly want to HTTPS all your web traffic. It offers a lot of benefits, at almost no cost. It’s just a tiny-bit complicated to setup certificates – and I’ll walk you through in this post on how you can automate free SSL certificates through Let’s Encrypt on Azure App Service.
App Service comes with built-in certificates. Those are however only valid for the azurewebsites.net domain. If you try to access your website on a custom domain without your own certificates, you’ll get a browser notification that traffic isn’t secure.

So, I’ll walk you through how to setup HTTPS on App Service on a custom domain. And let’s start with the question on why you want SSL?
Why you need SSL on all your web traffic
There’s a couple of reasons why you need SSL on all your web traffic. I’ll give you a quick rundown on why I consider it so important, but don’t take my word it. Troy Hunt – a security professional, podcaster and blogger – is very outspoken on why you need https. Check out some on his blog posts on the topic – or even check out his Pluralsight course on HTTPS.
To get to the reasons you need SSL: First and foremost, it improves security. Secondly, there is huge industry push to SSL, and non-https websites will be impacted by this push. Finally, HTTPS is the future of the web; and if you don’t do HTTPS, you won’t get the newest features available on the web. Let’s dissect all of these reasons in a bit more details.
On the first one: HTTPS improves security. It ensures only web servers that have your (private) certificate are able to serve your content. This in turns makes sure that when you serve content, you are certain about what that content is going to be, and nobody is able to – let’s say – insert their ads in your website. HTTPS also ensures that nobody can snoop in on traffic being sent to/from your webservers (e.g. bank account balances or passwords). It also ensures nobody will be able to alter a request that’s in flight. This is certainly important for private/security sensitive data, but also for – what might seem – non-sensitive data. Enough non-encrypted non-sensitive data might help a malicious actor de-anonymize that data and help them in launching a phishing attack on you.
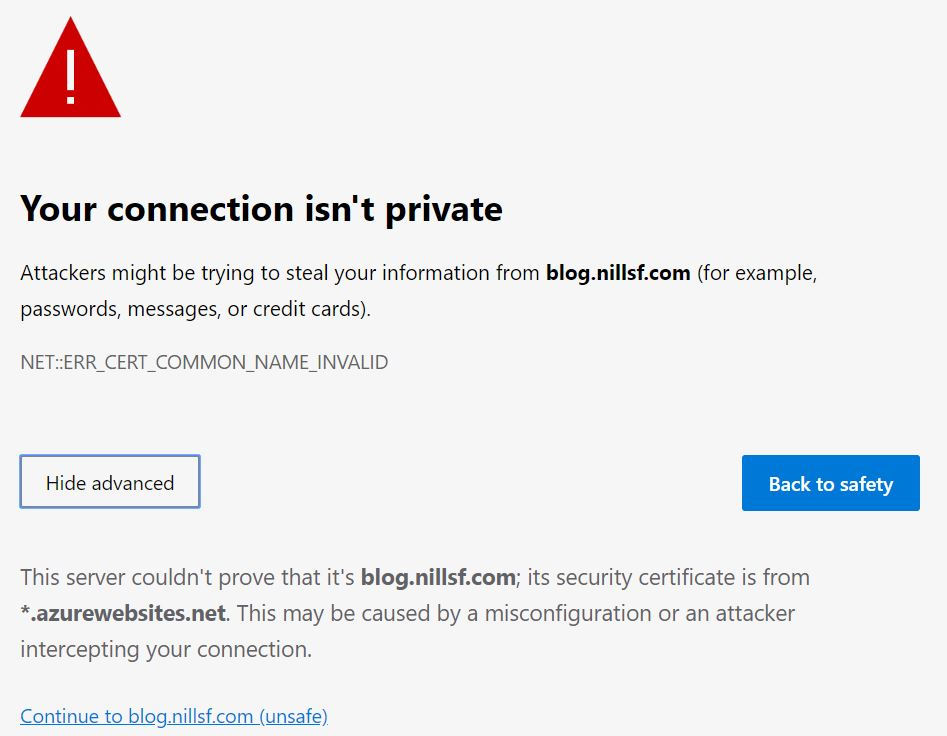
A second reason you need SSL, is that the industry wants you to get SSL. Chromium-based Microsoft Edge now highlights non-https websites as non-secure. (see the picture above) Google started in 2014 (that’s right, 5 years ago) with adapting it’s search algorithm to promote HTTPS websites. If you don’t serve HTTPS traffic, you’ll get ranked lower. Both reasons mean you’ll get less customers to your website as they either don’t trust it (it says not secure right there!) or they won’t even find your website (who ever goes to page 2 of the Google Search results?).
Finally, the web technology is shifting towards SSL anyways. HTTP/2 is implemented by all major browsers only over TLS encrypted sessions. According to a Google article, newer functionality in html/browser requiring user permission (notifications / geolocation /…) also requires HTTPS. So, if you want to use the future technologies of the web, you’ll need to use HTTPS.
With that being said, let’s have a quick look into how HTTPS works.
How does https work?
I don’t want to go in full detail in this post on how HTTPS works, for full detail I would recommend this stackexchange post as a starting point to get into more depth.
HTTPS essentially encrypts HTTP traffic between a client and a server. This is done via a concept called asymmetrical encryption. Asymmetrical encryption works based on a math concept involving prime numbers and modulo divisions (keeping the remainder of a division). Each party in asymmetrical encryption has a different, but complementary key. Party A encrypts a message with key A, which can only be decrypted by key B. Party B can in turn encrypt messages with key B, which can only be decrypted by key A.
In practice, this key in HTTPS is part of a larger certificate. This certificate is essential, as it contains the private and public key. The private key is what the server uses to encrypt/decrypt and the public key is what end-users use to encrypt/decrypt messages. A certificate also contains a “trust chain”, with a root CA (certificate authority) that is trusted by operating systems and browsers. Such a CA also has its own certificate, which it uses to generate certificates for its customers and which it uses to verify it’s own identity.
Certificates used to be bought at certificate authorities like Comodo or Digicert. The certificate market however has been recently disrupted by Let’s Encrypt. Let’s Encrypt is a free, automated, and open certificate authority brought to you by the non-profit Internet Security Research Group (ISRG). They offer an automated platform that offers free certificates. They are backed by the Linux Foundation and have a lot of corporate sponsors.
To enable HTTPS on this blog, I decided on a Let’s Encrypt certificate. Let’s have a look on how you can also set this up:
How to setup HTTPS on App Service using Let’s Encrypt.
Setting up an automatically renewing Let’s Encrypt certificate on App Service has been made easy by Simon J.K. Pedersen, via his App Service extension. This extension is open source, and has a good wiki article that explains the setup. Let me walk you through it:
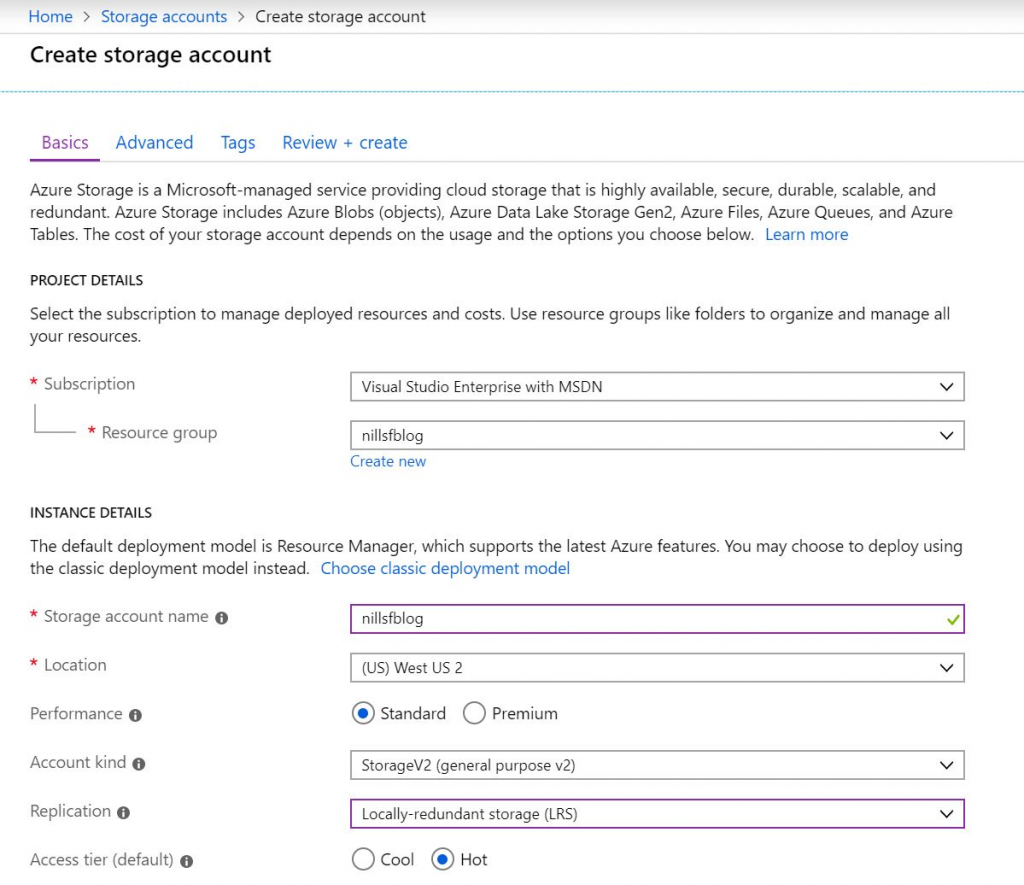
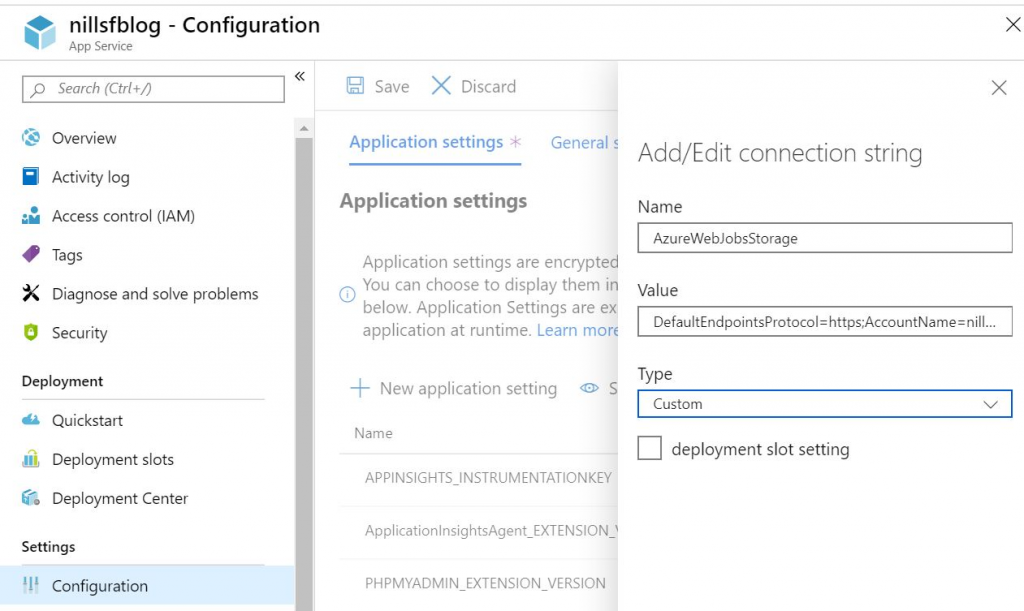
Step 1 is to create a storage account that will be used by the extension to store the certificate. Make sure to keep this in the same region as your app service, as this will improve performance. Copy the storage account connection strings, as you’ll need to add those to your app service: one with the name AzureWebJobsStorage, another with the name AzureWebJobsDashboard.
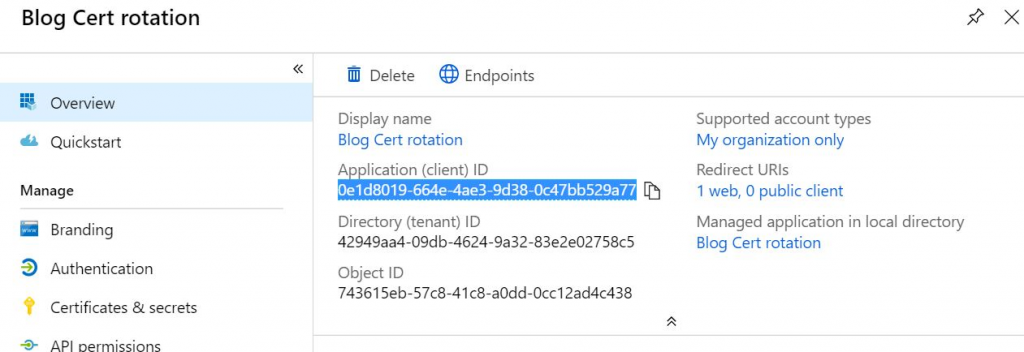
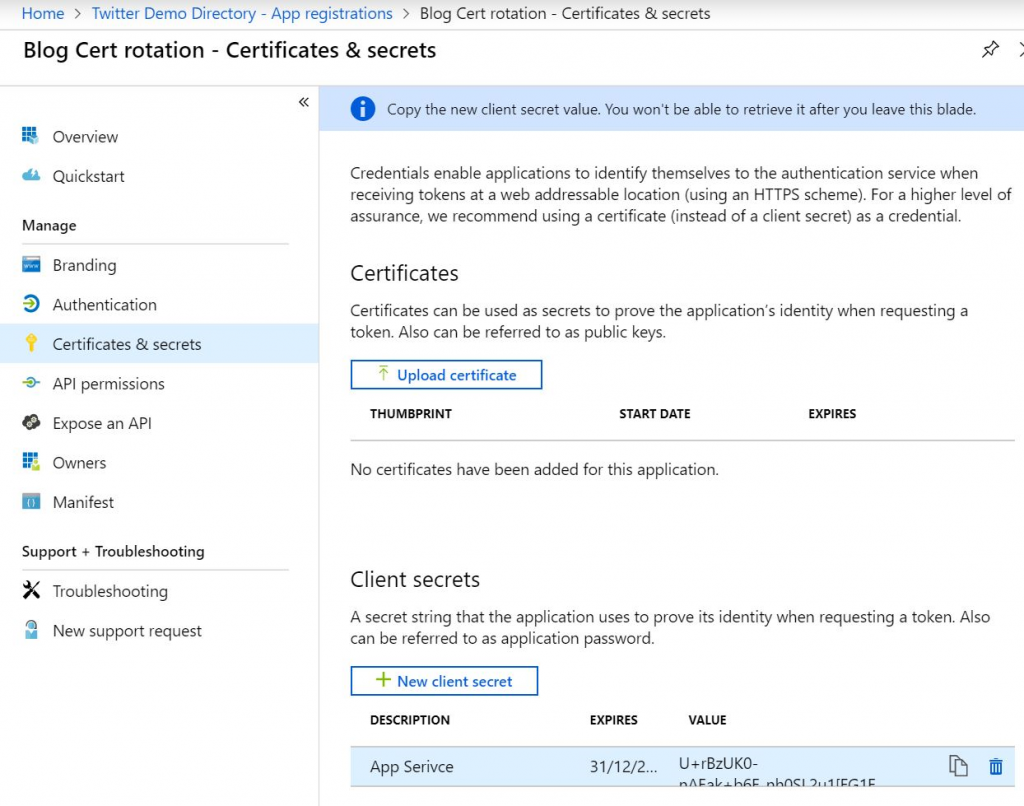
Next up is creating a Service Principal. Open the AAD blade, and go towards App Registrations. There, create new application. Once it is created, copy the Application (Client) ID. You’ll also need a secret, so open the Certificates & Secrets blade. Create a new Client Secret and copy the value. (you’ll only see this value once, so make sure to paste it somewhere).
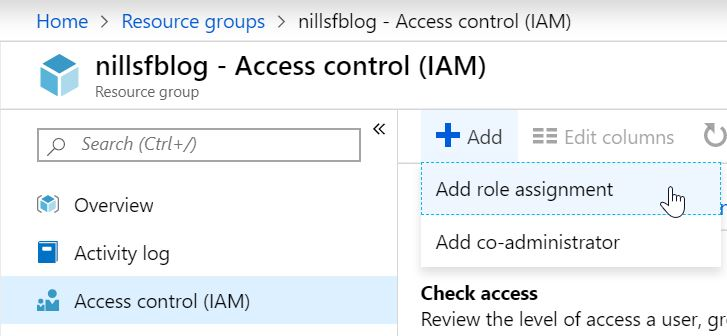
After that, you’ll want to give your Service Principal access to the resource group(s) hosting your App Service and App Service Plan. Go to the IAM blade of the resource, and click the Add button on top. Search the name of your service principal, and give it the contributor role on the resource group(s).
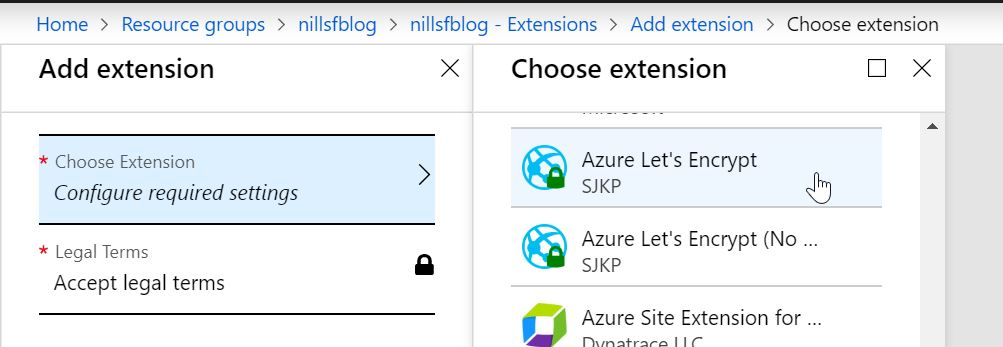
Now, open your App Service, and look for the Extensions blade. From there, look for the Azure Let’s Encrypt extension, and install that to your App Service. In the extension blade (once installed) there’s a browse button you can hit to get to the extension. This is where I had a small hiccup. According to the original Wiki, you should now be able to browse to the extension and setup Let’s Encrypt certificates. This didn’t work for me, as I got a message:
“No route registered for ‘/letsencrypt/”

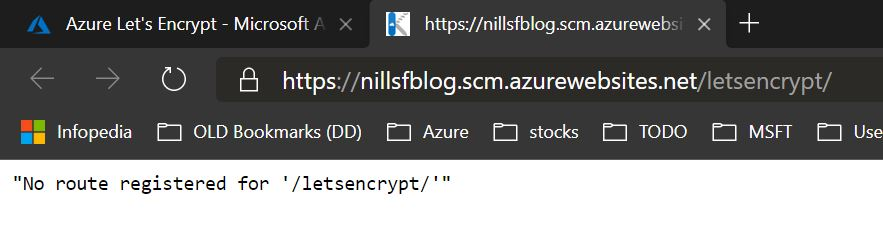
That’s not fun! Couple minutes of research and trying things out later, I discovered the solution for this issue. If you run into this issue, the solution is to restart your web app. Simply open the main blade for your app service, and on the top you can hit restart. This takes a couple of seconds, and afterwards the extension will load.
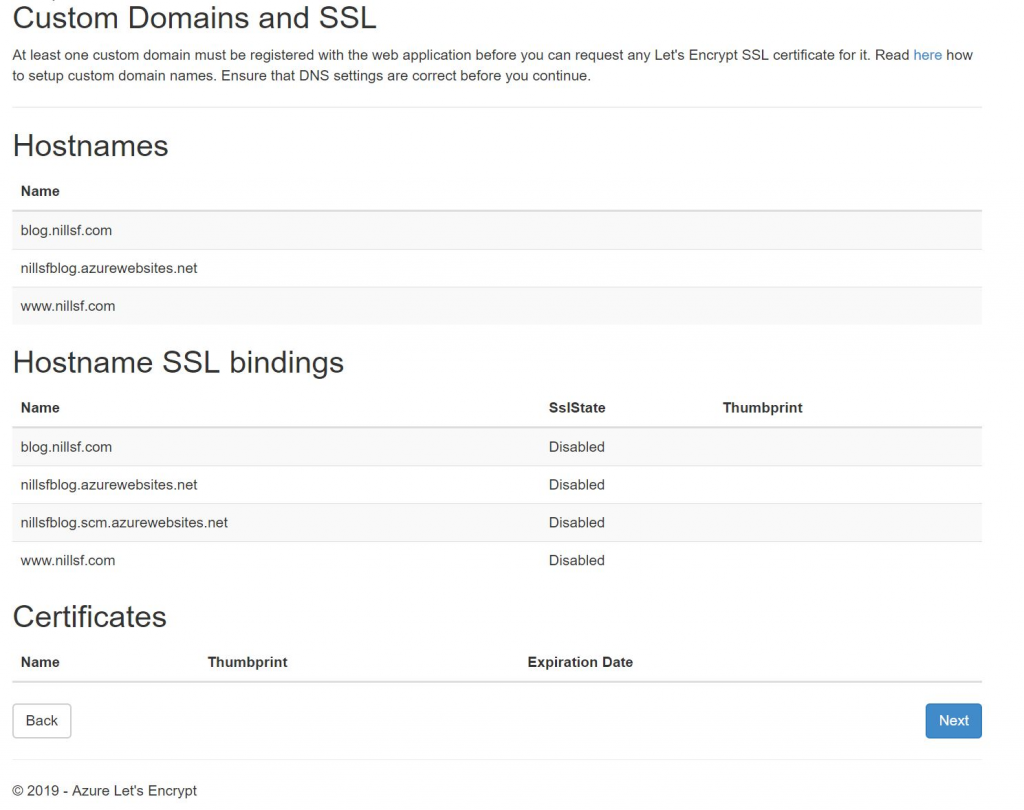
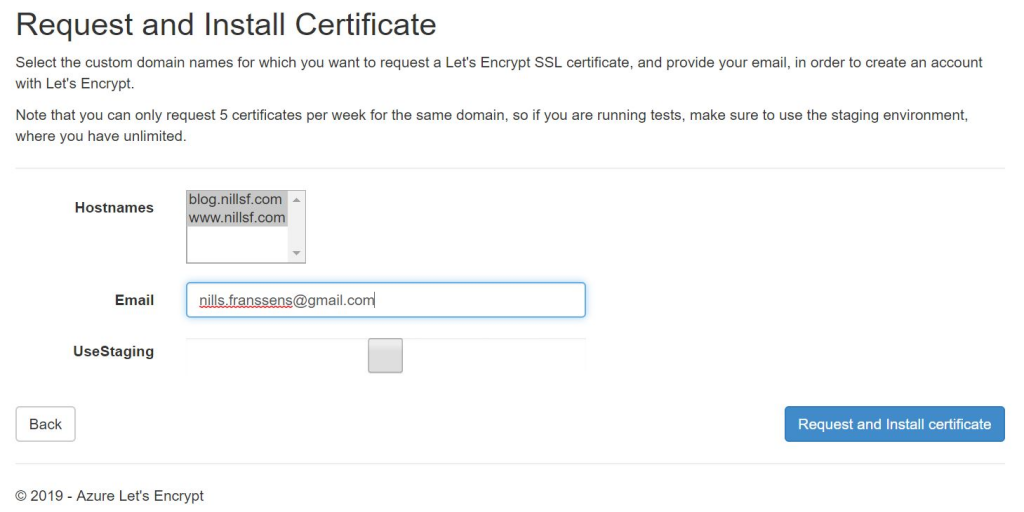
Based on these domains, you can select for which ones you want SSL. And BOOM, couple seconds later your website is served over HTTPS. It’s that simple!

Now, one additional setting that I would recommend applying now, is to force traffic to HTTPS and completely disabling HTTP. This can be done in the custom domain blade for your App Service, and toggling HTTPS only to On.

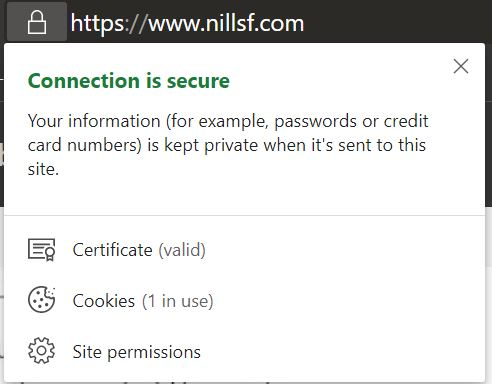
That’s it! Your website is now served securely
So, it was that easy to setup SSL. Great kudos to Simon J.K. Pedersen for creating this extension, and making all of this so easy to setup. It took me about 25 minutes to set everything up (including the small hickup with the extension not loading). And best of all, the SSL cert if completely free, thanks to Let’s Encrypt.
One thought to “How to setup https using let’s encrypt on app service”