This is part 7 in a series of blog posts covering my learning experience for the CKAD exam. You can find the other parts in the series here:
- Part 1: intro, exam topics and my study plan
- Part 2: Core concepts
- Part 3: Configuration
- Part 4: Multi-container pods
- Part 5: Observability
- Part 6: Pod Design
After a quick look at Ballerina earlier this week, let’s start our sprint towards the end of the CKAD series! In this part we’ll touch on Services and Networking, specifically covering these two exam objectives:
- Understand Services
- Demonstrate basic understanding of NetworkPolicies
A special note on NetworkPolicies: There is an inconsistency between Azure and Calico NetworkPolicies on AKS. I have a seperate post explaining the troubleshooting I did to figure that out. I believe Calico to be implemented correctly, and that’s what I’ll describe in this post.
But, let’s start with Services. We’ve used Services a couple of times before, but let’s cover the topic a little more in depth now.
Understand Services
A service within kubernetes is a way to expose applications. This can either be exposing them within the cluster or to the outside world. A service name will also act as a DNS record.
So why would we need services? Why not just send traffic straight to our pods? There’s a couple of reasons you don’t want to do that: first and foremost, pods are ephemeral, meaning pods can dynamically be rescheduled on new hosts, or could even be deleted and recreated when you update a deployment. A second reason is that – depending on your networking model – your pods might only be reachable within the cluster. The default networking in Kubernetes is kubenet, which is an overlay on top of a physical network. This means, outside actors cannot reach your pods.
Enter services with a solution. A service acts as a network abstraction on top of your pods. A service is both a DNS record and an IP address; and has a port assigned to it. When you communicate to a service, you communicate to the service IP on the service port, which will be translated to a pod (load balanced) and the ports actual port.
There are 4 types of services:
- ClusterIP: exposes your service on an IP that is available within the cluster.
- NodePort: this makes a port on each nodes IP address translate those connections to your service.
- LoadBalancer: this will manage an external load balancer (typically a cloud provider’s load balancer). This will (in the backend) create a clusterIP and a NodePort as well.
- ExternalName: this maps the service name to an CNAME.
Note that there are 3 ports in play end the end:
- Port: The port the service will be listening on;
- NodePort: A port on each node that translates connections to your service;
- TargetPort: The port your pods are listening on.
Now that we’ve done this, let’s play around with services a bit.
Let’s start off with a simple nginx deployment:
apiVersion: apps/v1
kind: Deployment
metadata:
  name: nginx-deployment
  labels:
    app: nginx
spec:
  replicas: 3
  selector:
    matchLabels:
      app: nginx
  template:
    metadata:
      labels:
        app: nginx
    spec:
      containers:
      - name: nginx
        image: nginx
        ports:
        - containerPort: 80
As usual, we can create this via kubectl create -f nginx-deploy.yaml
Let’s now create a ClusterIP service to connect to our nginx.
apiVersion: v1
kind: Service
metadata:
  name: clusterip-service
spec:
  type: ClusterIP
  selector:
    app: nginx
  ports:
    - protocol: TCP
      port: 8080
      targetPort: 80
Once created, we can see our service:
kubectl create -f service.yaml
kubectl get service                                                                                                       NAME                TYPE        CLUSTER-IP     EXTERNAL-IP   PORT(S)    AGE
clusterip-service   ClusterIP   10.0.197.167   <none>        8080/TCP   3s
And from within the cluster, we should be able to connect to our service:
kubectl run -i --tty busybox-shell --image=busybox -- sh
wget 10.0.197.167:8080
#or even fancier, use the service name, which is a DNS record:
wget clusterip-service:8080
But we won’t be able to connect to this from the outside. For this, we’ll create a new service with the type Load Balancer:
apiVersion: v1
kind: Service
metadata:
  name: lb-service
spec:
  type: LoadBalancer
  selector:
    app: nginx
  ports:
    - protocol: TCP
      port: 8080
      targetPort: 80
We can also create this service, which will take a bit longer as an external load balancer will need to be created:
kubectl create -f service-lb.yaml
kubectl get service --watch
NAME                TYPE           CLUSTER-IP     EXTERNAL-IP   PORT(S)          AGE
clusterip-service   ClusterIP      10.0.197.167   <none>        8080/TCP         11m
lb-service          LoadBalancer   10.0.21.91     <pending>     8080:30529/TCP   18s
lb-service          LoadBalancer   10.0.21.91     52.183.89.108   8080:30529/TCP   40s
Now we should be able to connect to our service on that IP, right from our web browser:

Demonstrate basic understanding of NetworkPolicies
By default, all traffic in a kubernetes cluster can flow unrestricted. Even pods in different namespaces can communicate with each other. NetworkPolicies allow you restrict traffic to only the traffic flows you actually want to allow. NetworkPolicies work on a allow-list, meaning that once a NetworkPolicy is applied to a pod all traffic is denied by default and only allowed traffic will flow.
Within a NetworkPolicy you define which traffic can flow from a certain source to a certain destination. Sources and destinations can either be IP addresses or ranges or can be pods within your cluster. You define which pods with the right selectors.
If you are planning – like me – to run this example on an Azure Kubernetes Cluster, make sure your cluster is enabled for Network Policies. They aren’t by default. You’ll want to add the --networkpolicy calico flag to your az aks create. It cannot be applied after a cluster has already been created.
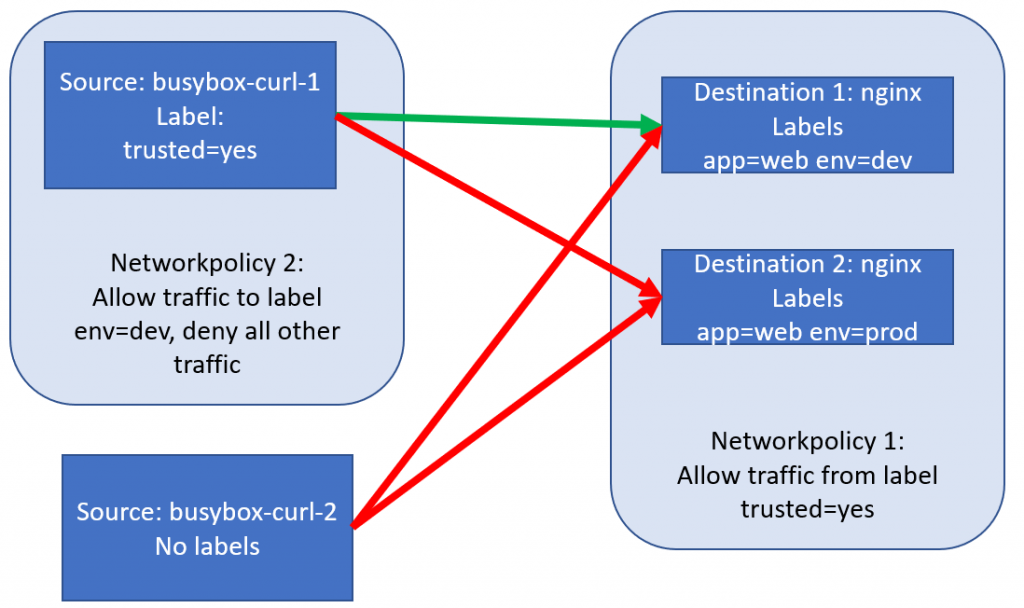
Let’s build a simple example to demonstrate how NetworkPolicies work. We’ll create 4 pods within the same namespace. 2 busybox-curl pods, 1 with a trusted label, 1 without a trusted label and 2 nginx web servers, both with label app=web, and 1 with label env=dev and the other with label env=prod.
Let’s create a new namespace for our networking work, and set it as the default for our kubectl:
kubectl create ns networking
kubectl config set-context $(kubectl config current-context) --namespace=networking
By now I expect you’d be able to create the YAML for these pods, so try to write this yourself before checking mine:
apiVersion: v1
kind: Pod
metadata:
  name: busybox-curl-1
  labels:
    trusted: "yes"
spec:
  containers:
  - name: busybox
    image: yauritux/busybox-curl
---
apiVersion: v1
kind: Pod
metadata:
  name: busybox-curl-2
spec:
  containers:
  - name: busybox
    image: yauritux/busybox-curl
---
apiVersion: v1
kind: Pod
metadata:
  name: nginx-dev
  labels:
    app: "web"
    env: "dev"
spec:
  containers:
  - name: nginx
    image: nginx
---
apiVersion: v1
kind: Pod
metadata:
  name: nginx-prod
  labels:
    app: "web"
    env: "prod"
spec:
  containers:
  - name: nginx
    image: nginx
We can create this with kubectl create -f pods.yaml. Let’s get the IPs of our Nginx servers – and try if we can connect to both from both our busyboxes:
kubectl get pods -o wide #remember the ip addresses of both your nginx boxes
kubectl exec -it busybox-curl-1 sh
curl *ip1*
curl *ip2*
#both curls should give you the nginx default page
exit #to go to our next busybox
kubectl exec -it busybox-curl-2 sh
curl *ip1*
curl *ip2*
#both curls should give you the nginx default page
If your results are the same as mine, all traffic flows, from both busyboxes to both nginx servers.
Let’s now define our first NetworkPolicy, which will allow traffic only from busyboxes with the label trusted=true. This will look like this:
apiVersion: networking.k8s.io/v1
kind: NetworkPolicy
metadata:
  name: policy1-allow-trusted-busybox
spec:
  podSelector:
    matchLabels:
      app: web
  policyTypes:
  - Ingress
  ingress:
  - from:
    - podSelector:
        matchLabels:
          trusted: "yes"
We can deploy this policy with kubectl create -f policy1.yaml. Creating this policy has no impact on the running pods (they remain up and running) but will impact network network almost instantly. Let’s test it out:
kubectl get pods -o wide #remember the ip addresses of both your nginx boxes
kubectl exec -it busybox-curl-1 sh
curl *ip1*
curl *ip2*
#both curls should give you the nginx default page
exit #to go to our next busybox
kubectl exec -it busybox-curl-2 sh
curl *ip1*
curl *ip2*
#these two curls should fail, as the busybox-curl-2 doesn't have the trusted label
Let’s now also deploy our second policy, which will limit egress traffic from our trusted busybox, only to the dev environment. This policy looks like this:
apiVersion: networking.k8s.io/v1
kind: NetworkPolicy
metadata:
  name: policy2-allow-to-dev
spec:
  podSelector:
    matchLabels:
      trusted: "yes"
  policyTypes:
  - Egress
  egress:
  - to:
    - podSelector:
        matchLabels:
          env: dev
Let’s create this policy as well, and see what the effect is. kubectl create -f policy2.yaml
kubectl get pods -o wide #remember the ip addresses of both your nginx boxes
kubectl exec -it busybox-curl-1 sh
curl *nginxdev* #yes it still works
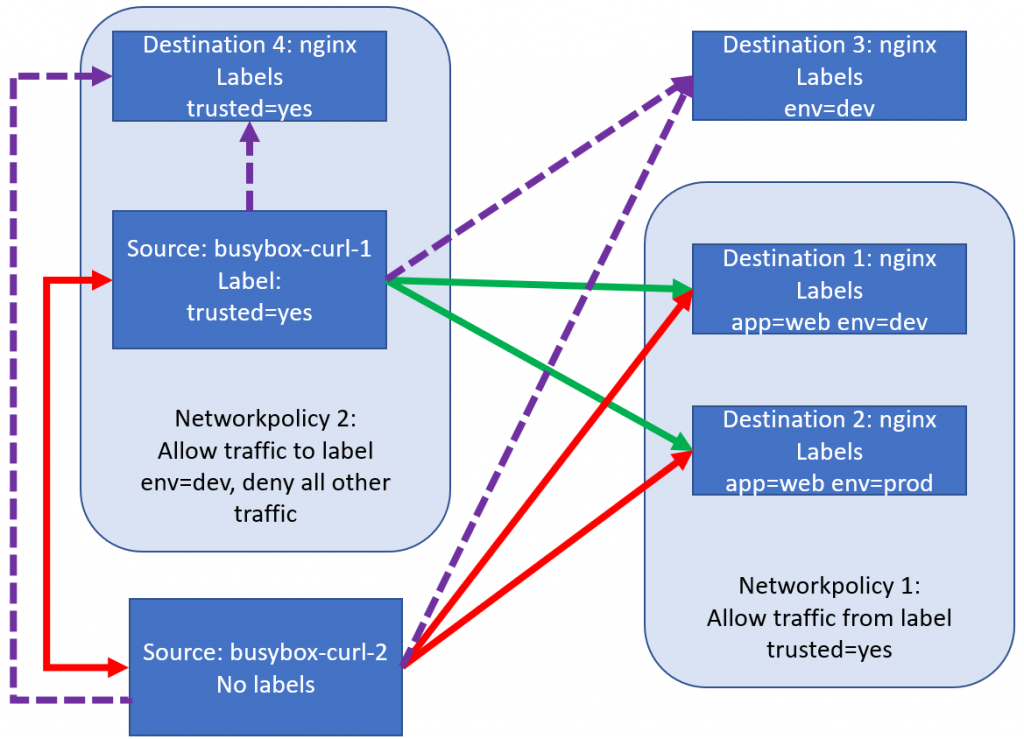
curl *ip2* #still no longer worksThat was cool. Let’s make our experiment a little more complex by adding two new nginx pods: one with the label env=dev (but no longer the app label, so policy1 doesn’t apply) – and one with the label trusted=yes. And then it’ll be our job to figure out which traffic flows are allowed in our experiment, those new arrows are the purple arrows in our drawing below:
The following YAML will create our new pods:
apiVersion: v1
kind: Pod
metadata:
  name: nginx-dev-noapp
  labels:
    env: "dev"
spec:
  containers:
  - name: nginx
    image: nginx
---
apiVersion: v1
kind: Pod
metadata:
  name: nginx-trusted-yes
  labels:
    trusted: "yes"
spec:
  containers:
  - name: nginx
    image: nginx
Let’s start with the two arrows going from busybox-curl-1:
kubectl get pods -o wide #remember the ip addresses
kubectl exec -it busybox-curl-1 sh
curl *nginx-dev-noapp* #this works, as expected. Allowed by the egress policy and there is no ingress to block anything
curl *nginx-trusted-yes* #this doesn't work, as expected. Blocked by the egress policy, which doesn't allow traffic to trusted=yes
Let’s do the same for busybox-curl-2:
kubectl get pods -o wide #remember the ip addresses
kubectl exec -it busybox-curl-2 sh
curl *nginx-dev-noapp* #this works, as there is no policy blocking anything
curl *nginx-trusted-yes* #this works, as there is no policy blocking anything. trusted=yes has a policy, but only egress, not ingress
This will make our picture look like this:
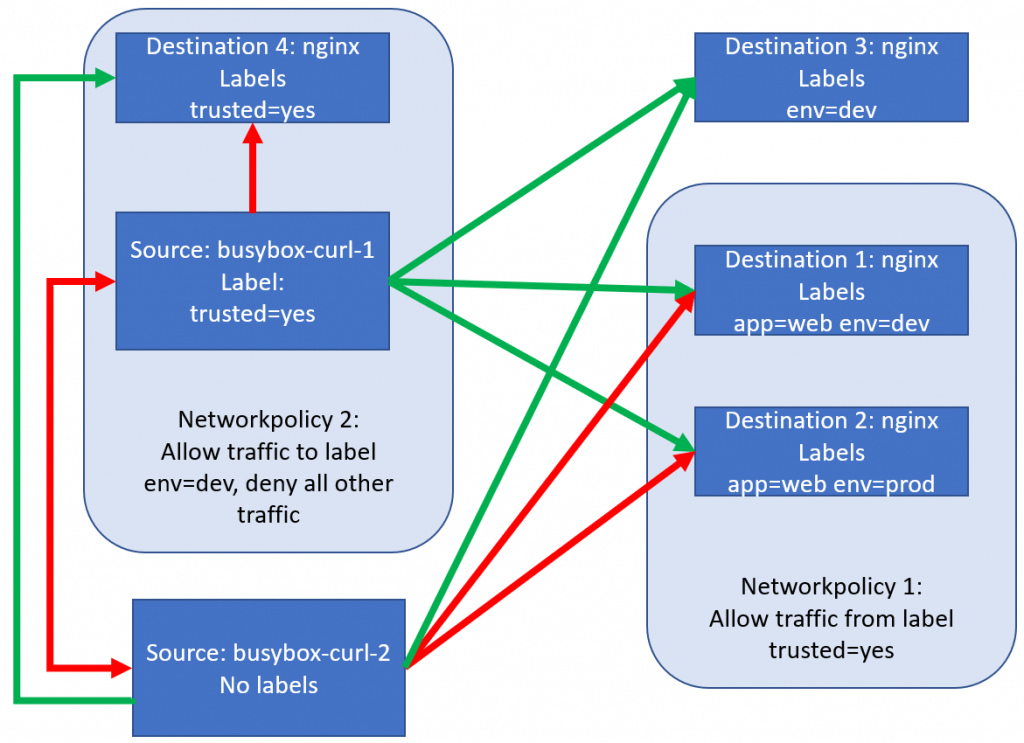
Conclusion of the working of NetworkPolicy (using Calico)
We’ve deployed a couple of NetworkPolicies now, and I hope you have the same understanding as I do:
- If there are no policies, all traffic is allowed.
- If there is only a ingress policy, traffic from the sources mentioned in the ingress policy is allowed.
- If there is only a egress policy, traffic from to the destinations mentioned in the egress policy is allowed.
- If there is a combination of ingress and egress policies, only traffic allowed by both will be allowed.
Conclusion
In this part we repeated some of our work with Services on which we touched earlier. We also took a look into NetworkPolicies. For those of you interested in the ramblings of a mad man looking for answers, I have a seperate post explaining some of the troubleshooting I went through to figure out something was broken was Azure NetworkPolicies.