ARM templates are a great way to deploy infrastructure to Azure. The issue however is that sometimes, you need to do something that is not supported in a template. Think about executing an Azure Function when the template completes, or updating a config file in blob storage / some table.
There is a new preview feature in the ARM template language that allows you to execute Azure PowerShell or Azure CLI from an ARM template. This feature is called deployment scripts.
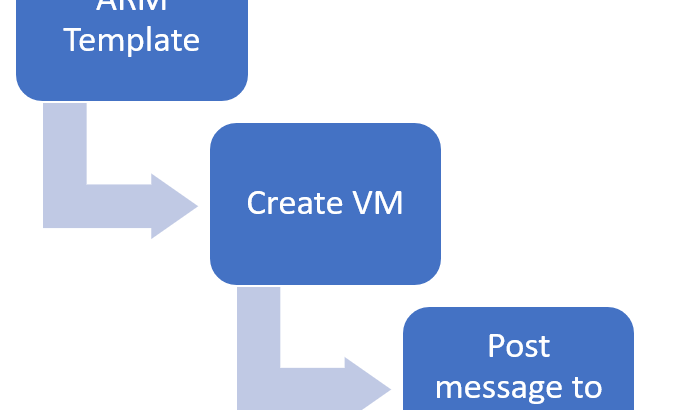
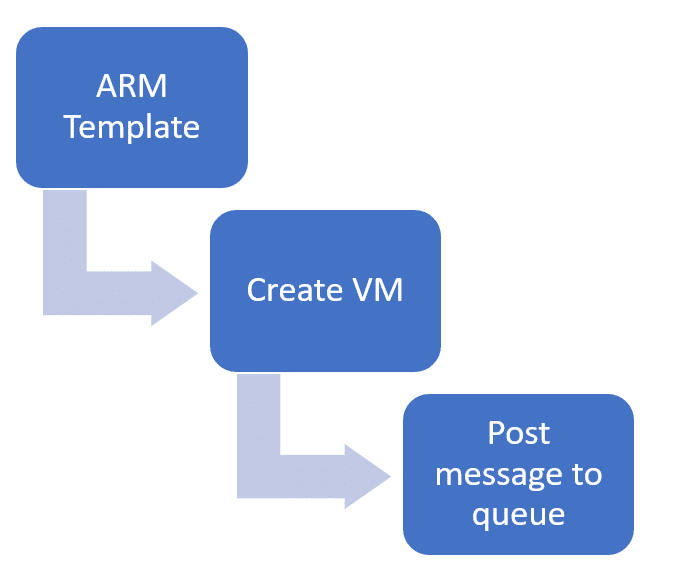
In this post, we’ll have a look at what deployments scripts are and what’s required to use them. After the theory, we’ll use it to deploy a virtual machine and post a message to a queue with the private IP address of the machine.
What are deployment scripts and how do you use them?
Deployment scripts allow you to execute scripts – either in PowerShell or bash – as part of the execution of an ARM template. These scripts run on Azure container instances, inside your subscription but outside of your VNETs. If you need the scripts to connect to your infrastructure, you’ll have to create a network path to your infrastructure.
In terms of permissions, you can use these deployment scripts to execute actions against Azure’s API as well. You could use it to upload a file to blob, insert a record in a CosmosDB or create an object in Azure AD.
Deployment scripts require a user-assigned managed identity to be passed in when they are executed. Even if you don’t plan to execute anything against Azure’s API, you still need to identity to be passed in during execution because Azure uses that identity to provision the container instance that executes your script (you’ll see this later on).
By default, the deployment scripts are only executed once. What this means is that if you develop a template and you deploy the template multiple times, the deployment script only executes the first time. This is assuming the script itself doesn’t change. If you change the script, for example by including timestamp, the script will be executed again.
For more information about the deployment scripts, I encourage you to check out the documentation page on it and to have a look at the template reference about the full object.
Using a deployment script to post a message to a storage queue
In the example I want to build, I want to push a message to a queue containing the private IP of the VM that I just created. So, outside of this template, I would need a storage account and a user assigned managed identity that has access to the storage account and the queue.
Note: We could create this storage account and do the role assignment through the template as well, but that would make the template less succinct than it needs to be to build the demo. Hence doing this in the portal.
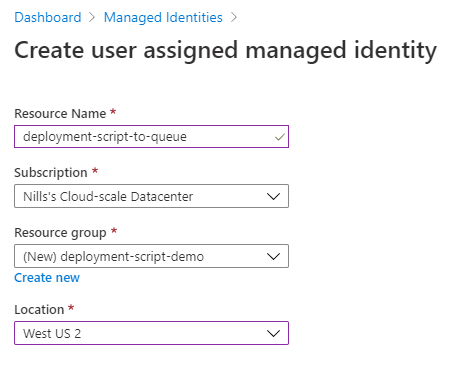
I’ll use an existing storage account that I have and I’ll create a new managed identity. To start that creation, let’s look for Managed Identity in the Azure search bar:

In the managed identity blade, hit the “+ Add” button to create a new one. Then provide the required details to create the user-assigned managed identity and hit the create button.
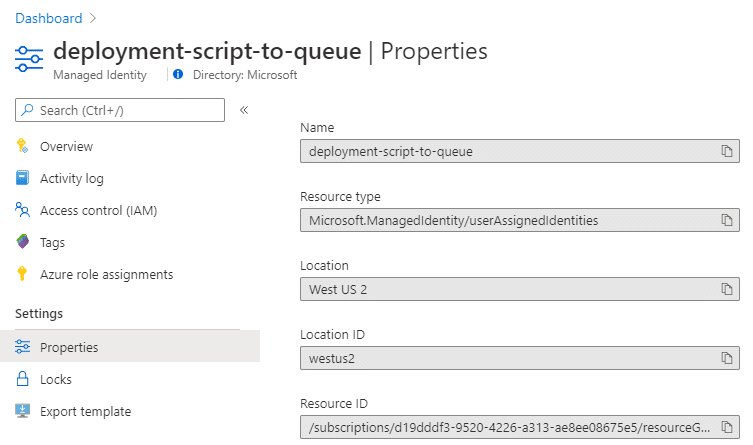
Once this is created, we’ll need the resource ID of this managed identity.
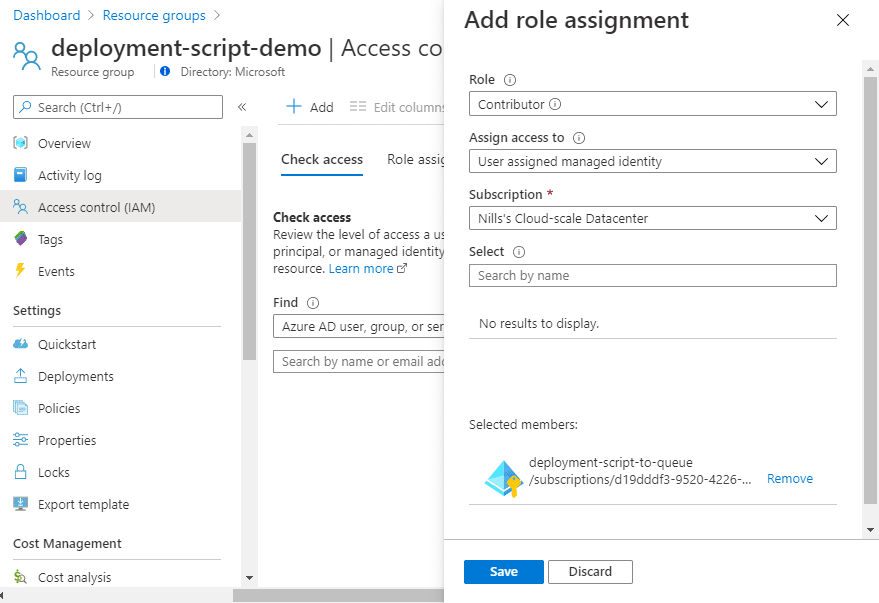
This identity will be used to create the container instance that will run the deployment script. For this, it needs contributor access to the resource group against which the deployment script will be executed. To allow this, provide this via the “Access control (IAM)” at the resource group level:
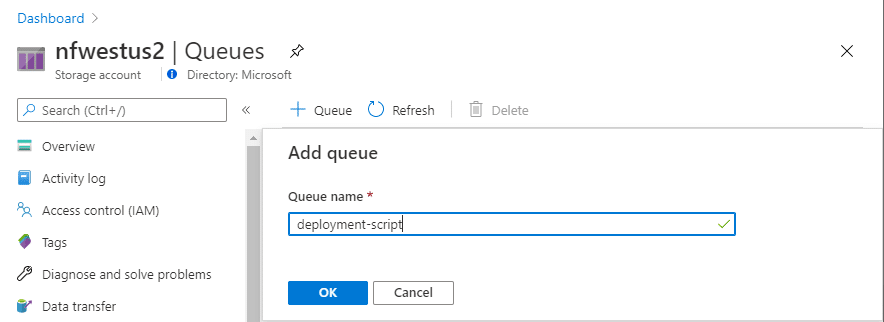
Next, we’ll provide this managed identity access to our queue. Let’s first create a new queue:
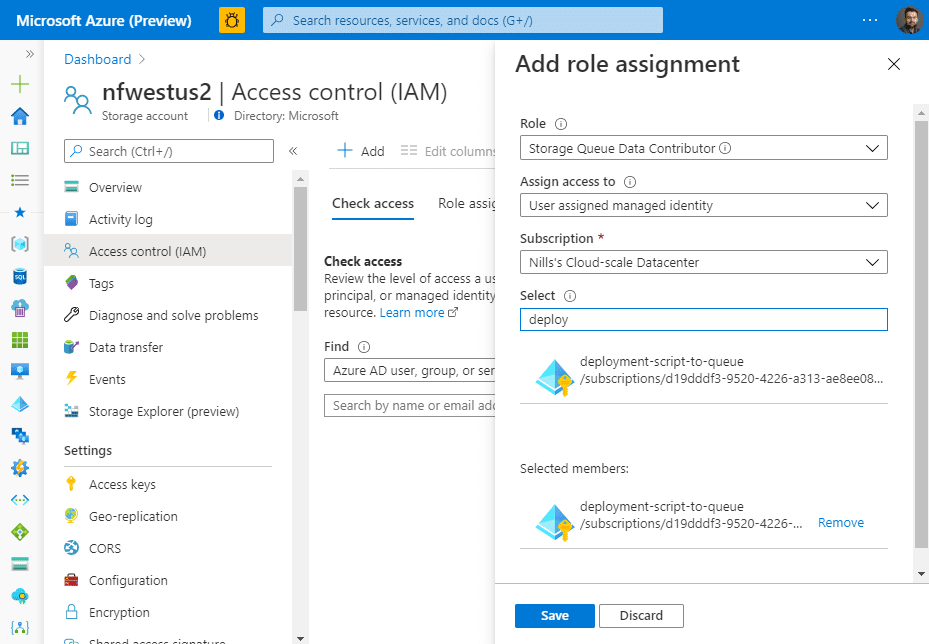
Then open that queue, select ‘Access control (IAM)’ in the menu on the left, and then add the “Storage Queue Data Contributor” role to the identity we just created and hit the save button.
With that out of the way, we can now develop our PowerShell script. The script will be simple, it’ll be an ‘Connect-AzAccount’ and then the necessary cmdlet to post a message to a queue.
Developing using container instances
Note: This section is optional, as I’ll explain here how I wrote and tested the PowerShell function that will be executed. If you just want to see the end result, you can skip to the end of this section.
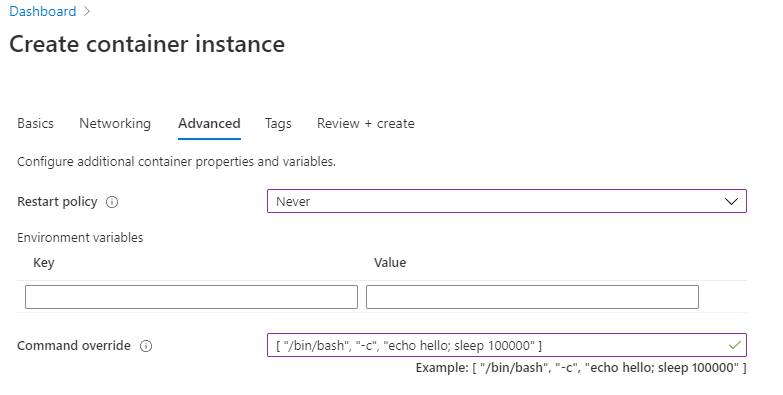
To develop this and test around with the managed identity, I’ll create an Azure Container Instance that I’ll use for testing. To start this, look for Azure Container Instances in the Azure search bar, and then hit the add button. Provide the necessary details, and provide mcr.microsoft.com/azuredeploymentscripts-powershell:az2.7 as the container image.
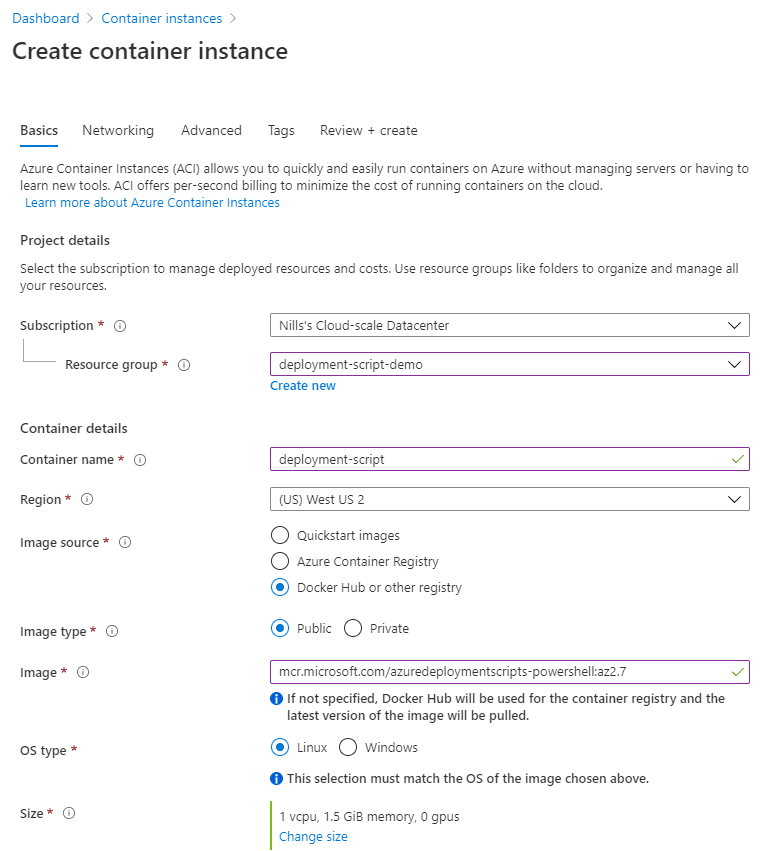
In the advanced section add the following command to the command override. That way, we can connect to the instance and do our development [ "/bin/bash", "-c", "echo hello; sleep 100000" ] .
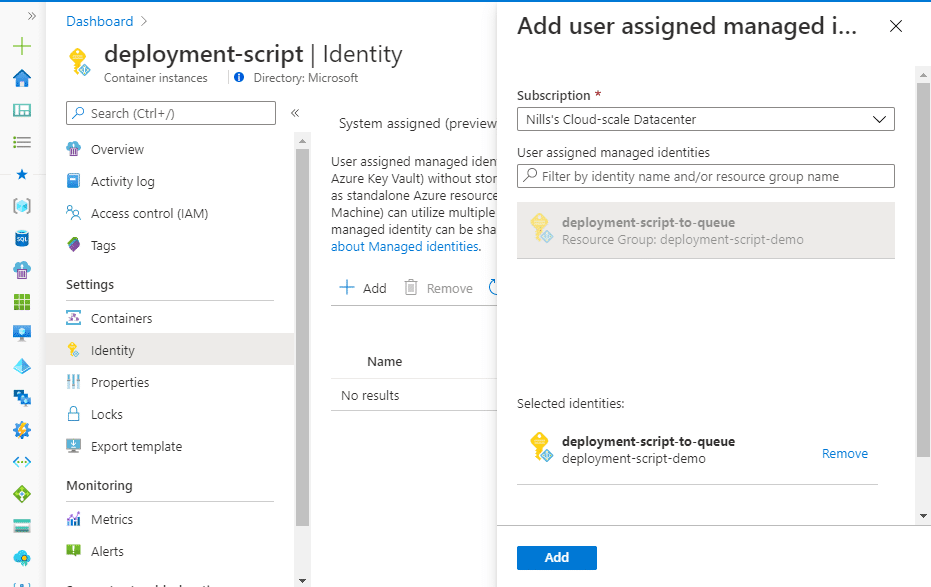
Hit the create button to create this ACI. Once it’s created, we can add the managed identity to it. To do this, open the container instance, go to identity, and add the user assigned managed identity:
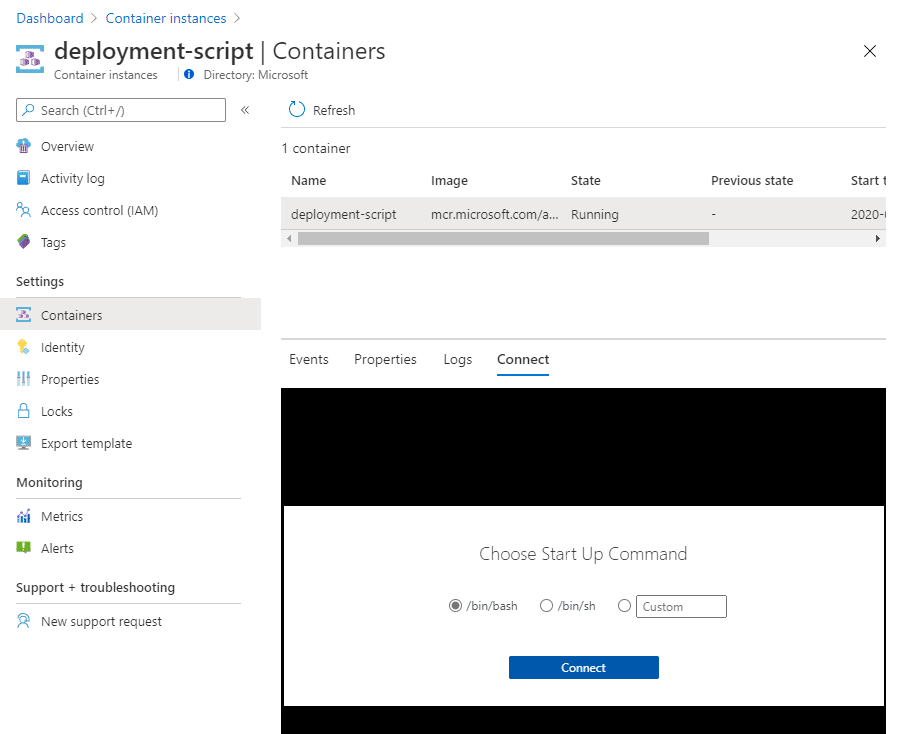
Once that’s done, we can connect to the container instance and do some development. We can do this straight from the portal, by navigating to ‘Containers’ in the container instance blade, selecting our (single) container and then hitting the Connect button. In this container, we can use /bin/bash to connect.
We are now connected to a container with Azure PowerShell installed. First thing I noticed is we’re not able to execute direct PowerShell commands. We’ll need to enter a PowerShell shell first by using the command pwsh.
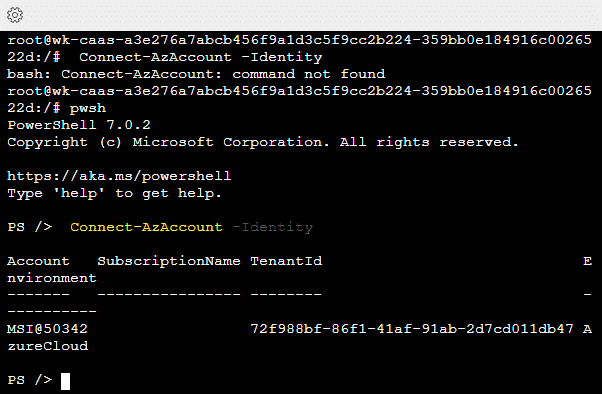
Next, we’ll need to create a storage account context so we can connect to our queue. Using the -UseConnectAccount option, we use the MSI to access the storage account.
$ctx = New-AzStorageContext -StorageAccountName nfwestus2 -UseConnectedAccountAfter that, we can use that context to connect to our queue:
$queue = Get-AzStorageQueue –Name deployment-script –Context $ctxAfter that, we can post a message to our queue:
$queueMessage = [Microsoft.Azure.Storage.Queue.CloudQueueMessage]::new("Testing from Container instance.")
$queue.CloudQueue.AddMessageAsync($QueueMessage)
And if we check the queue afterwards, we should see that this message got successfully posted to the queue:
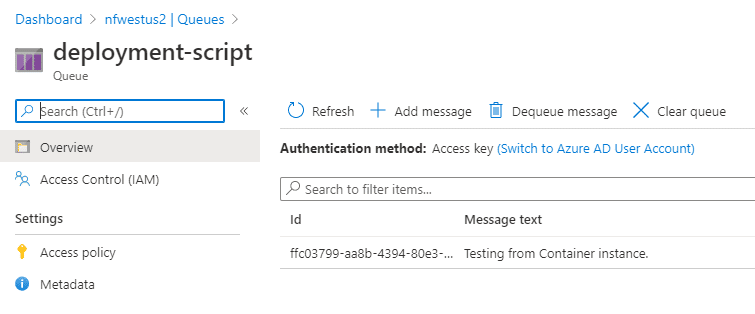
Since we won’t be processing the queue in this demo, I’ll simply dequeue this message.
In summary, this is the script we’ll be using in the deployment:
Connect-AzAccount -Identity
$ctx = New-AzStorageContext -StorageAccountName nfwestus2 -UseConnectedAccount
$queue = Get-AzStorageQueue –Name deployment-script –Context $ctx
$queueMessage = [Microsoft.Azure.Storage.Queue.CloudQueueMessage]::new("##Need to pass in output from NIC in here.##")
$queue.CloudQueue.AddMessageAsync($QueueMessage)
And with that out of the way, let’s have a look at the ARM object of a deployment script:
The ARM object of a deployment script
Next up, let’s deploy a deployment script. And just a deployment script. We’ll add in the VM at a later stage.
I created a ARM template that contains the deployment script and the PowerShell script that we developed in the previous step. You can find the template on GitHub, or read the code below.
{
    "$schema": "https://schema.management.azure.com/schemas/2019-04-01/deploymentTemplate.json#",
    "contentVersion": "1.0.0.0",
    "parameters": {
    },
    "functions": [
    ],
    "variables": {
    },
    "resources": [
        {
            "name": "deployment-script-only",
            "type": "Microsoft.Resources/deploymentScripts",
            "apiVersion": "2019-10-01-preview",
            "identity": {
                "type": "UserAssigned",
                "userAssignedIdentities": {
                    "/subscriptions/d19dddf3-9520-4226-a313-ae8ee08675e5/resourceGroups/deployment-script-demo/providers/Microsoft.ManagedIdentity/userAssignedIdentities/deployment-script-to-queue": {}
                }
            },
            "location": "[resourceGroup().location]",
            "kind": "AzurePowerShell",
            "properties": {
                "scriptContent":"
                Connect-AzAccount -Identity
                $ctx = New-AzStorageContext -StorageAccountName nfwestus2 -UseConnectedAccount
                $queue = Get-AzStorageQueue –Name deployment-script –Context $ctx
                $queueMessage = [Microsoft.Azure.Storage.Queue.CloudQueueMessage]::new('Need to pass in output from NIC in here.')
                $queue.CloudQueue.AddMessageAsync($QueueMessage)
                ",
                "azPowerShellVersion":"2.7",
                "retentionInterval": "P30D"
            }
        }
    ],
    "outputs": {
    }
}
I deployed this on my WSL machine using the AZ CLI.
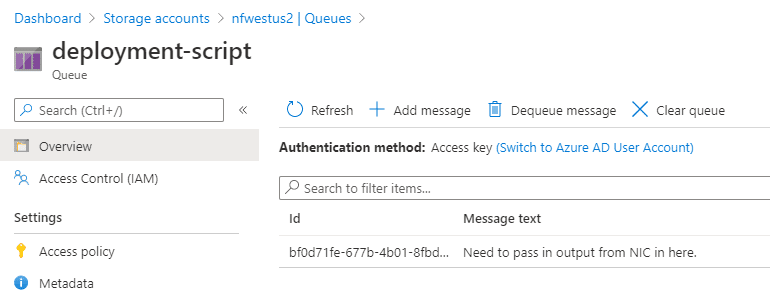
az deployment group create -g deployment-script-demo --template-file deployment-script-only.jsonOnce this deployed, I saw a message on my queue:
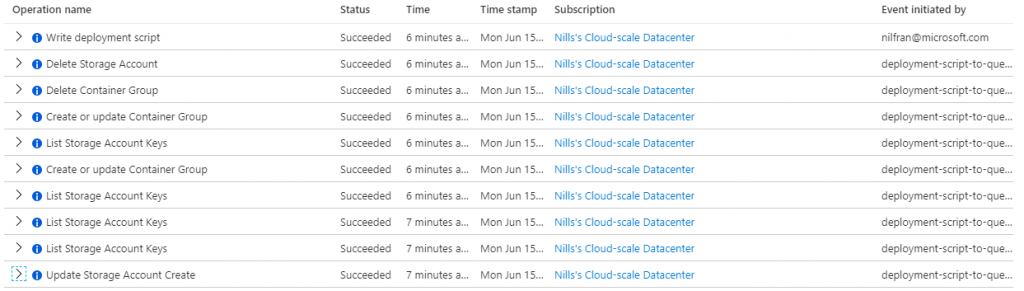
And in the activity log of this resource group, you could see the deployment script managed identity create and delete a storage account and a container group.
That was simple enough, let’s now integrate this into an end-to-end workflow when we’re creating a VM.
Passing the private IP of a VM to a queue
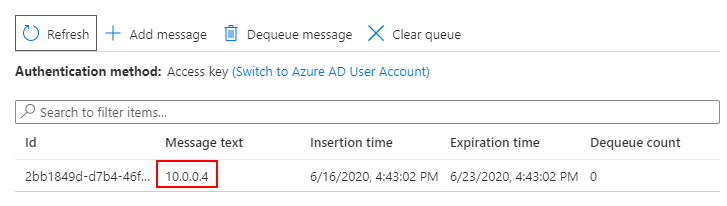
For the next – and final – step we’re going to integrate the private IP of our VM (technically, a NIC) into the message to the queue.
I’m going to spare you the details, you can find the template on GitHub. The one interesting piece is on line 33 of the template, where I updated the queue message with the private IP of the VM.
$queueMessage = [Microsoft.Azure.Storage.Queue.CloudQueueMessage]::new(''',reference(concat(variables('vmname'),'-nic')).ipConfigurations[0].properties.privateIPAddress,''')
All the rest is pretty boilerplate VM creation in ARM template. But, it works, and after deployment, I can see the private IP in the storage queue:
Summary
It’s nice to be able to execute Azure PowerShell or Azure CLI from within an ARM template. This definitely was a feature that I’ve been wanting for a while.
And, as you have seen from this post, it actually works as well. It’s easy to develop against it since it’s running in a container and you can run a container anywhere.
There’s a couple of things I am personally less fond of:
- Why does this service need contributor access to a resource group? I would have liked this to just be executed on Microsoft infrastructure behind the covers.
- I had issues with the ARM object itself. I don’t want to go in detail, but I feel like that’s why it’s still in preview.
Those two things aside, I’m glad the functionality is here! And I hope it’s useful for you too!