
A core dump is a common way to get information about process crashes. It saves the memory state, which can later be used for troubleshooting purposes.
Being able to perform a core dump in Kubernetes is a little bit more involved than on a regular system. You will need to configure the Kubernetes hosts in the cluster to perform the necessary logic you need to execute when a core dump occurs.
In what I’ll be describing today, we will configure an Azure Kubernetes cluster so that new core dumps are automatically uploaded to blob storage. To do this, we’ll do a couple of things:
- Make sure the system is configured for core dumps
- Download azcopy and copy it into the host’s filesystem
- Copy a custom script that uploads to blob onto the host’s filesystem
- Disable the default core dump process (apport in Ubuntu)
- Configure the custom script to be triggered when a core dump happens
We’ll execute those steps as a daemonset that runs on each host in the Kubernetes cluster.
Before we dive into the practical steps involved, let’s first look into how core dumps work in Ubuntu and how you can enable them. We’ll use a regular Ubuntu VM for this. To trigger core dumps, we’ll need a small sample program to trigger one.
Sample program to trigger a core dump
In doing my research, there are two ways to trigger a core dump:
- Run a sleep process, and kill it using
kill -11 [pid] - Write a small c program that divided by zero.
In my tests, I typically ran the second approach. The C program is simple:
int main()
{
    return 1/0;
}
This will need to be compiled. In order to compile, you need gcc installed. Install it and compile the program:
sudo apt update && sudo apt install gcc -y
gcc test.c -o crash
./crash
This will trigger a crash, and will dump the core:

Now that we have a demo program, let’s look into core dump configuration.
How core dumps work in Ubuntu
There are two things to configure when it comes to setting up core dumps in Ubuntu:
- Configure the destination for core dumps (either file system location or custom executable)
- Make sure there are no limits set on core dumps if writing to the file system
Finally, if you want your configuration to persist, you’ll have to disable the apport service and configure your system to load your configuration at boot.
Let’s look into what that means:
Configure the destination for core dumps
The configuration for core dumps is located in a configuration file. You can either write to this directly, or use systemctl to configure it.
/proc/sys/kernel/core_patternYou can configure two options there:
- A static location on the file system, where core dumps get stored
- Pipe to a custom executable (or script)
The default configuration in Ubuntu is to pipe the core dump to the apport service:

If you trigger a core dump using the default core_pattern, you’ll notice that a core dump will get created.

We could change this to write the core dump to a location on the file system. Let’s configure this and trigger a core dump:
mkdir /tmp/dumps
echo "/tmp/dumps/%h.%e.%p.%t" | sudo tee /proc/sys/kernel/core_pattern
Important detail, the lenght of the core_pattern is limited to 127 characters. If you need more than 127 characters, consider using a custom script, and piping to the custom script.
If we now trigger a crash, you’ll notice this does not trigger a core dump. This is due to limits configuration not allowing the core dump to be written (it’s set to a size of zero). To see the limits that are currently set for your user, run ulimit -c.

We can edit this, which we’ll do in the following section.
Make sure there are no limits set on core dumps
Limits only matter when writing the core dump to a file. When invoking a custom script (piping) you do not need to worry about these limits (as you saw with the default pipe to apport).
To set the limits to a non-zero value (I’ll go extreme and configure unlimited), one way to do this and persist is across reboots is to configure them in the /etc/security/limits.conf file. This file contains the default limits applied to users logged into the system. They can be user specific, but in this test case I’ll set them for all users:
echo "* soft core unlimited" | sudo tee -a /etc/security/limits.confThis will append a line that will configure unlimited core dump size limits. To apply the limits, do a reboot. When you login again, you’ll notice that if you now run ulimit -c, you’ll get an unlimited value:

However, apport has reset itself as the core dump destination (we’ll tackle disabling apport in the next section). For now, just reset your custom destination and trigger a crash.

And if we look in the target folder, we actually see our core dumps there:

This shows you how to store core dumps in a custom location.
Let’s now have a look at the last problem here, how to permanently disable apport from overwriting the core_pattern.
How to disable apport
If you were to reboot your system, you lose your core dump configuration (as you saw eaerlier). To disable the apport service and make sure your core dump pattern is remembered after a reboot, there are three things to configure:
- Configure systemd to load your configuration.
- Edit the apport configuration file to disable it.
- Configure the service so it does not automatically start.
To do the first, you’ll need to add a line to the /etc/sysctl.conf file. To configure the core_pattern at boot, execute the following command:
echo "kernel.core_pattern=/tmp/dumps/%h.%e.%p.%t" | sudo tee -a /etc/sysctl.confTo do the second, you need to set enabled=0 in the /etc/default/apport file. You can do this with the following line of bash:
sudo sed -i "s/enabled=1/enabled=0/" /etc/default/apportTo disable the service, you can run the following systemctl commands. Practically speaking, this might not be required since disabling apport in the config file should be sufficient, but from what I read online there are a couple edge cases where apport could still inject itself.
sudo systemctl stop apport.service
sudo systemctl disable apport.service
sudo systemctl mask apport.service
Now do a reboot, and verify that post reboot the core dump is still configured to your custom destination. This should now remain post reboot.
Configuring core dumps on kubernetes nodes
How that we know how core dumps work on Ubuntu, we can take our knowledge to our Kubernetes cluster. To configure core dump on Kubernetes we can use a priviliged daemonset to configure each node. In my demo, I want to configure the core dump to upload dumps to Azure. To do this, I’ll need azcopy on the node.
If you plan to run this yourself in production, make sure to security harden this solution. I’ve put a couple of security pointers in the conclusion of this post.
I’ll use two scripts in my case:
- configure.sh: this script will be run on the daemonset, and will be used to configure the node.
- corecopy.sh: this script will run the actual copy to blob. To keep things simple (maybe not perfectly secure) I’m using a SAS token with write permissions to upload to blob. I can’t paste th efull azcopy command with the SAS token into the core_pattern itself, since the maximum lenght for that is 127 characters. That’s why the upload is put in a custom script.
Before showing you the scripts, let me explain to you one trick I’m using here. Since commands on a pod in Kubernetes execute within the context of that pod, executing system configuration within the pod, won’t imnpact the host. To do this, we can use the nsenter command. (you’ll in an example in a second). What the nsenter command allows us to do, is enter a namespace and execute commands there. Since we’ll be running in a priveliged container, we can also enter the host namespace.
Let me show and explain both scripts, starting with configure.sh
# Download Azcopy and copy to /root

wget https://aka.ms/downloadazcopy-v10-linux -O - | tar -xz
mv -f azcopy*/azcopy /root/azcopy
rm -rf azcopy*

# copy corecopy script to /root
cp /opt/scripts/corecopy.sh /root/corecopy.sh

# Disable apport
nsenter -t 1 -m -- su -c "sed -i \"s/enabled=1/enabled=0/\" /etc/default/apport"

nsenter -t 1 -m -- su -c "sudo systemctl stop apport.service"
nsenter -t 1 -m -- su -c "sudo systemctl disable apport.service"
nsenter -t 1 -m -- su -c "sudo systemctl mask apport.service"

# Configure corecopy as the script to execute when core is dumped
nsenter -t 1 -m -- su -c "echo \"|/bin/sh /root/corecopy.sh -n %h.%e.%p.%t\" > /proc/sys/kernel/core_pattern"

# Configure our custom script in sysctl.conf. Only add it if the line doesn't exist yet.
nsenter -t 1 -m -- su -c "grep -qxF 'kernel.core_pattern=|/bin/sh /root/corecopy.sh -n %h.%e.%p.%t' /etc/sysctl.conf || echo 'kernel.core_pattern=|/bin/sh /root/corecopy.sh -n %h.%e.%p.%t' >> /etc/sysctl.conf"

# Check if azcopy exists. If OK, sleep. If not, restart.
FILE="/root/azcopy"
if [[ -f $FILE ]];then
    echo "All was setup succesfully. Going to sleep infinity"
    sleep infinity
else
    # if azcopy does not exist, just let the pod restart. I've noticed a couple times that on new nodes DNS isn't ready when the first pod gets created. This way, we are protected from pod failures.
    echo "azcopy not found. restarting pod"
fi
This script this a couple tasks:
- Downloads azcopy and moves it onto /root (/root is mounted in the pod) (I had a small issue with DNS here, which I circumvent in the end by restarting the container. The issue with DNS was that on a brand new node, the pod gets created before the DNS setup finishes.)
- Copies the corecopy script onto the host
- Disables apport (as done above)
- Configures the core dump
- Checks if the azcopy binary exists. If not, that means I had a DNS issue (which occurs if the pod is created on a new node), and it’s safe for the pod to restart. If the file exists, sleep for infinity.
The corecopy script is easier, it does the following:
#!/bin/sh

while getopts n: option
do
    case "${option}"
        in
            n) NAME=${OPTARG};;
            esac
done
read FILE
echo $FILE | /root/azcopy cp "https://nfwestus2.blob.core.windows.net/coredump/$NAME?sv=2019-12-12&ss=b&srt=sco&sp=wtfx&se=2030-12-05T06:34:05Z&st=2020-12-04T22:34:05Z&spr=https&sig=xxxx" --from-to PipeBlob
This script takes in one parameter (-n), which is the name of the blob we’ll be uploading. It also takes piped input (through the read command), and then uploads it to blob using azcopy.
To copy the scripts onto my pods, I’m using a configmap in Kubernetes, which I’ll mount as files in my actual pod. This is a neat trick a colleague of mine thaught me on Friday.
apiVersion: v1
kind: ConfigMap
metadata:
  name: scripts
data:
  configure.sh: |
    # Download Azcopy and copy to /root

    wget https://aka.ms/downloadazcopy-v10-linux -O - | tar -xz
    mv -f azcopy*/azcopy /root/azcopy
    rm -rf azcopy*

    # copy corecopy script to /root
    cp /opt/scripts/corecopy.sh /root/corecopy.sh

    # Disable apport
    nsenter -t 1 -m -- su -c "sed -i \"s/enabled=1/enabled=0/\" /etc/default/apport"

    nsenter -t 1 -m -- su -c "sudo systemctl stop apport.service"
    nsenter -t 1 -m -- su -c "sudo systemctl disable apport.service"
    nsenter -t 1 -m -- su -c "sudo systemctl mask apport.service"

    # Configure corecopy as the script to execute when core is dumped
    nsenter -t 1 -m -- su -c "echo \"|/bin/sh /root/corecopy.sh -n %h.%e.%p.%t\" > /proc/sys/kernel/core_pattern"
    nsenter -t 1 -m -- su -c "grep -qxF 'kernel.core_pattern=|/bin/sh /root/corecopy.sh -n %h.%e.%p.%t' /etc/sysctl.conf || echo 'kernel.core_pattern=|/bin/sh /root/corecopy.sh -n %h.%e.%p.%t' >> /etc/sysctl.conf"

    FILE="/root/azcopy"
    if [[ -f $FILE ]];then
        echo "All was setup succesfully. Going to sleep infinity"
        sleep infinity
    else
        # if azcopy does not exist, just let the pod restart. I've noticed a couple times that on new nodes DNS isn't ready when the first pod gets created. This way, we are protected from pod failures.
        echo "azcopy not found. restarting pod"
    fi

  corecopy.sh: |
    #!/bin/sh

    while getopts n: option
    do
            case "${option}"
                    in
                    n) NAME=${OPTARG};;
            esac
    done
    read FILE
    echo $FILE | /root/azcopy cp "https://nfwestus2.blob.core.windows.net/coredump/$NAME?sv=2019-12-12&ss=b&srt=sco&sp=wtfx&se=2030-12-05T06:34:05Z&st=2020-12-04T22:34:05Z&spr=https&sig=xxxx" --from-to PipeBlob
And this configmap (together with the /root folder) will get mounted in my daemonset configuration:
apiVersion: apps/v1
kind: DaemonSet
metadata:
  name: init-node
spec:
  selector:
    matchLabels:
      job: init-node
  template:
    metadata:
      labels:
        job: init-node
    spec:
      hostPID: true
      restartPolicy: Always
      containers:
      - image: alpine:3.12.0
        name: init-node
        securityContext:
          privileged: true
        command: ["/bin/sh"]
        args:
          - "-c"
          - "sh /opt/scripts/configure.sh"
        volumeMounts:
        - name: scripts
          mountPath: "/opt/scripts"
        - name: hostmount
          mountPath: "/root"
      volumes:
      - name: hostmount
        hostPath:
          path: /root
      - name: scripts
        configMap:
          name: scripts
As you can see in the daemonset, I’m mounting the /root folder in /root and mounting the scripts from the configMap in /opt/scripts. As the command on the daemonset, I execute the configure.sh script.
To deploy this, you can use kubectl create -f . in the folder where the files are located. This will create the daemonset and the configmap.
Let’s verify what happens now when we actually invoke a crash:
Verifying core dump in Kubernetes
To verify the core dump is working correctly on my cluster, I’ll exec into one of the daemonset pods, and create the same C program. To do this, first get the name of one of the pods:

With one of those pods, do the following:
kubectl exec -it [podname] -- sh
apk update
apk add build-base
echo "int main() {      return 1/0; } " > test.c
gcc -o crash test.c
./crash
And as you can see, this triggers a core dump:
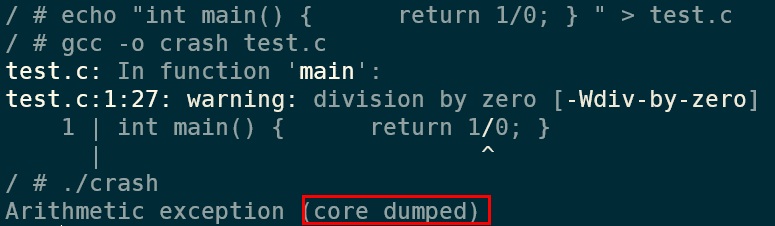
And opening up the blob container, I can see a file there with the name of the pod I used:
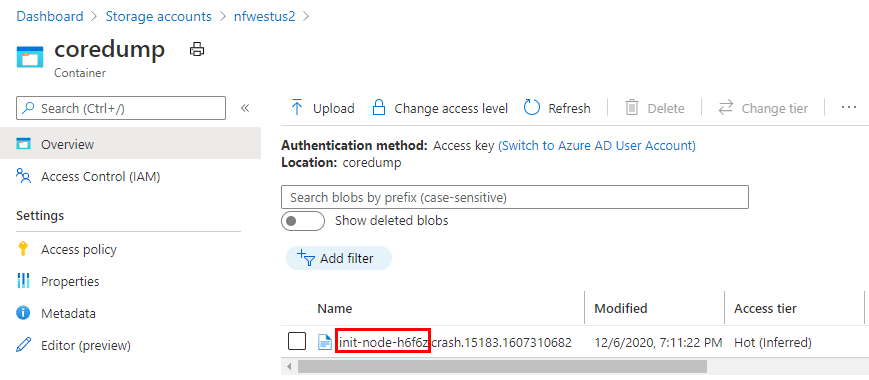
And that’s how the core dumps get pushed to a blob storage account.
Summary
In this blog post we explored how you can setup core dumps in an Azure kubernetes cluster (the instructions will work on other clusters as well, the only difference being working with the apport service).
We started by looking into how core dumps work in a regular Ubuntu system, and then applied the lessons learnt to a Kubernetes cluster using a daemonset. In that daemonset we executed a script that configured the nodes to use azcopy to push the core dumps to blob storage.
If you’re thinking about putting this into production, let me give you a couple of considerations:
- Be careful with the priviliged daemonset (Kubernetes CIS v.1.6.0 5.2.1 contains this recommendation). Priviliged containers should be handled carefully, since every process/user with access to that container can execute any arbritaty code on the host node.
- To upload to blob, we’re now using the host itself. Another approach to do this would be to write the coredump locally on the host first – and leverage a seperate daemonset to upload to blob.
- We’re uploading to blob using a SAS token. You might want to consider switching to managed identities.