I had a great week this week at Ignite. There were a couple of nice announcements that I want to dive into soon (Azure Arc being one of them). If you have doubted about attending Ignite before, I can highly recommend it for a couple of reasons:
- There is a great atmosphere, and there a lot of great sessions. The sessions are recorded, so sessions as such should not be the only reason to attend Ignite.
- There is a large ‘Hub’ area, where you can learn more from both Microsoft product teams and partners. In this hub, you can network with a lot of folks and actually discuss your use cases.
- There are a lot of Microsoft customers at Ignite, allowing you to connect with others in the industry and learn more about what they are doing.
I enjoyed all of those three things at Ignite. I attended a bunch of sessions, I walked around the hub a couple of time (and have a couple of follow-ups scheduled with both internal teams and partners), and talked to a lot of customers.
The last two days of Ignite, I spent attending an OpenHack around DevOps. OpenHacks are a Microsoft event, where customers (and Microsoft employees as well) come together to work through a challenge-based hackathon (or lab). The instructions are very thin, and the coaches won’t give you to answers. It’s a fun experience that I highly recommend.
During our OpenHack around Devops, we implemented a zero-downtime Azure DevOps pipeline. We deployed an application to AKS using Helm, and used different blue-green deployment models to deploy our application to production.
I found this experience very fun, and wanted to share some of the things I learned for the public to learn. One of the things I learned about, is setting up Kubernetes blue-green deployments. Let’s walk through this today!
About blue green deployments
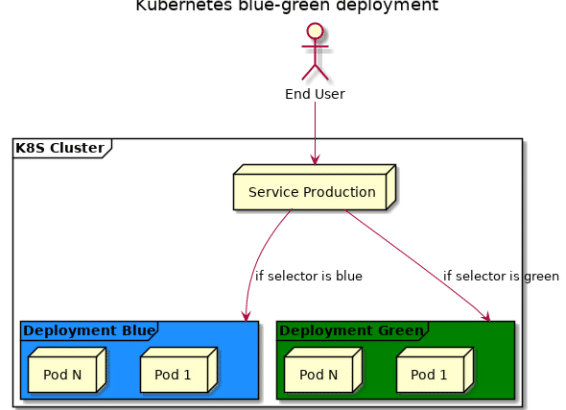
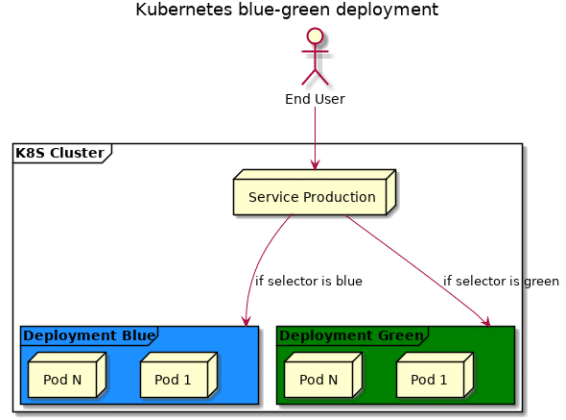
Blue green deployments allow you to have multiple versions of your application running side by side, and do a clean cutover from v1 to v2. You would bring v2 of your application live, next to production, and have the ability to test it out without impacting production. Once you’re happy with v2, you would switch production from routing to blue, to routing to green.
There are different mechanisms in Kubernetes to setup blue-green deployments, one of which we’ll build today:
- Using the Service object in Kubernetes, and routing that to the right label.
- Using an ingresscontroller to route traffic to a particular service.
- Using a Service Mesh (such as Istio) to route traffic to a particular set of your deployment.
The easiest way to setup blue-green deployments is actually using the Service object in Kubernetes. This gives you less traffic control, but if you only need simple blue-green deployments, this might actually work. So, let’s start out our blue-green deployment this way.
Blue-green deployments using Kubernetes Services
Within Kubernetes, a Service is a network level abstraction. It allows you to re-use the same service IP address, and route traffic to multiple versions of your application (or rather said, multiple versions of your application deployment). The way you do this is by labeling your pods, and having the right selector in the kubernetes service.
Typically, you have a service which will route traffic to a deployment. If you do a rolling upgrade of your service, some traffic will go to the old deployment, some traffic will go to the new deployment (as per the rolling deployment).
We can however, also achieve blue-green deployments with kubernetes. Think about it this way:
- Your current production deployment is running in Blue.
- You setup your service, to route traffic to pods labeled
Color=Blue - The moment you do an update, you do the update to the Green deployment. The rolling deployment happens, without impacting production, as all production traffic is sent to the blue deployment.
- Now, once the update is complete, you switch traffic by changing the selector in the kubernetes service, to pods with the label
Color=Green.
This is all nice in theory, but why don’t we build that out?
Setting up Blue and Green
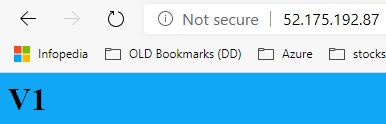
As a sample application I got really creative, and I decided to launch 2 deployments of nginx – each with a different background color, and each with a version in a <h1> header in html. Very creative right?
To deploy both deployments, I created a couple of files. All of these files can be found on my Github repo. Let me walk through them for the blue deployment, just rinse and repeat for the green deployment. First off, the index.html file:
<html>
 <head>
  <title>Blue</title>
 </head>
 <body bgcolor="#11a7f7">
  <h1>V1</h1>
 </body>
</html>
As you can see, not very creative. It is simply a page with a header and a nice background color. We’ll store this index.html file as a configMap in kubernetes:
kubectl create configmap index-blue-v1 --from-file=index.htmlWe’ll version this configmap, so we can make changes to the index.html file, then update the configmap and then update the deployment. Talking about the deployment, here it is. I included a service for the deployment itself, so we can directly connect to either blue or green.
apiVersion: apps/v1beta1
kind: Deployment
metadata:
  name: blue
spec:
  replicas: 10
  template:
    metadata:
      labels:
        app: web-version
        color: blue
    spec:
      containers:
      - name: nginx
        image: nginx
        ports:
        - containerPort: 80
        volumeMounts:
        - name: config-volume
          mountPath: /usr/share/nginx/html
      volumes:
      - name: config-volume
        configMap:
          name: index-blue-v1
---
apiVersion: v1
kind: Service
metadata:
  name: blue
spec:
  type: LoadBalancer
  ports:
  - port: 80
  selector:
    color: blue
And we can deploy this using:
kubectl create -f deployment.yamlIf we wait a couple of minutes for the public IP of the Load Balancer to become available, we can browse to our service and see v1 in the blue service. (to get the IP, do a kubectl get svc).
Let’s now show, why we would need blue-green. Imagine that now with blue running in v1, that we do an update to v2. The kubernetes deployment will then do a rolling upgrade, with v1 and v2 running side-by-side.
Let’s show this. To demo this, I wrote a quick shell script that will show us every 300 milliseconds the version returned:
#!/bin/bash
IP=${1?Error: no IP given}

while :
do
    curl -s $IP | grep h1 | sed -e 's/^[ \t]*//' -e "s/^<h1>//" -e "s/<\/h1>//"
    sleep 0.3
done
Run this shell script in another terminal, via ./show-versions.sh <blue-ip>
Let’s make an update to our index.html for blue to v1.1 – create a new v1.1 configmap and then update our deployment.
vi index.html # make a change to update blue to v2
kubectl create configmap index-blue-v1.1 --from-file=index.html
vi deployment.yaml #make volume point to v1.1
kubectl apply -f deployment.yaml
When watching the output of show-versions.sh – I saw the following versions being returned:
V1
V1
V1.1
V1.1
V1
V1
V1.1
V1.1
V1.1
V1.1
V1.1
V1.1
V1
V1.1
V1.1
V1.1
As you can see, it is a mix between v1 and v1.1, which is not deterministic. Let’s fix this in the next section.
For now: clean up v1.1, rinse and repeat for green, so both blue and green have v1 running; and then we’ll look at our blue-green deployment.
Setting up a blue-green service and doing updates
Setting up a blue-green service is actually quiet straightforward. Let’s walk through this, and show you the example. This is what the production-service will look like:
apiVersion: v1
kind: Service
metadata:
  name: production
spec:
  type: LoadBalancer
  ports:
  - port: 80
  selector:
    color: blue
As you can see, I deemed blue to be the production service for now. This means, that anytime I browse to the production service, I’ll get the blue info.
Let’s now update our green service to v1.1. This won’t have an impact to our production service as these pods don’t carry the blue label.
vi index.html # make a change to update green to v1.1
kubectl create configmap index-green-v1.1 --from-file=index.html
vi deployment.yaml #make volume point to v1.1
kubectl apply -f deployment.yaml
And now, as production traffic is not disturbed, we can watch the deployment rollout complete: kubectl rollout status deploy green
And now, let’s flip over our service. Let’s keep the script from earlier running – which will show v1 all the time – and then switch:
kubectl edit svc production # switch the selector to green in stead of blueThe moment we hit enter, all traffic is switched over, and we should only see v1.1 being returned.
V1
V1
V1
V1
V1.1
V1.1
V1.1
V1.1
V1.1
As you can see, this is a clean cutover, as we expected.
Conclusion
Using Kubernetes services, it is easy to setup a blue-green deployment. The cutover is clear, and we have no same versions running side by side. By having both a blue and a green service running, you could actually do tests of the new version without impacting production and afterwards do a clean cutover.
The cutover however is a full cutover. There is no way to do “testing” in production, as the traffic decision is a binary decision. This is where an ingress such as Traefik could help, by doing more intelligent traffic routing. That’s a topic for another post.