It caugt me a little by surprise last week when Microsoft released a Service Mesh:
We are beyond excited to introduce Open Service Mesh (OSM), a lightweight and extensible #servicemesh that implements @SMI_spec and runs on @kubernetesio @EnvoyProxy! Check out what we’ve been up to here:https://t.co/l6fy4OUorO
— Open Service Mesh (@openservicemesh) August 5, 2020
The Open Service Mesh (OSM) is an implementation of a service mesh according to the Service Mesh Interface (SMI) spec, using the Envoy proxy as a sidecar. If all of this means nothing to you, stay tuned as I’ll walk you through all those terms in this blog show you OSM in action.
So, let’s start with the beginning, and discuss what a service mesh is.
What is a service mesh?
I still remember the first time I heard about service meshes. The year was 2018, and it was a hot August afternoon in Mountain View. I had just moved to the US a month ago, and was looking to integrate better in the tech community here. That afternoon, I jumped on my bike to attend a meetup in Mountain View at the headquarters of WSO2. The title of that meetup was “Introduction to Istio and onto 1.0”, and I had no idea what I was walking into. Dan Curuli from Google presented on Istio and the problems it solved. He made such a great presentation that I wrote a blog post the next post to share some of my lessons learnt. Since then, service meshes and Istio has grown in popularity, and I am happy to have learnt about it first hand from Dan.
So, what is a service mesh? A service mesh is an infrastructure component that helps managing inter-service communication. In other words, it’s a transparent piece of technology that offloads certain logic of inter-service communication out of your application code and into the service mesh. A good example of that logic is for instance retry logic when calling an API. Without a service mesh, you’d have to code that into your actual code. With a service mesh, you’ll be able to offload that retry logic into the service mesh and leverage a retry policy in the service mesh (example in Istio).
A service mesh is typically used in a Kubernetes environment, although you can use it on non-Kubernetes environments as well. In a Kubernetes cluster, a service mesh is typically implemented using the sidecar pattern. A sidecar is a container that gets added to an application pod to add additional functionality, in this case the service mesh functionality.
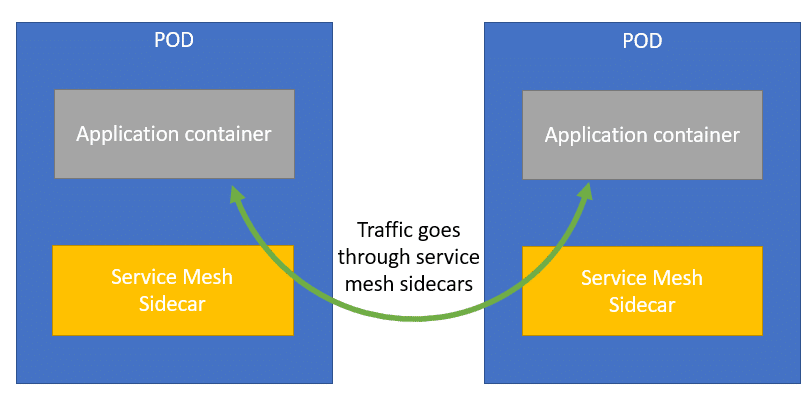
This sidecar proxy can be a number of things. Envoy is a popular option as a sidecar, and it is the sidecar that is used by Istio (and the open service mesh as well). Envoy is a proxy originally developed by Lyft. Envoy is similar in functionality to Nginx or HAProxy for instance. However, Envoy has some distinct advantages, including high performance processing and a centralized configuration management system. Enjoy isn’t the only sidecar that can be used, other options include nginx or linkerd2. Often, each service mesh will have a default/preferred sidecar proxy.
There are a number of popular service meshes out there. Istio is the most popular one. Istio is a project originally created by Google, IBM and Lyft. Although it’s the most popular service mesh, there is a little commotion right now in the open source community around how Google created a new foundation called the Open Usage Commons to donate Istio to, rather than donating Istio to the CNCF. Istio isn’t the only service mesh. Other popular meshes include Linkerd, Consul and Maesh.
The service mesh space is still in early stages. Each service mesh has its own advantages and disadvantages. However, switching from one mesh to another isn’t very straightforward. This is because each mesh has its own configuration language syntax. This is the problem that the SMI spec tries to solve. Let’s explore the SMI spec in the next section.
The SMI spec
The Service Mesh Interface (SMI) specification (spec) is a standard interface for service meshes running on Kubernetes. If you’re familiar with the Ingress resource in Kubernetes, SMI is to service mesh, what Ingress is to reverse proxy. By that I mean it’s a standardized way to configure multiple backend implementations. This has the benefit that you don’t have the learn the specifics about a particular implementation, and you can simply use the SMI-spec to configure your service mesh.
Microsoft initially created the SMI spec in May of 2019 and donated the spec to the CNCF in April of 2020. Right now, 4 meshes implement the SMI spec:
- Istio ( via adaptor )
- Linkerd
- Consul Connect ( via adaptor )
- Maesh
And there’s a new mesh joining these 4 meshes: the Open Service Mesh. Let’s have a look at Open Service Mesh:
Open Service Mesh
Open Service Mesh (OSM) is a new service mesh that uses Envoy sidecar proxies and leverages the SMI spec for configuration. Although the service mesh is only a couple days young (publicly), it implements a couple of features already (taken from the website of OSM):
- Easily and transparently configure traffic shifting for deployments
- Secure end-to-end service to service communication by enabling mTLS (mTLS or mutual TLS enables encryption between services with source and destination certificates)
- Define and execute fine grained access control policies for services
- Observability and insights into application metrics for debugging and monitoring services
- Integrate with external certificate management services/solutions with a pluggable interface
- Onboard applications onto the mesh by enabling automatic sidecar injection of Envoy proxy
- Flexible enough to handle both simple and complex scenarios through SMI and Envoy XDS APIs
So why don’t go ahaed and install OSM in a Kubernetes cluster?
Getting started with OSM
I’ll install OSM on an existing cluster I’ve got in Azure. OSM requires a kubernetes cluster running v1.15.0 or higher and a config that points to that cluster.

Next step is to download the osm binary. I’ll download the v0.2.0, but I highly encourage you to check out GitHub to download the latest version.
wget https://github.com/openservicemesh/osm/releases/download/v0.2.0/osm-v0.2.0-linux-amd64.tar.gz
tar -xvzf osm-v0.2.0-linux-amd64.tar.gz
sudo mv linux-amd64/osm /usr/local/bin/osm
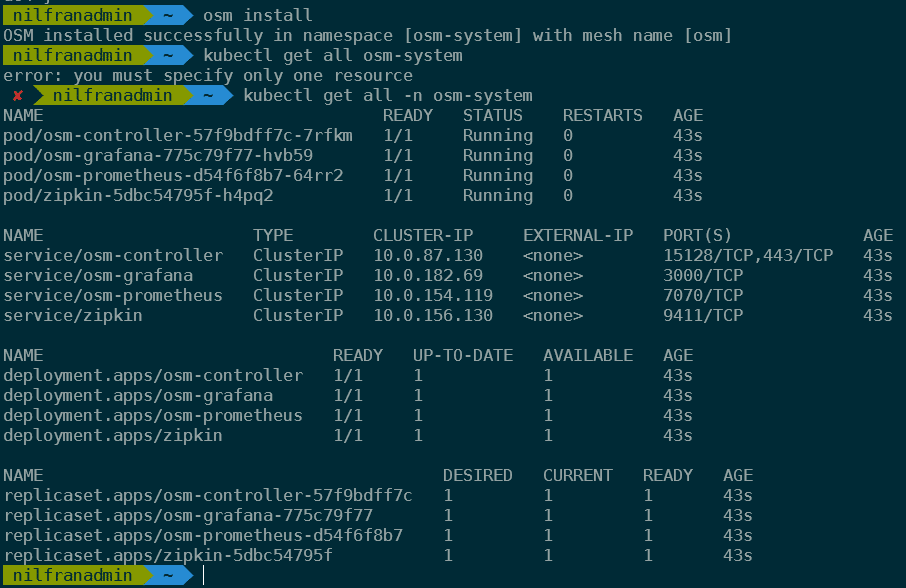
rm -rf linux-amd64And then, we have one step remaining, installing osm:
osm installWhich results in OSM being installed.
That was very un-exciting. But now that we have OSM installed, we can explore a demo application, which will be a lot more exciting!
Running a demo application with OSM
Basic setup
The team behind OSM has been kind enough to create a full demo application (for those familiar with Istio, you might see a common theme here). Let’s walk through this. We’ll create a couple of namespaces and deploy a couple of applications:

Let’s get started with this. First, we’ll need to clone the repo of osm locally and navigate into the directory.
git clone https://github.com/openservicemesh/osm.git
cd osm
Now, we’ll create 4 namespaces and onboard those 4 namespaces to OSM:
for i in bookstore bookbuyer bookthief bookwarehouse; do kubectl create ns $i; done
for i in bookstore bookbuyer bookthief bookwarehouse; do osm namespace add $i; done
Then we’ll deploy the 4 applications. Their configuration is in the docs/example/manifests/apps/ directory. Let’s have a look at what’s in that directory.

As you can, there’s 4 YAML files defining the applications, and then a traffic-split.yaml file. I assume this is containing the configuration for the service mesh. Let’s explore what’s in that file.
apiVersion: split.smi-spec.io/v1alpha2
kind: TrafficSplit
metadata:
  name: bookstore-split
  namespace: bookstore
spec:
  service: bookstore.bookstore # <root-service>.<namespace>
  backends:
  - service: bookstore-v1
    weight: 100
And indeed, this is SMI configuration. As you can see here as well, there’s no specific configuration that mentions OSM, this is following the smi-spec.
Let’s deploy everything that’s contained in that folder and see what happens.
kubectl create -f docs/example/manifests/apps/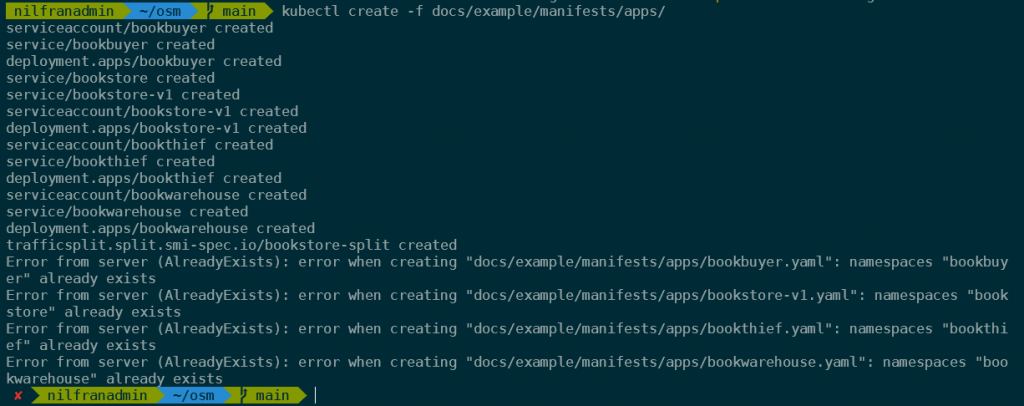
This has created a whole number of objects in Kubernetes. To see the actual application that is deployed, we can setup port forwarding and explore the application itself. It’s recommended to do this in a different terminal window, so you keep using the primary window for the tutorial.
cp .env.example .env
./scripts/port-forward-all.sh
This will make the following endpoints available on your localhost:
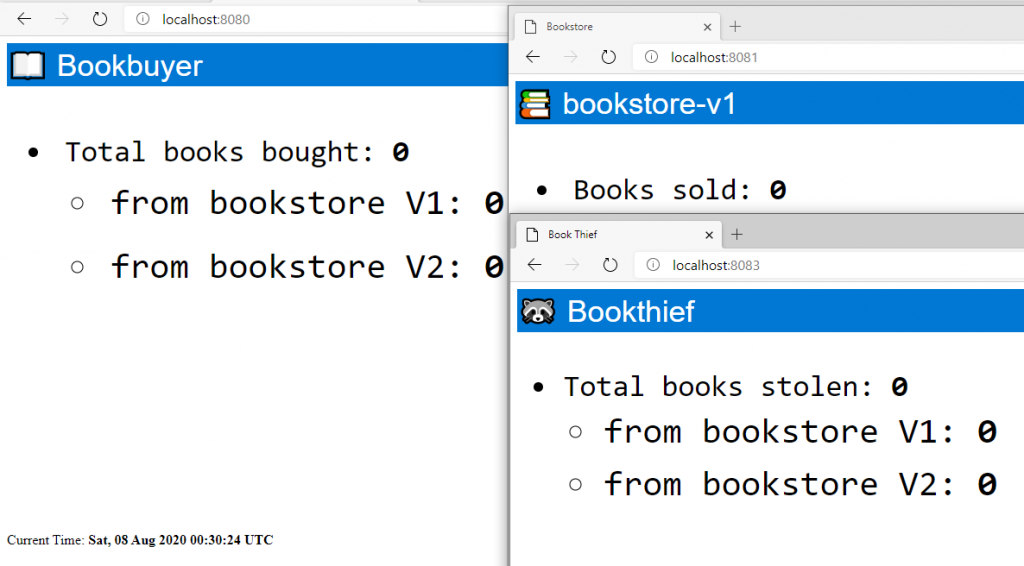
- http://localhost:8080 – Bookbuyer
- http://localhost:8081 – bookstore-v1
- http://localhost:8083 – bookthief
This is what these services look like right now:
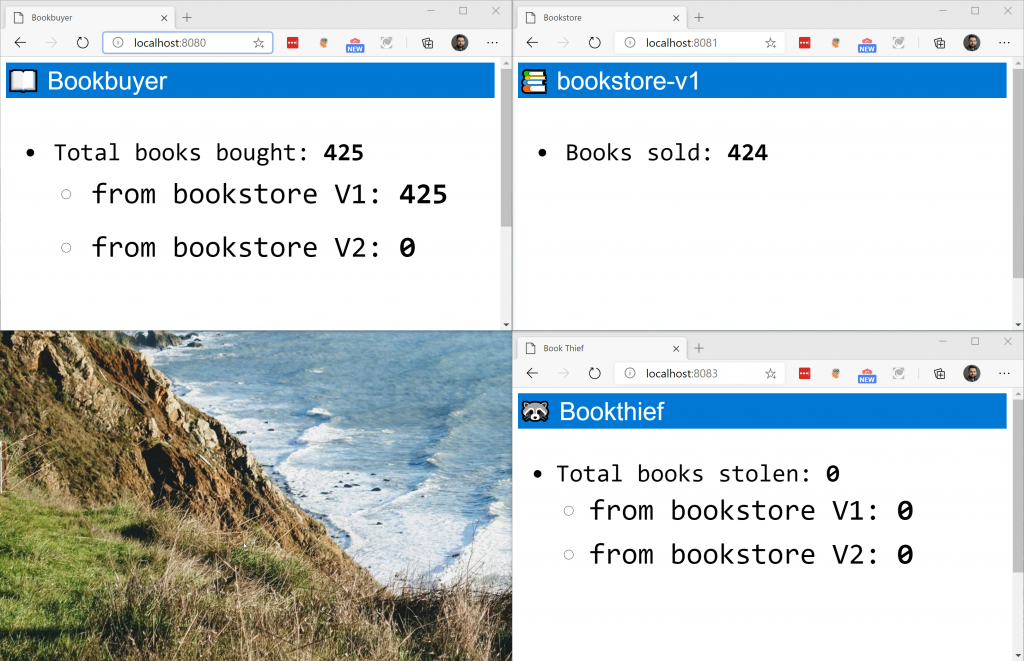
Allowing traffic
If the services could communicate to each other, we should see counters increase. However, right now there’s no traffic allowed between the three services, meaning no books are being bought/stolen. We can change this by applying an access control policy. An example policy is stored in the docs/example/manifests/access/ directory. Let’s have a look at this before we create it:
kind: TrafficTarget
apiVersion: access.smi-spec.io/v1alpha2
metadata:
  name: bookstore-v1
  namespace: bookstore
spec:
  destination:
    kind: ServiceAccount
    name: bookstore-v1
    namespace: bookstore
  rules:
  - kind: HTTPRouteGroup
    name: bookstore-service-routes
    matches:
    - buy-a-book
    - books-bought
  sources:
  - kind: ServiceAccount
    name: bookbuyer
    namespace: bookbuyer
  #- kind: ServiceAccount
    #name: bookthief
    #namespace: bookthief
---
apiVersion: specs.smi-spec.io/v1alpha3
kind: HTTPRouteGroup
metadata:
  name: bookstore-service-routes
  namespace: bookstore
spec:
  matches:
  - name: books-bought
    pathRegex: /books-bought
    methods:
    - GET
    headers:
    - host: "bookstore.bookstore"
    - "user-agent": ".*-http-client/*.*"
    - "client-app": "bookbuyer"
  - name: buy-a-book
    pathRegex: ".*a-book.*new"
    methods:
    - GET
    headers:
    - host: "bookstore.bookstore"
There’s a couple of things in this definition:
- First, the bookthief service account isn’t allowed anything since that portion is commented out.
- Secondly, you can see we are creating two objects: a HTTPRouteGroup and a TrafficTarget.
- A
TrafficTargetassociates a set of traffic definitions (rules) with a service identity which is allocated to a group of pods. - A
HTTPRouteGroupis used to describe HTTP/1 and HTTP/2 traffic. It enumerates the routes that can be served by an application.
- A
- In our case, what we’re seeing is:
- We’re creating a
TrafficGroupto the destination bookstore-v1, matching twoHTTPRouteGroups. - The source right now is just the service account bookbuyer, not the thief (since he is commented out).
- Below that, we create the
HTTPRouteGroups, explaining the traffic flows.
- We’re creating a
Let’s create this now:
kubectl create -f docs/example/manifests/access/Once the access policy is created, you should see the counters increment, meaning book are getting bought and sold, but none being stolen just yet.
Let’s now enable our book thief. To do this, will comment out those three lines from the docs/example/manifests/access/traffic-access.yaml file.
kind: TrafficTarget
apiVersion: access.smi-spec.io/v1alpha2
metadata:
  name: bookstore-v1
  namespace: bookstore
spec:
  destination:
    kind: ServiceAccount
    name: bookstore-v1
    namespace: bookstore
  rules:
  - kind: HTTPRouteGroup
    name: bookstore-service-routes
    matches:
    - buy-a-book
    - books-bought
  sources:
  - kind: ServiceAccount
    name: bookbuyer
    namespace: bookbuyer
  - kind: ServiceAccount
    name: bookthief
    namespace: bookthief
We can then apply this new TrafficTarget using:
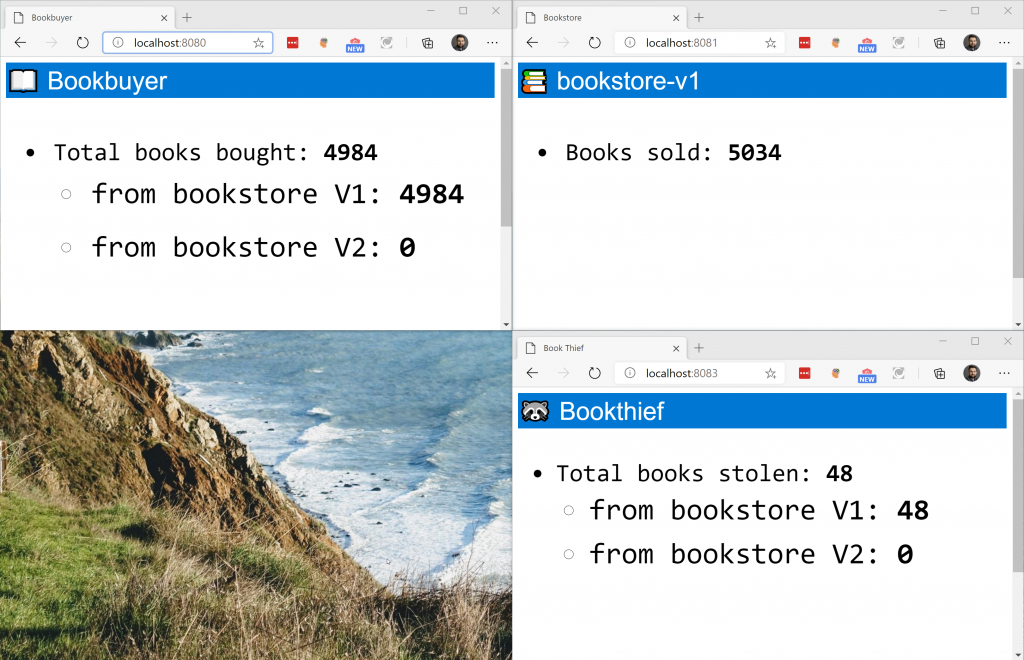
kubectl apply -f docs/example/manifests/access/traffic-access.yaml
And pretty soon, we’ll see our bookthief in action.
Let’s do a quick recap of what we’ve done up to this point:
- We’ve setup OSM in our cluster.
- We created 4 namespaces, and onboarded those to the OSM mesh.
- We created an application, and saw that traffic was blocked by default.
- We created a traffic policy using the TrafficTarget and HTTPRouteGroup object to allow specific traffic in our mesh.
In the second part of the demo, we’ll create a new version of our bookstore (bookstore-v2), and we’ll be able to direct traffic from one service to another.
Traffic splitting
In this section we’ll deploy a new version of the bookstore, and slowly direct all the traffic towards it. To start, let’s deploy the second version of the bookstore.
kubectl apply -f docs/example/manifests/bookstore-v2/In the terminal window where we’re doing the port-forwarding, we’ll need to stop the script and start that again to also port-forward to the second version of the bookstore.
You can see the counters increase, but you’ll be able to see that the second bookstore isn’t selling any copies. This is because the TrafficSplit is configured to direct 100% of the traffic to the primary bookstore. We can verify this by inspecting that object:
kubectl get trafficsplit bookstore-split -n bookstore
We can redirect some traffic to the v2 by applying the docs/example/manifests/split-v2/traffic-split-v2.yaml file. Let’s first have a look at what’s in that file.
apiVersion: split.smi-spec.io/v1alpha2
kind: TrafficSplit
metadata:
  name: bookstore-split
  namespace: bookstore
spec:
  service: bookstore.bookstore # <root-service>.<namespace>
  backends:
  - service: bookstore-v1
    weight: 0
  - service: bookstore-v2
    weight: 100
As you can see, this redirects 100% of the traffic to the v2. Let’s apply this:
kubectl apply -f docs/example/manifests/split-v2/traffic-split-v2.yamlAnd immediately you should see only the v2 counters increase:
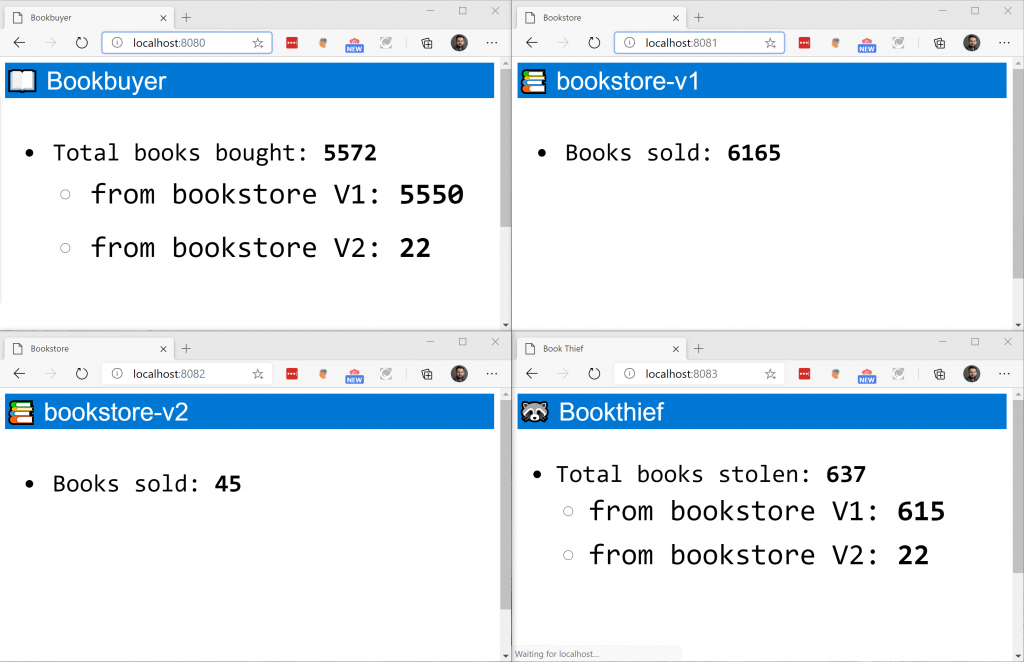
We could also do partial traffic splitting, and for instance do a 50/50 split. Do configure this, let’s quickly make a change using:
kubectl edit trafficsplit bookstore-split -n bookstore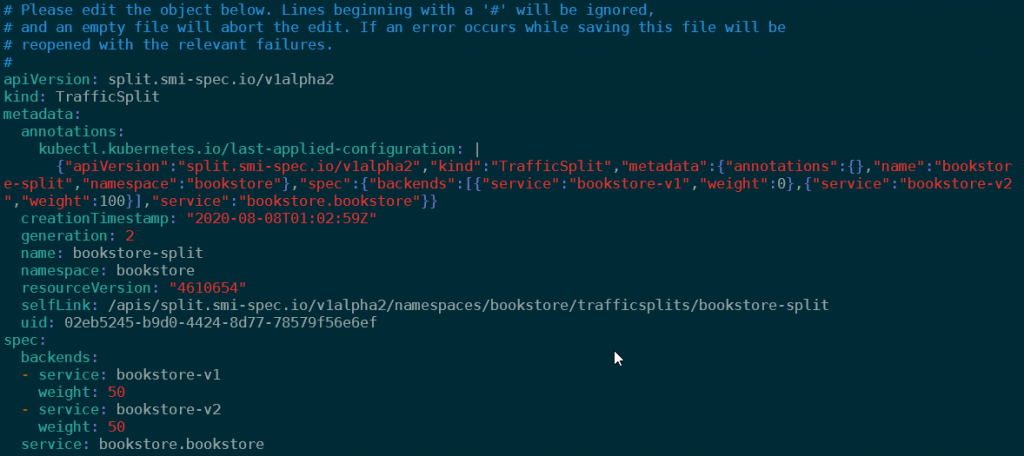
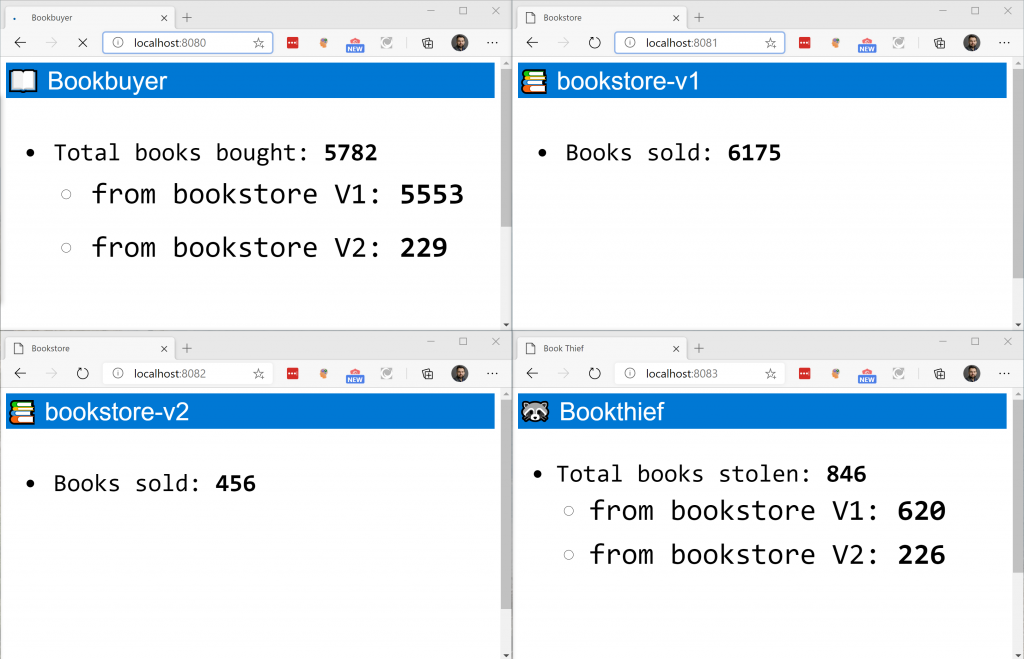
And with this 50/50 split, we should see both bookstores increasing at about the same rate:
So, let’s recap what we did here:
- We setup a new bookstore
- We first sent 100% of the traffic to the new bookstore. We could see only bookstore-v2 update.
- Afterwards we did a 50/50% traffic split, and we saw that both bookstores received roughly equal portions of traffic.
Finally, in this demo application, let’s have a look at some of the monitoring that comes built-in with OSM.
Monitoring traffic
OSM comes pre-installed with Prometheus, Grafana and Zipkin. These tools allow you to create graphs about your traffic (prometheus/grafana) and do distributed tracing (Zipkin).
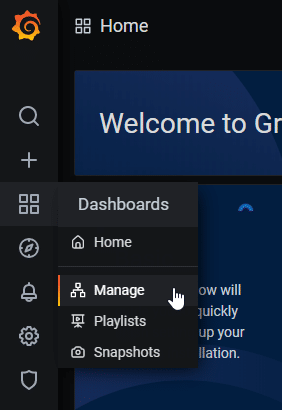
To access Grafana, you can browse to localhost:3000. The default login is admin/admin. In grafana, open the dashboard management view:
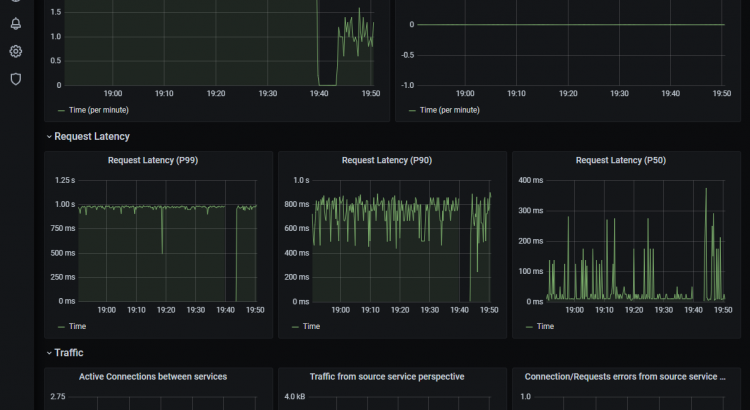
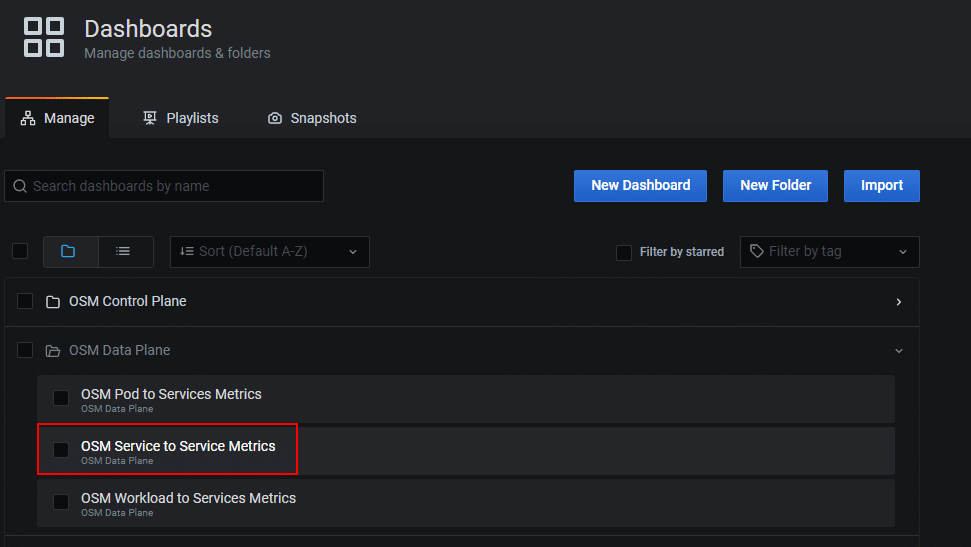
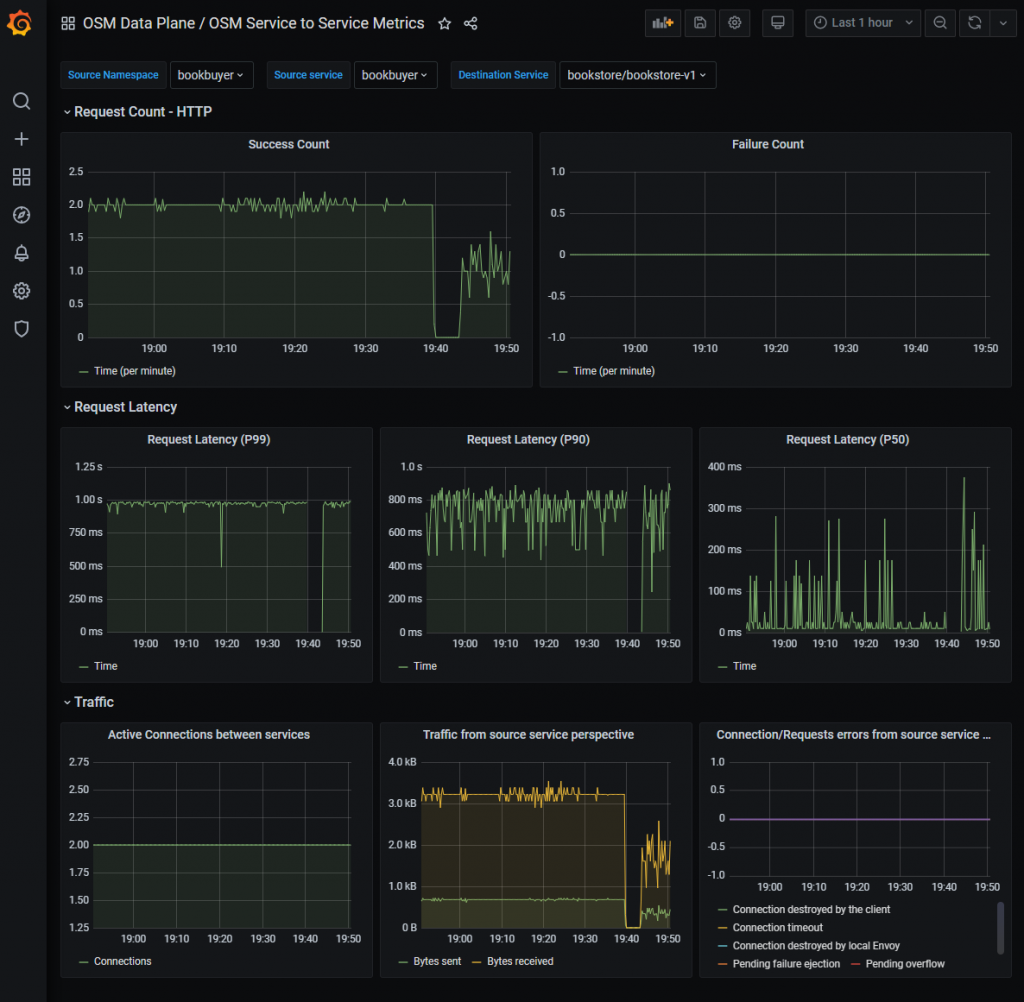
Let’s have a look at the service-to-service data plane metrics.
We can configure this dashboard to show us traffic between different systems/services. If we configure this to monitor traffic between bookbuyer and bookstore-v1, we’ll clearly see where we had 100% of traffic flowing and where we had 50% of traffic flowing. Additionally, this default dashboard shows us request latencies and a couple other metrics. Since this is an open tool, you are free to configure this to contain the relevant metrics for you.
Summary
We had a look at the open service mesh in this blog post. OSM is a new service mesh, using envoy proxies and follows the SMI-spec completely. We deployed the demo application, and deployed a couple of policies.
I had fun deploying the demo application and playing around with the policies. It was pretty straightforward to configure things, and the built-in monitoring certainly was nice as well.