I am working with a customer right now that is doing a lot of work with Azure Data Factory (ADF). ADF is a powerful cloud based data integration tool that lets you move data from a multitude of source, process that data and store it in a target data store. You can think of it as cloud-native ETL.
In working with this customer, a requirement came up to securely transfer data between blob storage accounts with the least permissions possible. There are a couple options to achieve this:
- Encode storage connection string with the storage account master key in ADF.
- Store the storage connection string with master key in Key Vault, and authenticate ADF to Key Vault.
- Encode a static SAS token in ADF.
- Store a SAS token in Key Vault, and use Key Vault to get the SAS token.
- Have Key Vault manage your storage accounts, and get a dynamically created SAS token.
- Use the managed identity of ADF to authenticate to Azure blob storage.
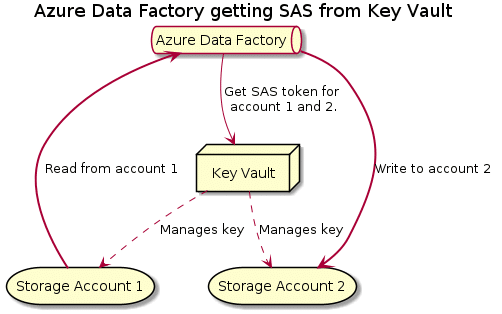
We decided to pursue the 5th option. This means we will have Key Vault manage the Azure storage accounts and frequently rotate the keys, and have Key Vault use those keys to generate SAS token for us. ADF comes out of the box with a managed identity now. We will then use this managed identity of ADF to authenticate towards Key Vault to get the SAS tokens.
For those of you not familiar with SAS tokens: SAS tokens are a way to give access to Azure storage (works with blob, file, queue and table) with a limited set of permissions. Permissions can be scoped to which service, can be time bound, can be limited by IP addresses etc. A lot safer than leveraging the storage account master key.
The purpose of this post is to explain the mechanism and show you how this would work in ADF.
Overview of the demo we’ll build in this blog post
I built a small demo environment for this demo. The demo environment consists of:
- 2 storage accounts. One will be read by ADF, another will be written to.
- A key vault. This key vault will manage both storage accounts and generate SAS tokens.
- An Azure data factory, which will read data from storage account 1 and write it to storage account 2.
So, let’s start at the beginning, creating the two storage accounts, the key vault and configuring the key vault for managing the storage accounts.
Setting up storage accounts and key vault
To setup the storage accounts and have key vault manage the, I decided to use Azure PowerShell. If you want to execute this all-in-one, you can find the script on Github. I’ll walk you through the steps here.
First up, we’ll setup a number of variables. We’ll use those throughout the setup.
# Setup couple of variables
$staccname = "nfadfkvread"
$staccname2 = "nfadfkvwrite"
$rgname = "kv-adf"
$location = "westus2"
$kvname = "kv-nf-adf-sas"
$keyVaultSpAppId = "cfa8b339-82a2-471a-a3c9-0fc0be7a4093"
$storageAccountKey = "key1"
$SASDefinitionName = "readFromAccount1"
$SASDefinitionName2 = "writeToAccount2"
Next up, we’ll login to Azure. Then we’ll create the actual resources. Meaning resource group, storage accounts and key vault:
# Login
Connect-AzAccount

# Create all resources
Write-Output "Create all resources"

New-AzResourceGroup -Name $rgname -Location $location
$stacc = New-AzStorageAccount -ResourceGroupName $rgname -Location $location -Name $staccname -SkuName Standard_LRS
$stacc2 = New-AzStorageAccount -ResourceGroupName $rgname -Location $location -Name $staccname2 -SkuName Standard_LRS
$kv = New-AzKeyVault -VaultName $kvname -ResourceGroupName $rgname -Location $location
Then, we’ll do some role assignments. First, we’ll give key vault permission to rotate the keys in the storage account. Then we’ll give my user account permissions in the key vault itself (FYI: Even if you are owner of a Key Vault that doesn’t give you access to the objects in the vault. The control (Azure API) and data plane (Key Vault itself) are configured independently).
# Give KV permissions on Storage to rotate keys
Write-Output "Give KV permissions on Storage to rotate keys"

New-AzRoleAssignment -ApplicationId $keyVaultSpAppId -RoleDefinitionName 'Storage Account Key Operator Service Role' -Scope $stacc.Id
New-AzRoleAssignment -ApplicationId $keyVaultSpAppId -RoleDefinitionName 'Storage Account Key Operator Service Role' -Scope $stacc2.Id

# Give my user access to KV storage permissions
Write-Output "Give my user access to KV storage permissions"

$userId = (Get-AzContext).Account.Id
Set-AzKeyVaultAccessPolicy -VaultName $kvname -UserPrincipalName $userId -PermissionsToStorage get, list, delete, set, update, regeneratekey, getsas, listsas, deletesas, setsas, recover, backup, restore, purge
When that is done, we’ll need to wait a couple of seconds for the role assignments to propagate fully in Azure. The role assignment that is the most critical here is the permission of key vault over the storage accounts. I have a 30 second sleep in the script itself. After that sleep, we can add the storage accounts to key vault.
# Add storage accounts to key vault
$regenPeriod = [System.Timespan]::FromDays(2)
Write-Output "Sleeping 30 seconds to have role assignments propagate and catch up"
Start-Sleep -Seconds 30
Write-Output "Done sleeping. Add storage accounts to key vault"

Add-AzKeyVaultManagedStorageAccount -VaultName $kvname -AccountName $staccname -AccountResourceId $stacc.Id -ActiveKeyName $storageAccountKey -RegenerationPeriod $regenPeriod
Add-AzKeyVaultManagedStorageAccount -VaultName $kvname -AccountName $staccname2 -AccountResourceId $stacc2.Id -ActiveKeyName $storageAccountKey -RegenerationPeriod $regenPeriod
With that done, we can onboard the first storage account. What we need to do here is configure a SAS definition in Key Vault. For this first storage account, we’ll configure very fine permissions: only read and list allowed for the blob service. This will protect the account in case the SAS token would potentially leak.
# Onboard first account with list/read permissions only
Write-Output "Onboard first account with list/read permissions only"

$storageContext = New-AzStorageContext -StorageAccountName $staccname -Protocol Https -StorageAccountKey Key1
$start = [System.DateTime]::Now.AddDays(-1)
$end = [System.DateTime]::Now.AddMonths(1)

$sasToken = New-AzStorageAccountSasToken -Service blob -ResourceType Container,Object -Permission "rl" -Protocol HttpsOnly -StartTime $start -ExpiryTime $end -Context $storageContext

Set-AzKeyVaultManagedStorageSasDefinition -AccountName $staccname -VaultName $kvname `
-Name $SASDefinitionName -TemplateUri $sasToken -SasType 'account' -ValidityPeriod ([System.Timespan]::FromDays(1))
Then we do the same for the second storage account. For the second one, we will configure a SAS policy that will only allow write and list operations. (I’m going to say it here already, having no read access on the destination account will not allow ADF to do integrity validation of the data that is written. This can be fine if you don’t want integrity validation, but if you want this, you’ll also want to add read permissions. Later on in the demo you’ll see my first pipeline run fail because I turn on integrity validation, but don’t have read permissions.)
# Onboard second account with write/list permissions only
Write-Output "Onboard second account with list/read permissions only"

$storageContext = New-AzStorageContext -StorageAccountName $staccname2 -Protocol Https -StorageAccountKey Key1
$start = [System.DateTime]::Now.AddDays(-1)
$end = [System.DateTime]::Now.AddMonths(1)

$sasToken = New-AzStorageAccountSasToken -Service blob -ResourceType Container,Object -Permission "wl" -Protocol HttpsOnly -StartTime $start -ExpiryTime $end -Context $storageContext

Set-AzKeyVaultManagedStorageSasDefinition -AccountName $staccname2 -VaultName $kvname `
-Name $SASDefinitionName2 -TemplateUri $sasToken -SasType 'account' -ValidityPeriod ([System.Timespan]::FromDays(1))
Finally, we can check that the secrets work correctly by getting a SAS token for each account. The name of the secrets is important here. The secrets don’t show up in the Azure portal. The secrets have the naming pattern storageAccountName-SASDefinitionName.
# Getting secrets to verify everything works
Write-Host "Getting secrets to verify things work."

$secret = Get-AzKeyVaultSecret -VaultName $kvname -Name "$staccname-$SASDefinitionName"
$secret.SecretValueText
$secret = Get-AzKeyVaultSecret -VaultName $kvname -Name "$staccname2-$SASDefinitionName2"
$secret.SecretValueText
And this concludes setting up the storage accounts and key vaults. We can now use both in Azure Data Factory.
Setting up the Azure Data Factory
Since the ADF piece is the interesting piece I wanted to dive into, I’ll do this work via the portal. To start, we’ll create the actual data factory. Look for Azure Data Factory in either the Azure search bar or in the marketplace. This will open the creation wizard for a new ADF:
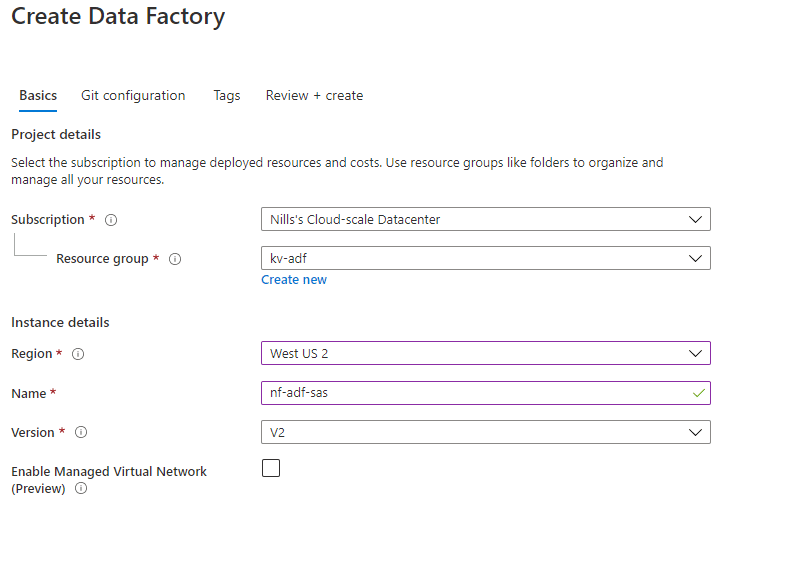
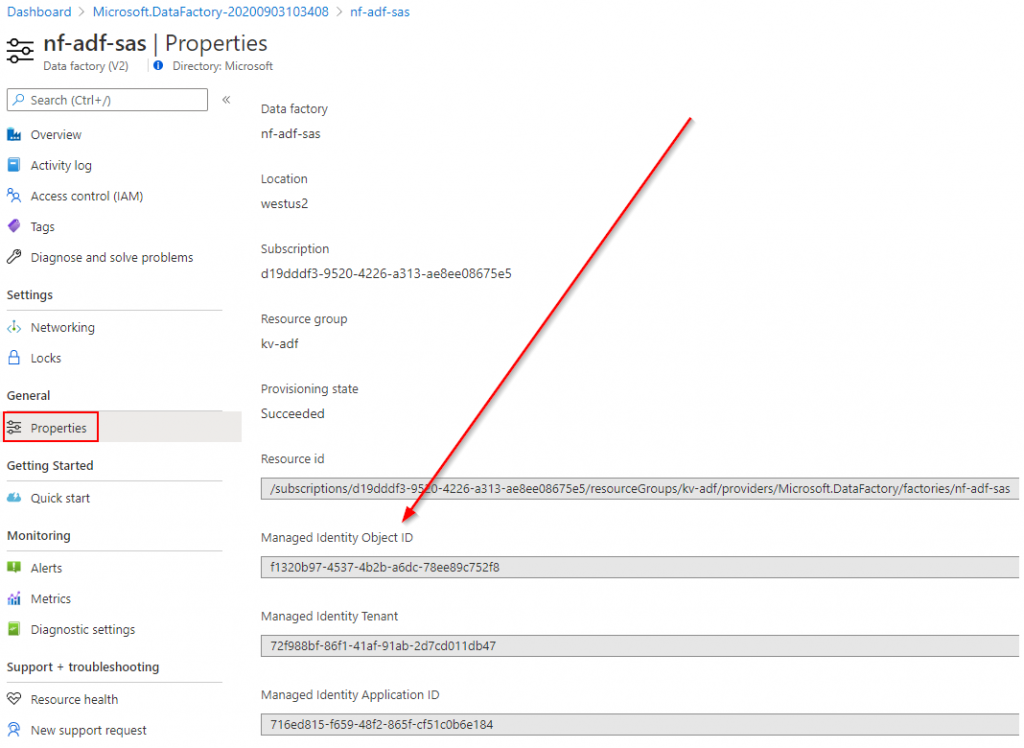
I just filled in the basics, and skipped the git integration for now. When the ADF is created, the first thing we’ll do is give this ADF permissions to Key Vault. We could do this later on in the pipeline creation wizard, but I’d like to show this manually here. What we need here is the managed identity object ID, and then give that permissions in key vault. To start, get this object ID from the properties:
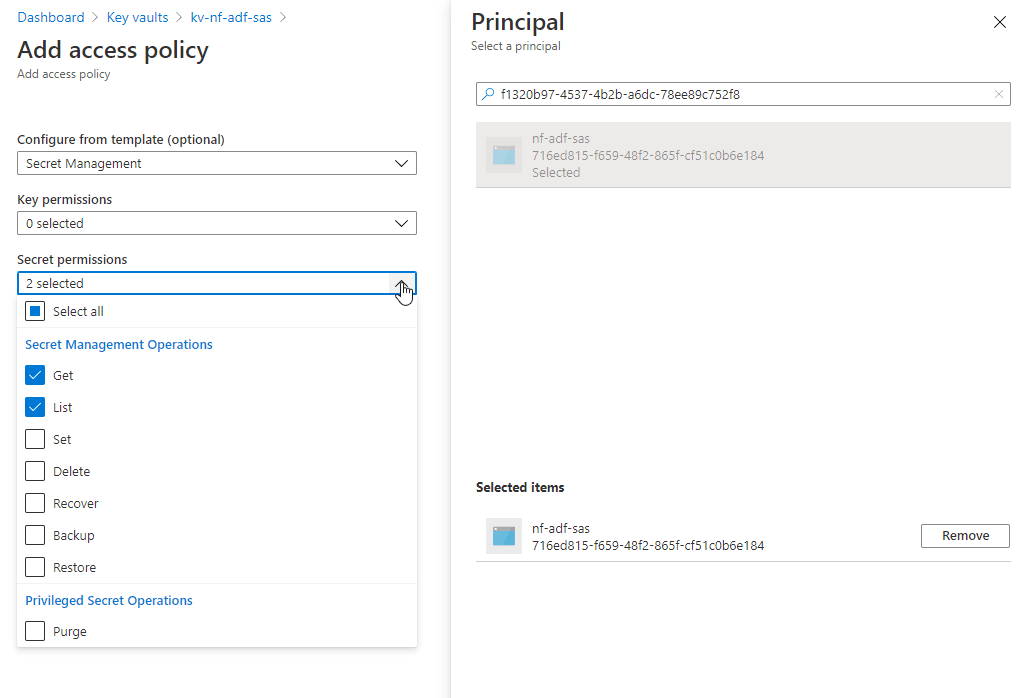
Then open your key vault, and add an access policy. Look for the managed identity of your ADF by using the object ID, and give it secret list and get permissions.
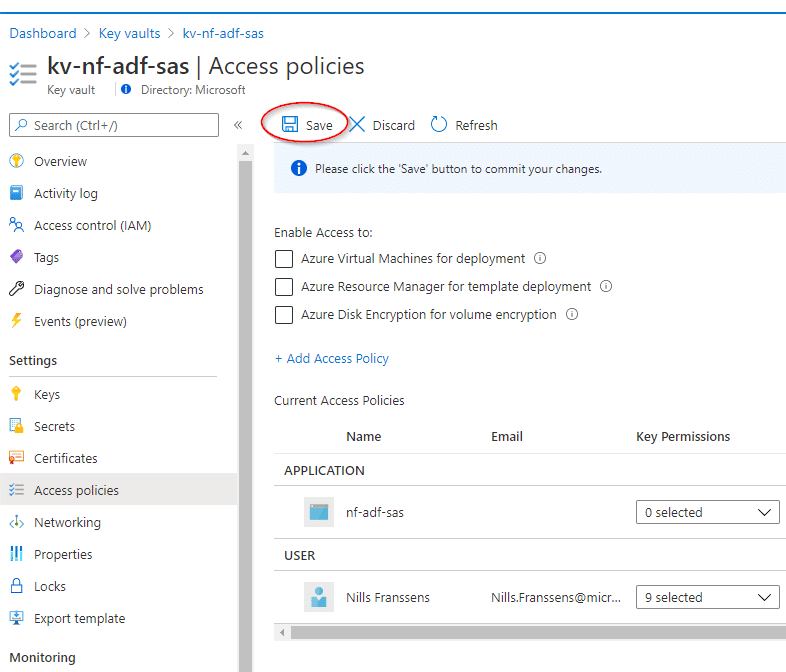
Important gotcha now, once you add the access policy, you can’t forget to actually save the access policy. Hit the save button before you move forward.
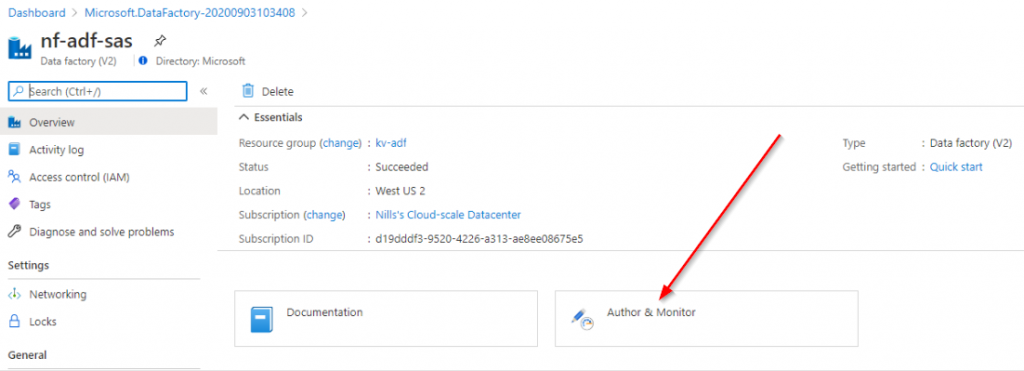
With that setup, we can open up the ADF editor. Go back to your ADF, and hit the Author and Monitor button:
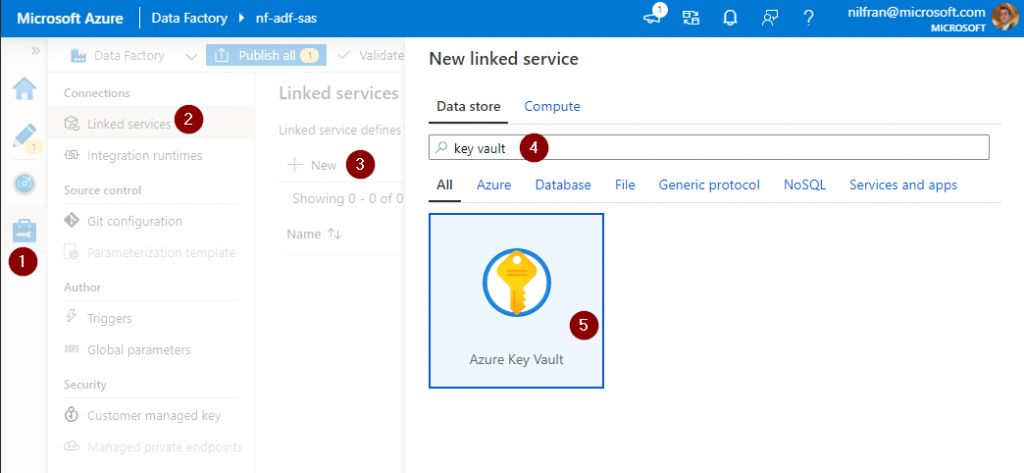
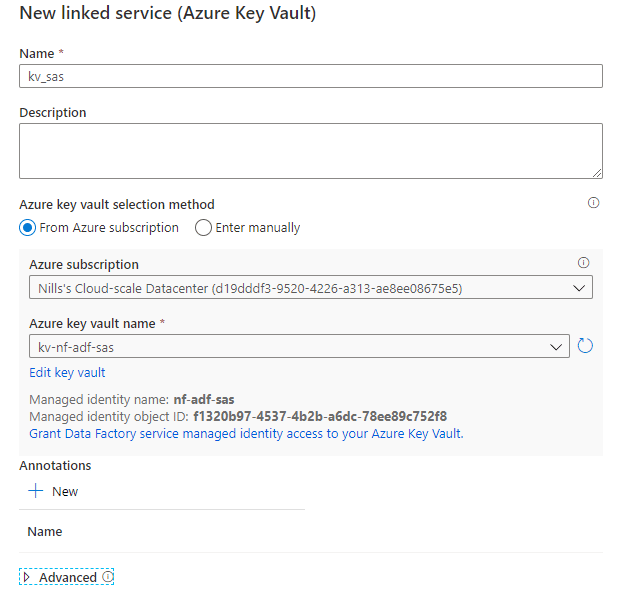
In this window, we’ll start off by adding the linked services we need. We need our key vault and both storage account. To add a linked service, start by clicking the manage button, go to linked services, hit the add button and look for Azure Key Vault:
Then look for the Azure Key Vault we created earlier. As you can see, we could provide permissions to key vault for the identity of ADF here as well, but I wanted to actually show this manually so you know where to look for this.
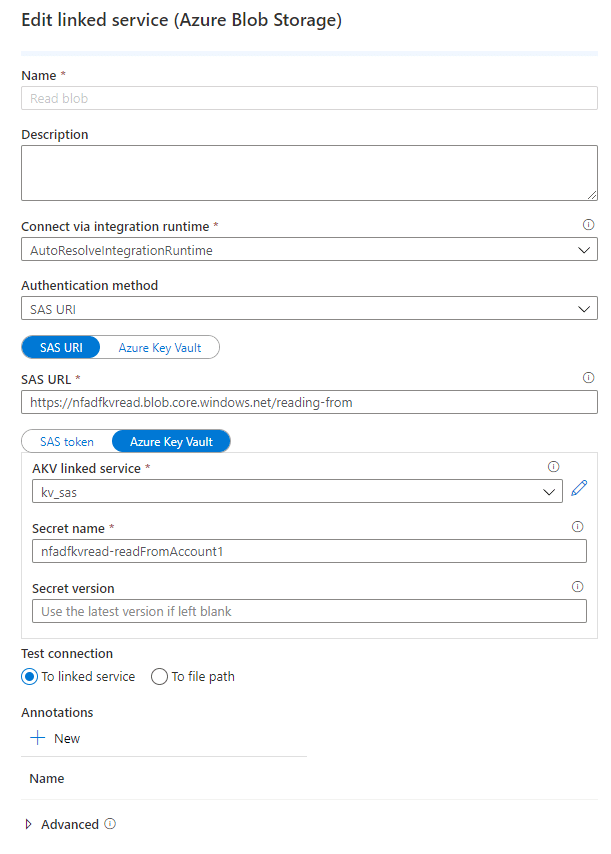
Next up, add another linked service and look for Azure blob storage. In there, provide the following details:
- Authentication method: SAS URI
- Select SAS URI
- Provide the URL of the container in blob you want to monitor
- Select Key Vault
- Select the key vault we configured before
- Provide the secret name as
storageAccountName-SASDefinitionName.
You can test this connection, and it should work.
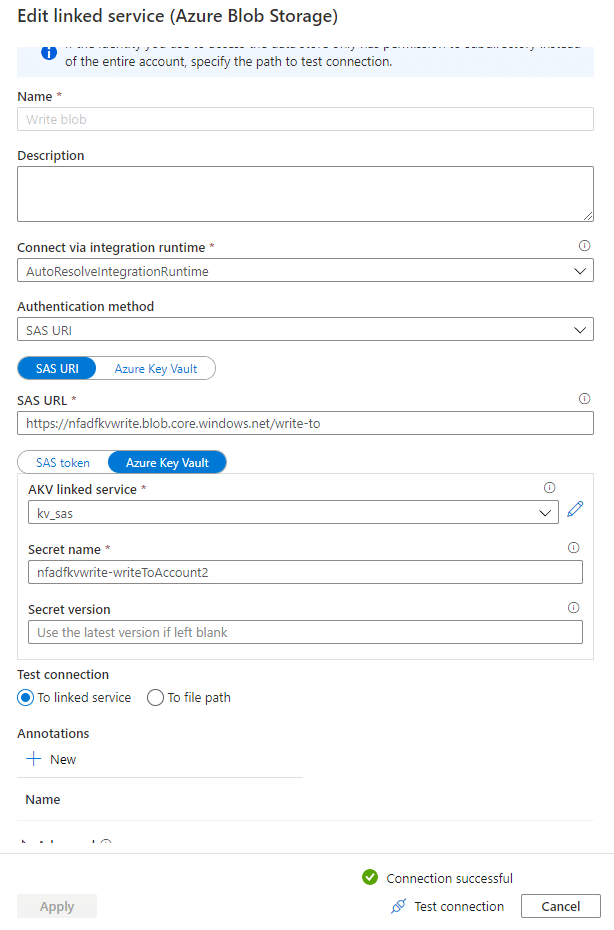
Do the same for the second account, changing the account name and the secret name.
That’s the setup of the data factory. Next step is to actually build the copy activity:
Building the copy activity
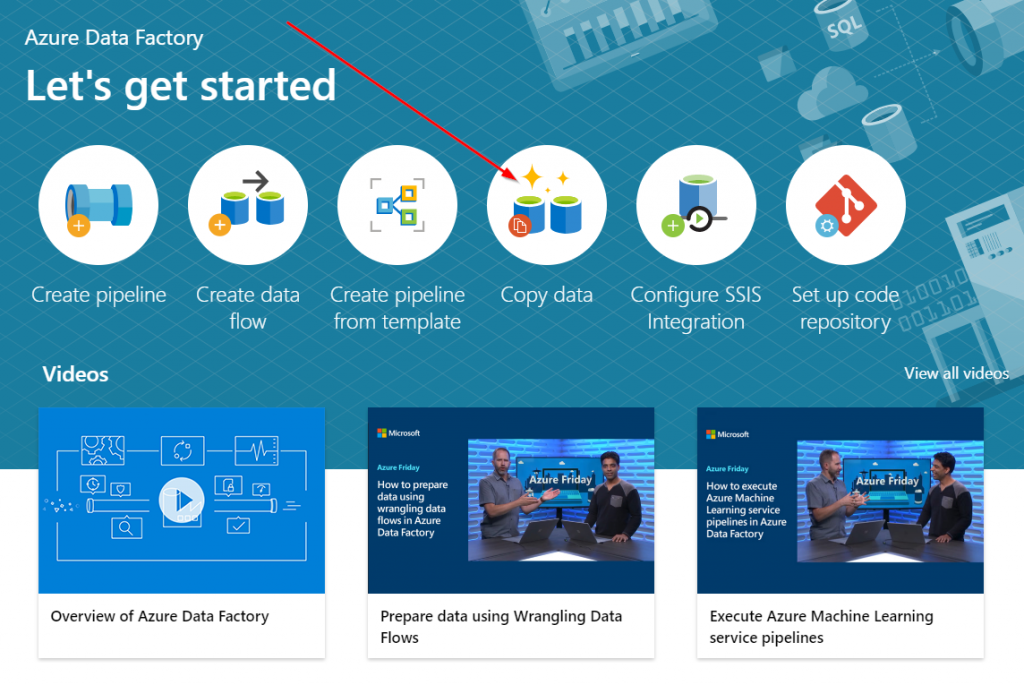
To start building the copy activity, select the copy data wizard in the ADF wizard getting started page.
This is a guided wizard that will walk us through the copy activity. It’s pretty straightforward and well explained. Let me walk you through it:
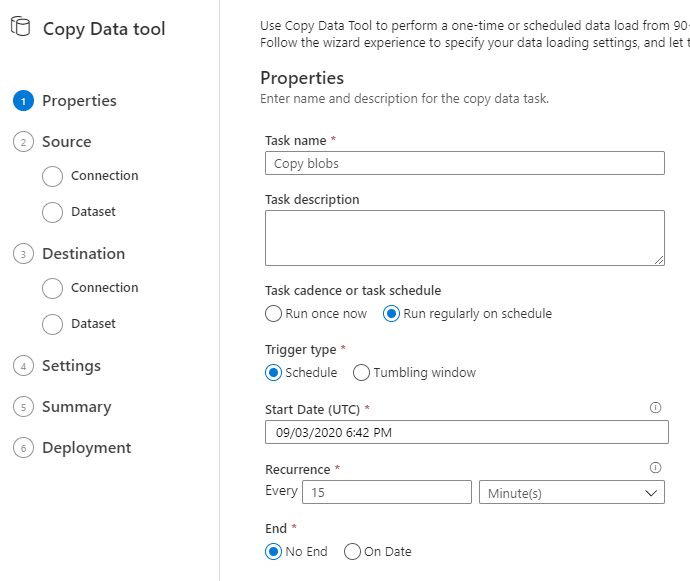
Step one is to provide the metadata of the copy activity. I configured mine to run once every 15 minutes.
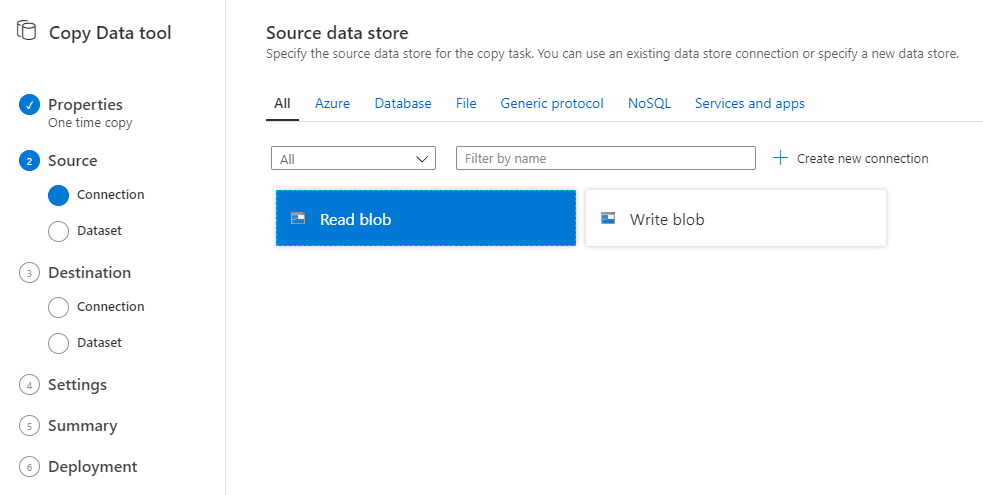
Next, you’ll select the source. Select the Read blob connection we created earlier:
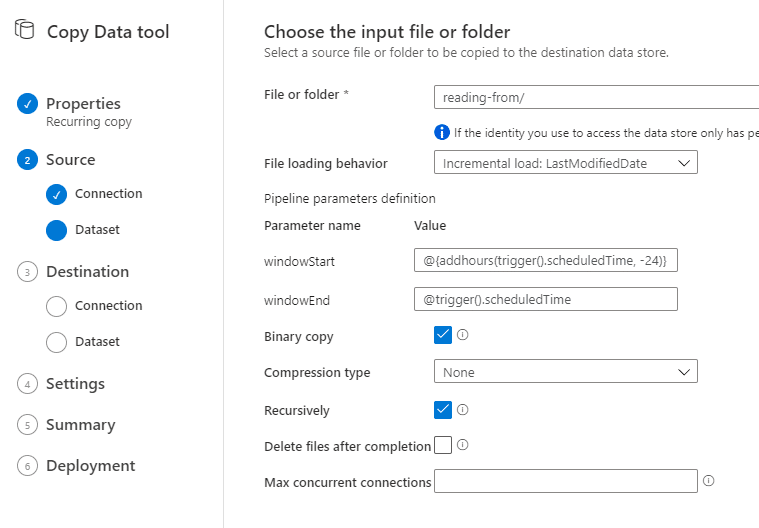
Then, we’ll provide additional details for the read blob connection. I configured the file loading behavior to be based on the LastModifiedDate and to do an actual binary copy without compression.
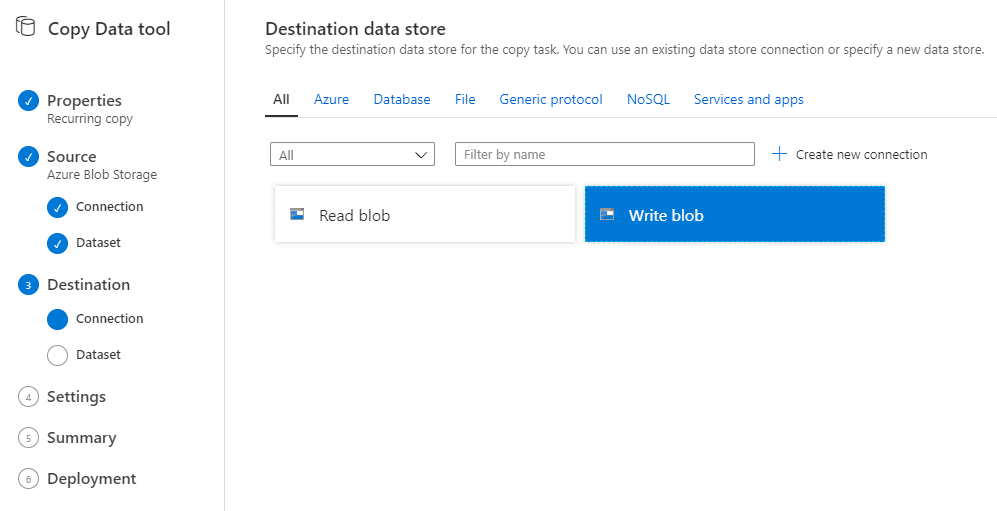
Next up, we’ll select the write blob connection we configured earlier as the destination of this copy activity.
This also asks you for additional configuration information. In my case, I only provided the target container to store the data into.
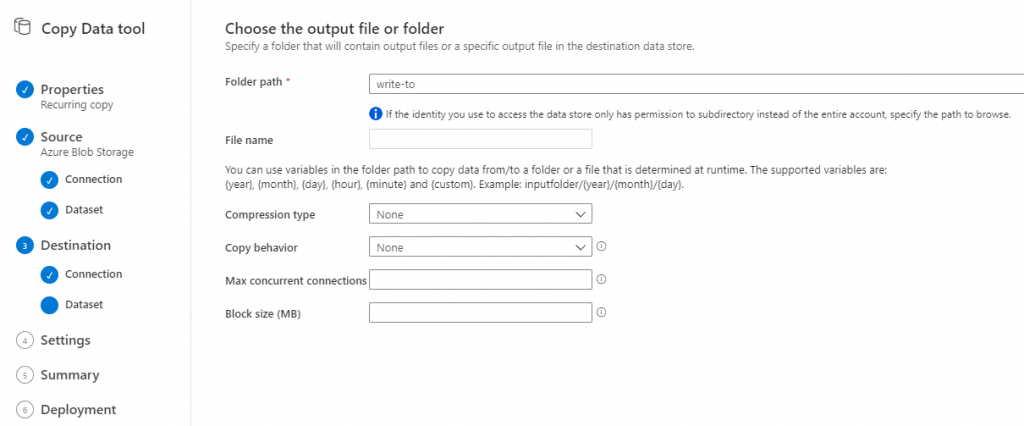
Then we’ll provide additional settings for the copy activity. I configured additional data consistency verification and provided a container in my writing storage account to write logs to. (If you followed along earlier in the blob, you’ll remember that the data consistency verification will actually cause my pipeline to fail because I don’t have read permissions in the target storage account. We’ll change this later on).

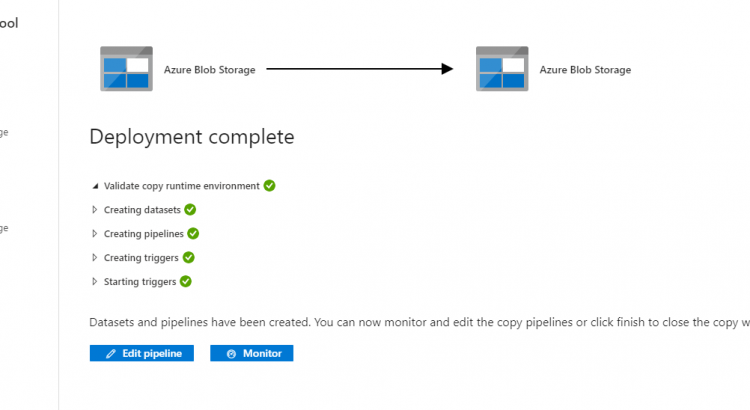
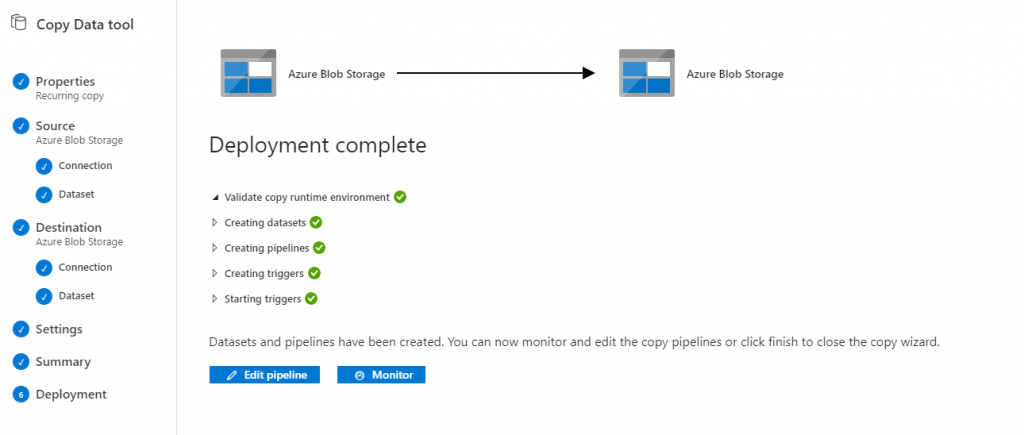
Finally, we’ll get a summary (no screenshot) and we can deploy the copy operation. This will create a pipeline in ADF.
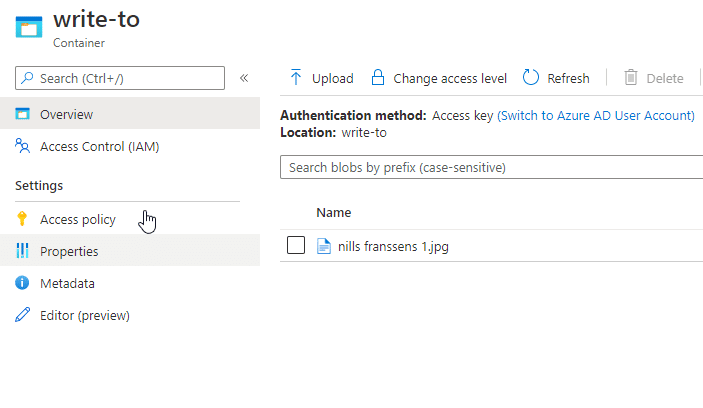
To have a file to copy, I uploaded a file to blob storage that will be picked up by ADF in 15 minutes when it runs.
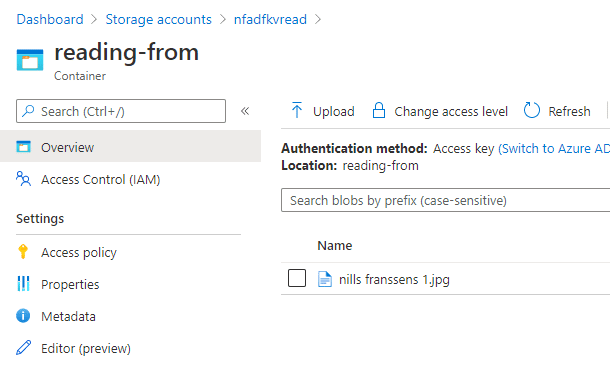
After waiting a couple minutes, the ADF was triggered, and I could see the file appear in my destination store. (which is good)
However, checking the ADF logs showed an error:
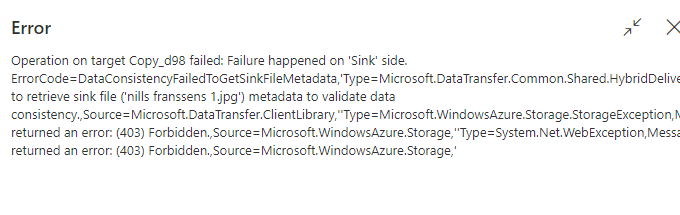
This shows that ADF couldn’t retrieve the sink file, meaning the file in the target store. Let’s have a look at solving the error:
Solving the data consistency error (can’t read from sink)
There are two ways to solve this error:
- Add read permissions to the SAS token.
- Disable consistency checks.
In my case, I actually went ahead and added read permissions to the SAS token. I did this using PowerShell (this is part of the comments below in the GitHub script btw.)
# Change SAS token to include read for second account
Remove-AzKeyVaultManagedStorageSasDefinition -AccountName $staccname2 -VaultName $kvname `
-Name $SASDefinitionName2


$storageContext = New-AzStorageContext -StorageAccountName $staccname2 -Protocol Https -StorageAccountKey Key1
$start = [System.DateTime]::Now.AddDays(-1)
$end = [System.DateTime]::Now.AddMonths(1)

$sasToken = New-AzStorageAccountSasToken -Service blob -ResourceType Container,Object -Permission "wlr" -Protocol HttpsOnly -StartTime $start -ExpiryTime $end -Context $storageContext

# Need to give this a new name due to default key-vault soft delete behavior
$newSasName = $SASDefinitionName2 + "bis"
Set-AzKeyVaultManagedStorageSasDefinition -AccountName $staccname2 -VaultName $kvname `
-Name $newSasName -TemplateUri $sasToken -SasType 'account' -ValidityPeriod ([System.Timespan]::FromDays(1))

$secret = Get-AzKeyVaultSecret -VaultName $kvname -Name "$staccname2-$newSasName"
$secret.SecretValueText
As you can see in the script above, I actually needed to change the name of the SASDefinition. I believe this is due to default Key Vault soft delete behavior. Because I was a little lazy, I just gave it a new name. (in all honesty, I wasn’t 100% lazy. I tried hard deleted the soft deleted SAS definition, but it appears Az PowerShell doesn’t support this yet. I plan to open a GitHub once this blog is posted).
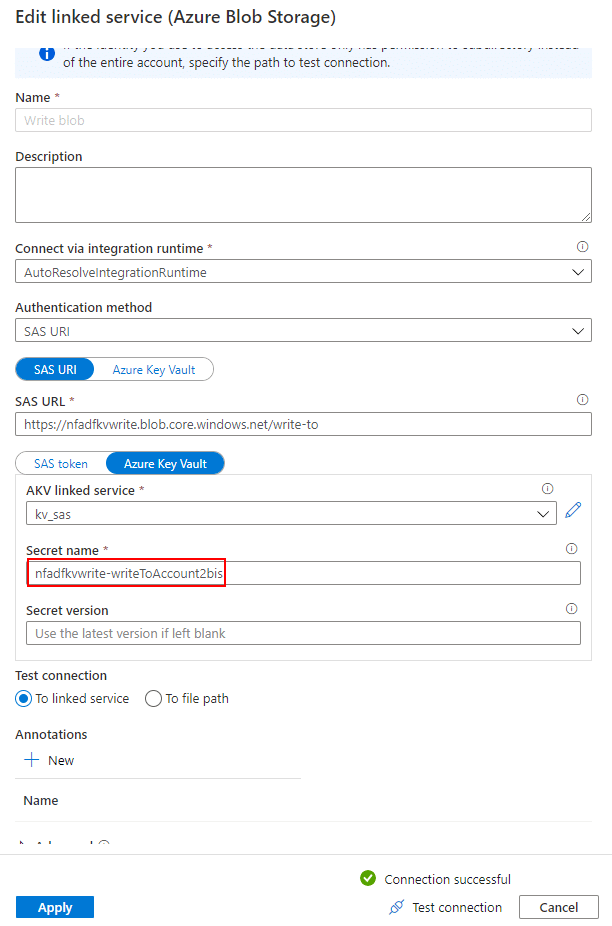
With the new secret created, we need to change the storage account 2 definition. We’ll do that in the linked services. There we’ll provide the updated secret name:
And with that out of the way, let’s test our pipeline again. I uploaded a second file to our read container:
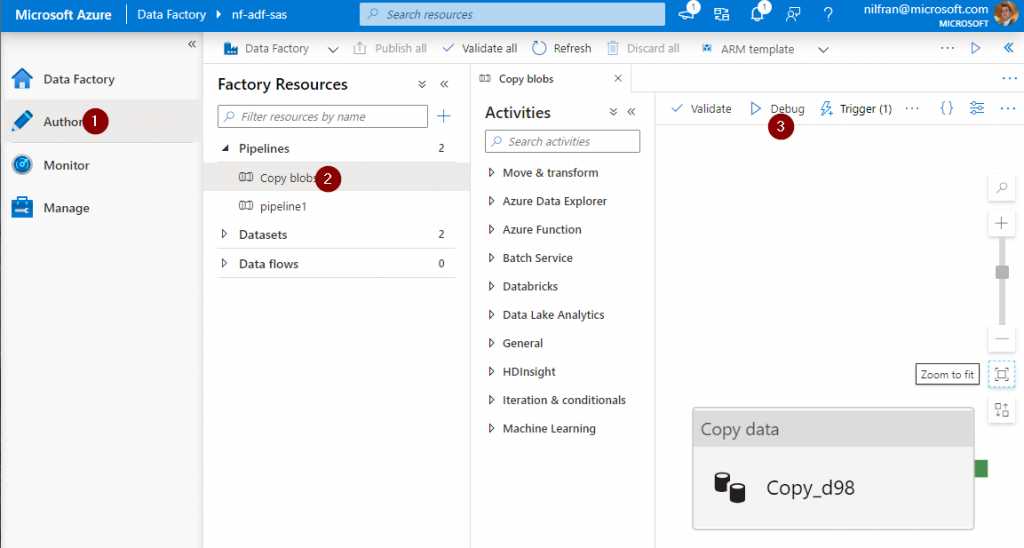
This time, I don’t want to wait 15 minutes for the pipeline to trigger. In stead, I’ll head over to the designer, select our pipeline and hit the debug button:
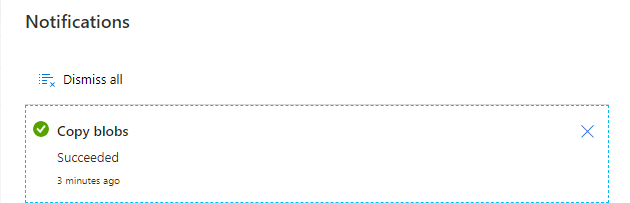
And this time, the copy job succeeded succesfully:
Summary
In this post we explored how we can use SAS tokens provided by Key Vault to move data between storage accounts. We configured Key Vault to manage 2 storage accounts, and configured fine grained control in the SAS token on which permissions were allowed on which account. We hit a small issue with the data consistency check, but were able to solve this by editing the write SAS policy.