I’ve done some work with a customer lately, where I helped them build a mutating admission controller on Kubernetes. The goal of this blog post is to explain what admission controllers are and how to deploy them on Kubernetes. To keep the content of the post manageable, the development of the admission controller itself is not handled. That will be the matter for a future post.
As the demo in this post, we’ll use a mutating admission controller (if you don’t know what that is yet, stay tuned) to influence Kubernetes scheduling decisions. The admission controller we’ll demo will add a toleration to a new pod that gets created to support running them on the virtual kubelet, but only if the cluster doesn’t have enough resources to run that new pod. This means my admission controller will query the Kubernetes API to see if there are enough available resources to schedule the pods on a node in the cluster. You’ll see this in action at the end of this blog post.
In this post, we’ll handle the following topics in order:
- What are admission controllers
- How do admission controllers work
- How to deploy an admission controller on a Kubernetes cluster
- Admission controller in action
What are admission controllers
Admission controllers are a way in Kubernetes to either validate or change requests coming into your Kubernetes cluster. They work on objects in the cluster that get created, updated or deleted. The name “admission controller” and “admission webhook” are used interchangeably, so you might come across both. The reason they are often called a webhook, is because the admission controllers reach out to an external webhook to either validate or change a request.
There are two types of admission controllers:
- MutatingAdmissionWebhook: This controller can both validate and change a request made to your cluster.
- ValidatingAdmissionWebhook: This controller can only validate requests made to your cluster.
They are a perfect tool to implement certain automated policies onto your cluster. An example use case for a mutating webhook is the automatic adding of labels to certain objects; an example use case for a validating webhook is to only allow containers to be run from a trusted registry (that’s defined in the admission controller).
Although not used in this blog post, the Open Policy Agent (OPA) is a popular open-source project that uses these admission controllers to make implementing policy on Kubernetes easier. Rather than having to write your own webhooks to implement your policies, with OPA you can define your policies and submit those to OPA. For more info on OPA, either check out their website or check out this CNCF webinar.
How do admission controllers work
In that webinar, you’ll not only learn about OPA, but you’ll also learn how admission controllers work. I like how Gunjan Patel explains this in detail in that webinar. Let me try to summarize how they work:
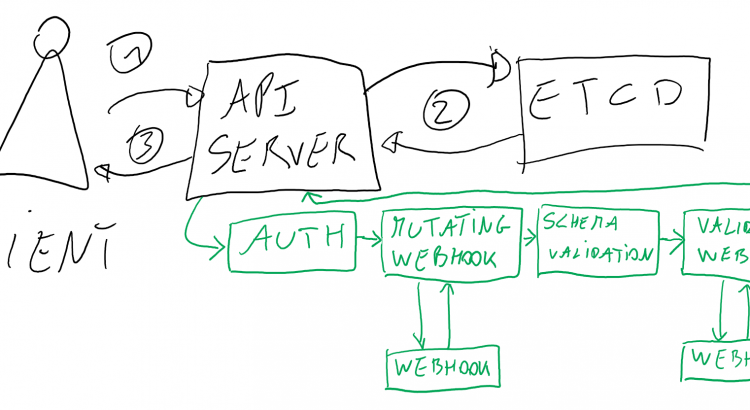
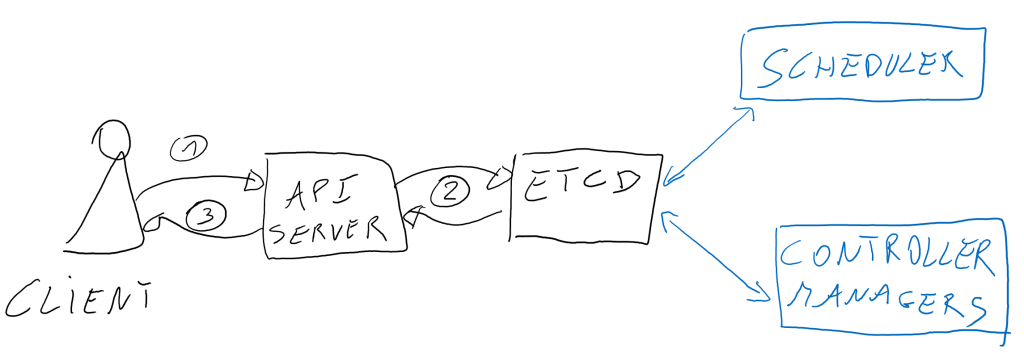
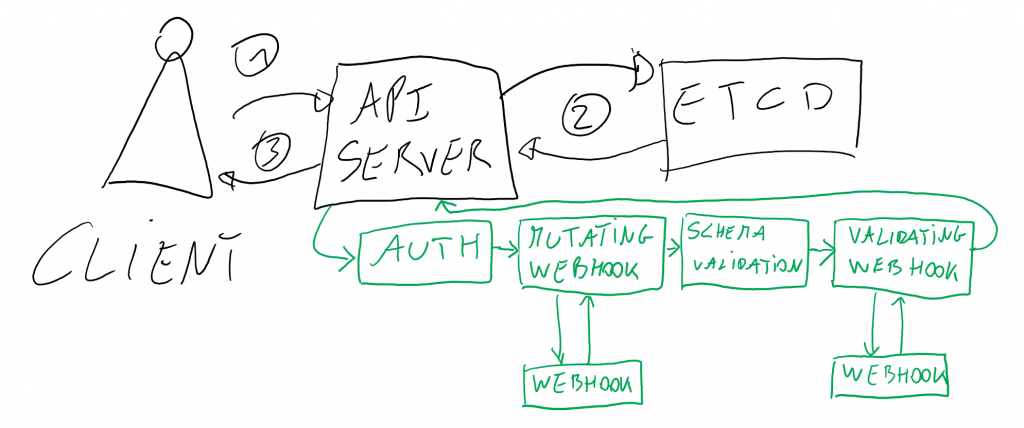
When you make a request to the Kubernetes API server (1), the first job is for Kubernetes to commit the requested state of that request in the control plane (2), specifically in etcd (etcd is the database kubernetes uses in the control plane). Once the state is committed to etcd, you get a success message back (3). The scheduler and controller managers will then get to work and attempt to deploy your desired state to the cluster.
In between step (1) and (2) is where kubernetes does a number of steps to validate the request itself. It checks if the user making the request is authorized to make the request, calls out to mutating webhooks, does schema validation and then checks against a validating webhook. Only if all these steps complete will the request be accepted and be persisted into etcd. This is where admission controllers come in.
The webhook themselves can be hosted anywhere. It’s typical to see them hosted inside the cluster itself (what I’m doing here as well), but you can host them outside the cluster on e.g. an Azure Function or AWS Lambda as well.
That’s a little on how these admission controllers work. Let’s have a look at what it takes to set them up:
How to deploy an admission controller on a Kubernetes cluster
Credit where credit is due, I used this excellent blog as a starting place. However, in my case, I needed a couple of extra things since I’m interfacing with the API-server as well to get nodes and see if pods can be scheduled. All in all, to get the mutating admission webhook to work, I am creating the following:
- A couple RBAC pieces to give the webhook app permissions on the cluster.
- A serviceAccount, to give the deployment a role to access the API server.
- A clusterRole, which defines the API level access.
- A clusterRoleBinding, which links the service account to the clusterRole.
- The webapp for the webhook.
- A secret, containing a certificate that the web app uses to offer TLS.
- A deployment, hosting the web application.
- A service, to route traffic to the web application.
- A MutatingWebhookConfiguration, which is the actual API hook to link API requests to the web application.
Let’s walk through the different elements and how you could deploy those by yourself.
The RBAC pieces
The RBAC pieces are the easy pieces of this deployment. It contains a service account, a clusterRole and a clusterRoleBinding. The clusterRole will give read access to the required resources (pods and nodes). The clusterRoleBinding links the role to the serviceaccount:
apiVersion: v1
kind: ServiceAccount
metadata:
  name: admission-python
apiVersion: rbac.authorization.k8s.io/v1
kind: ClusterRole
metadata:
# "namespace" omitted since ClusterRoles are not namespaced
name: node-pod-reader
rules:
- apiGroups: [""]
resources: ["nodes","nodes/status","nodes/metrics"]
verbs: ["get", "list", "watch"]
- apiGroups: [""]
resources: ["pods"]
verbs: ["get", "watch", "list"] apiVersion: rbac.authorization.k8s.io/v1
kind: ClusterRoleBinding
metadata:
name: get-nodes
subjects:
- kind: ServiceAccount
name: admission-python # Name is case sensitive
namespace: default
roleRef:
kind: ClusterRole
name: node-pod-reader
apiGroup: rbac.authorization.k8s.ioThe webapp
The web app is a little more involved. The first piece is TLS. The webhooks in Kubernetes require TLS to work. I used a self-signed certificate for this. To create the cert, use the following command:
openssl req -x509 -sha256 -newkey rsa:2048 -keyout certificate.key -out certificate.crt -days 1024 -nodesIn Kubernetes, you’ll need base64 versions of the certificate and the key, to get those, run the following command:
cat certificate.key | base64 -w 0
cat certificate.crt | base64 -w 0
And then create a secret in Kubernetes using those base64 strings as values:
apiVersion: v1
kind: Secret
metadata:
  name: python-admission-cert
type: Opaque
data:
  tls.crt: [[base64 tlscrt]]
  tls.key: [[base64 tlskey]]
That’s how to create the secret for the TLS certificate. Next up, is creating the deployment for the webapp. I won’t go into depth on the code in the container (potential for another blog post). In the deployment, there are two pieces to have a look at:
- The service account. This is how we’re linking the service account we created earlier to the deployment.
- The secret mount. This is how the TLS certificate gets loaded in.
apiVersion: apps/v1
kind: Deployment
metadata:
  name: python-admission
spec:
  replicas: 1
  selector:
    matchLabels:
      app: python-admission
  template:
    metadata:
      labels:
        app: python-admission
    spec:
      serviceAccountName: admission-python
      containers:
      - name: python-admission
        image: nfvnas.azurecr.io/python-admission/python-admission:3
        ports:
        - containerPort: 8001
        volumeMounts:
        - name: certs
          mountPath: /var/run/vn-affinity-admission-controller
          readOnly: true
      volumes:
      - name: certs
        secret:
          secretName: python-admission-cert
Finally, we’ll be exposing this deployment using a service. The service will be used by the admission controller later to send traffic to:
apiVersion: v1
kind: Service
metadata:
  name: test-mutations
spec:
  selector:
    app: python-admission
  ports:
  - port: 8001
    targetPort: 8001
And that’s the webapp part. Now up to the actual admission controller:
Admission controller
The final piece to this puzzle is the actual admission controller. As you can see from the definition below, you see that we refer to our test-mutations service on the exposed port. We configure the admission controller to send all pod create requests to the service.
apiVersion: admissionregistration.k8s.io/v1beta1
kind: MutatingWebhookConfiguration
metadata:
  name: mutating-webhook
  labels:
    component: mutating-controller
webhooks:
  - name: test.example.com
    failurePolicy: Fail
    clientConfig:
      service:
        name: test-mutations
        namespace: default
        path: /mutate/pods
        port: 8001
      caBundle: [[base64 tlscrt]]
    rules:
      - apiGroups: [""]
        resources:
          - "pods"
        apiVersions:
          - "*"
        operations:
          - CREATE
Let me show you this in action. As I mentioned, the code of the admission controller itself is outside of the scope of this blog post, but let me show you what the effects look like.
Admission controller in action
Let’s have a look at the admission controller in action. Before doing this, let’s review what it does:
The admission controller will append a toleration to run a pod on the virtual kubelet, only if that pod cannot be scheduled on the cluster itself. I log every request that comes into the admission controller.
The admission controller logs to stdout, which allows us to see when it gets triggered. Let’s setup a tail/follow on the logs:

As you can see, for now, there are (almost) no logs, since we haven’t created any pods. For this test, I have a deployment that creates an Nginx pod with certain memory and cpu requests, but without the virtual kubelet toleration:
apiVersion: apps/v1
kind: Deployment
metadata:
  name: nginx-deployment
  labels:
    app: nginx
spec:
  replicas: 1
  selector:
    matchLabels:
      app: nginx
  template:
    metadata:
      labels:
        app: nginx
    spec:
      containers:
      - name: nginx
        image: nginx:1.14.2
        resources:
            requests:
              memory: 100Mi
              cpu: 400m
            limits:
              memory: 100Mi
              cpu: 400m
        ports:
        - containerPort: 80
      nodeSelector:
        kubernetes.io/os: linux
If we create this, we can see we now have one pod, hosted on a real node.

What’s more, we can also see that this triggered our admission webhook and we see an entry in the logs.
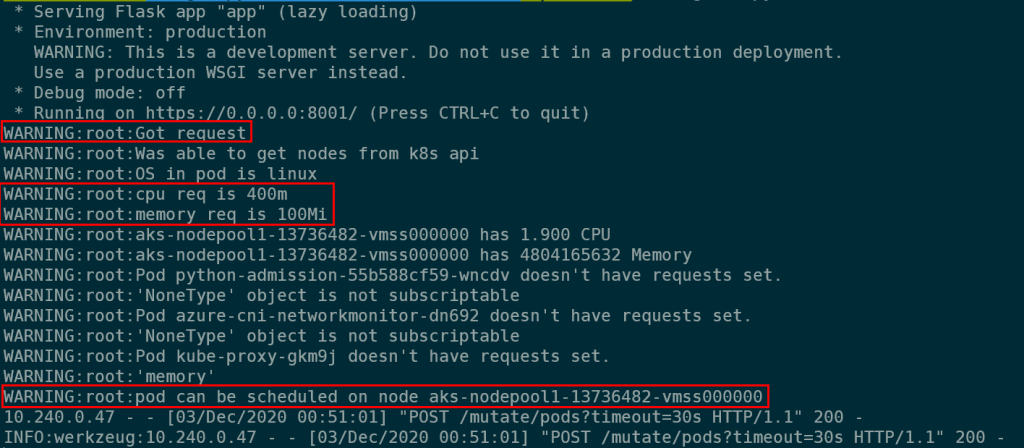
There’s some more verbose logging in the system that you can safely ignore.
We can now scale out the deployment to saturate the physical nodes.

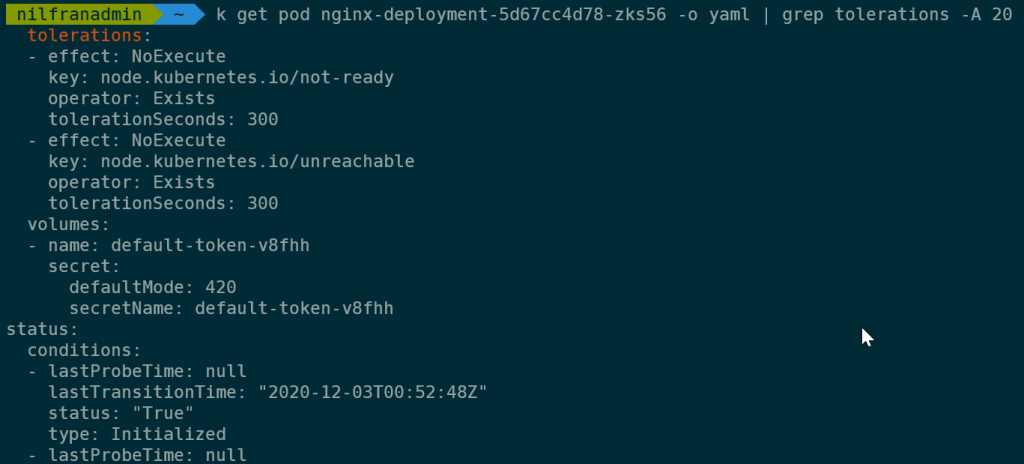
And if we were to check the YAML definition of those pods, none of these have the toleration for the virtual kubelet set.
If we keep scaling out however, we would exhaust the cluster capacity and new pods would be scheduled on virtual kubelet nodes.

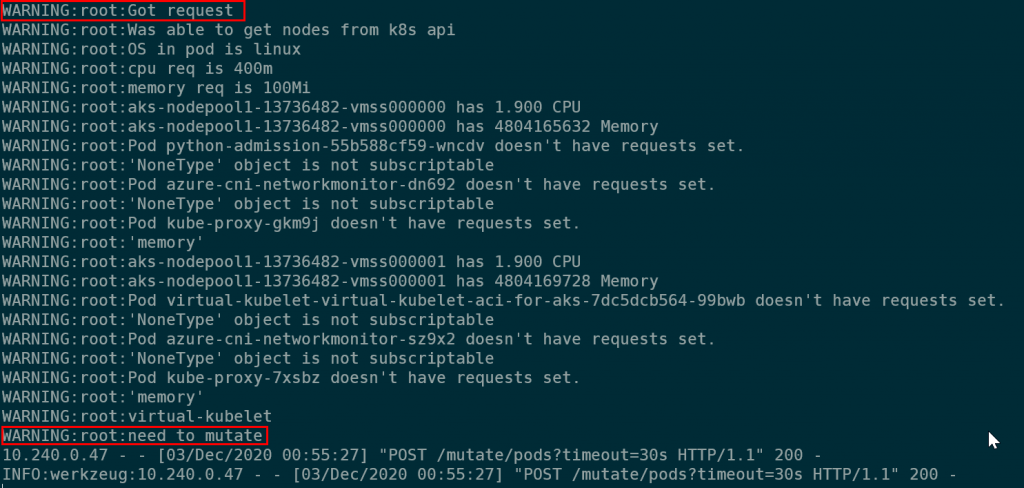
If we check the logs of the admission controller pod, we will see that it added the toleration:
And if we check the toleration on the new pod, we’ll see that the virtual kubelet toleration is present:
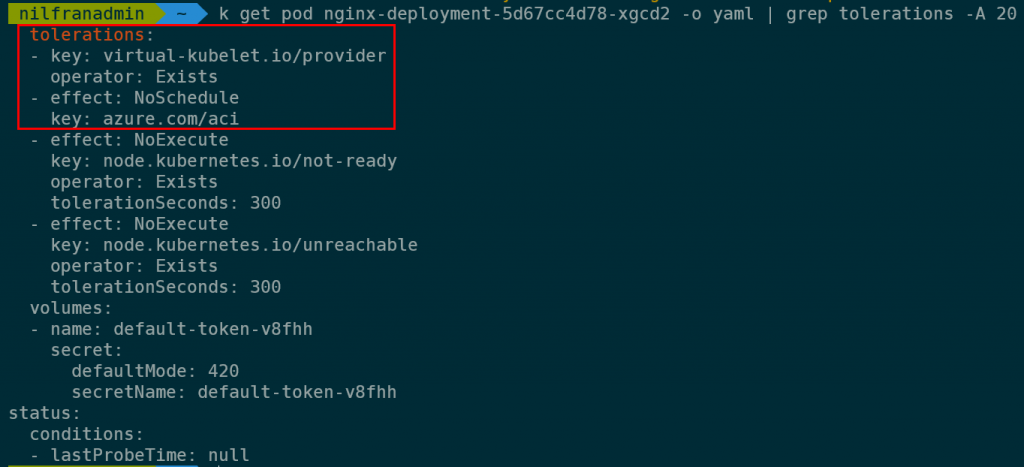
That toleration is not part of the deployment but was set dynamically by the mutating webhook, because the pod couldn’t be scheduled on the cluster anymore. That’s exactly what we wanted to achieve.
Summary
In this blog post we explored what it takes to set up a mutating admission webhook in Kubernetes. We explored this very practically with an example of a mutating webhook running. We showed that this mutating webhook can add a toleration to pods, based on information from the cluster itself.