I have had the idea about writing about container and kubernetes networking for a while. Every time I dove in the research, I started looking at the networking aspects from a bottom-up lens. This means, starting at the Docker layer, moving into IPtables and into Kubernetes networking.
What I learned about customer conversations about Kubernetes networking – and more specifically AKS networking – is that most people deal with top-down questions (e.g. how to integrate AKS with API management) rather than bottom-up questions (what do all these IP-tables rules mean).
The impetus for me publishing this post is a customer call that one of my colleagues Moonis Tahir pulled me into last week. A customer had some questions about integrating their AKS cluster with API Management and the Application Gateway. This has nothing to do with docker, iptables, and not even with the discussion around basic vs advanced networking in AKS. This has to do with how does a kubernetes cluster and its resources present themselves in a customer scenario, and how can the surrounding infrastructure integrate with that cluster.
During this post I hope to first introduce you to a couple of concepts around Kubernetes networking and how to present your services (or applications) outside of the AKS cluster. Afterwards we’ll put this into practice by publishing an API through API management. All of this done as much as possible through Terraform. I read that it should be possible to even deploy your Kubernetes deployments and services using Terraform, and I want to give that a spin.
I would also like to touch on how to integrate the Application Gateway with AKS, and I’ll reserve that right for a follow-up post.
All code for this blog post can be found here.
With that, let’s get started with a couple of concepts:
Kubernetes Services
In this section of the post, we’ll take at why it’s a bad idea to route traffic directly to pods and why you should use a Kubernetes service. We’ll also look into how we can publish a service privately in AKS.
A deployment in Kubernetes is a cluster managed resource that will create and manage the containers or pods that your application requires. A deployment will create a ReplicaSet, which will in turn make sure the right amount of pods is always present for your application. If a pod dies, or a host dies and pods running on it dies, the Replicaset will ensure that your deployment will match its desired state and will create new pods on a new host.

This has impact on the networking aspects of your application. While it is feasible to connect directly to your pods, this is typically not something you should be planning on. A pod is an ephemeral resource, meaning it might (and will) not be persistent in your cluster, its artifacts might change. Practically speaking, a pod might be running on Host A today, and be rescheduled to run on Host B tomorrow – meaning it’s IP address will change.

To solve this challenge, Kubernetes has an object called a service. A service is a network level abstraction on top of the pods in your deployment. Where I mentioned before that you typically do not directly connect to your pods, you do connect to a service in Kubernetes.
In practice, a service is nothing more than a load balancer and a couple of NAT rules. On a cloud provider’s platform (this is not AKS specific), when you deploy a service, Kubernetes will actually deploy a load balancer from that cloud provider (an Azure Load Balancer in the AKS case). This load balancer will do health checks and will perform the actual balancing of the load between your back-end nodes.
By default on AKS, this will create a load balancer with an external IP address. This is ideal to publish your service to the outside world. This is however not a desired outcome if you want to publish your API through API management as we are intending to do today. With AKS, you have the option to publish your service to an internal load balancer through the use of a kubernetes annotation. The following code snippet will create a service that is ‘fronted’ by an internal load balancer:
apiVersion: v1
kind: Service
metadata:
  name: internal-app
  annotations:
    service.beta.kubernetes.io/azure-load-balancer-internal: "true"
spec:
  type: LoadBalancer
  ports:
  - port: 80
  selector:
    app: internal-app
This means that our service will only be available to other resources in the private address space that our Kubernetes cluster is deployed in. In the case of API Management that works out well, as we have the ability to deploy both our Kubernetes cluster as well as our API management instance into a VNET. Looking at this graphically, the following two pictures depict the architecture we’ll build in the next. If you’re wondering why two different visualizations, check out my blog post about PlantUML.
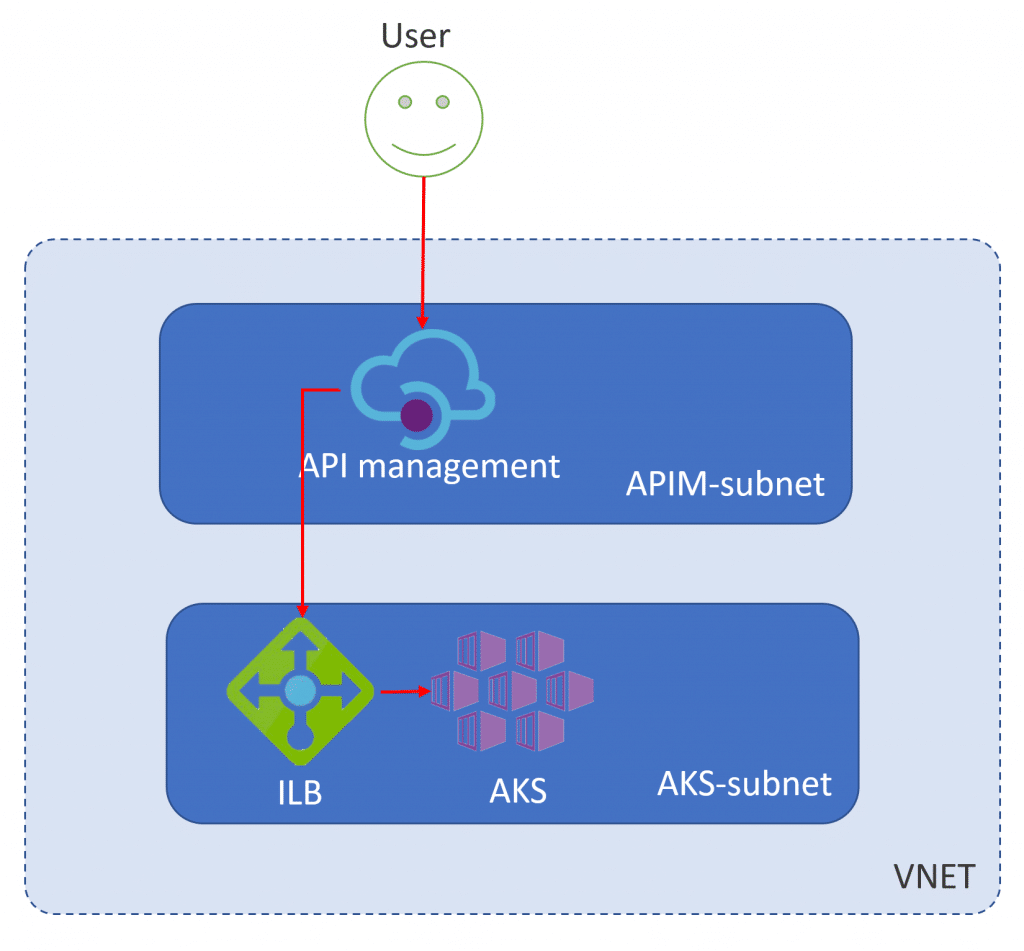
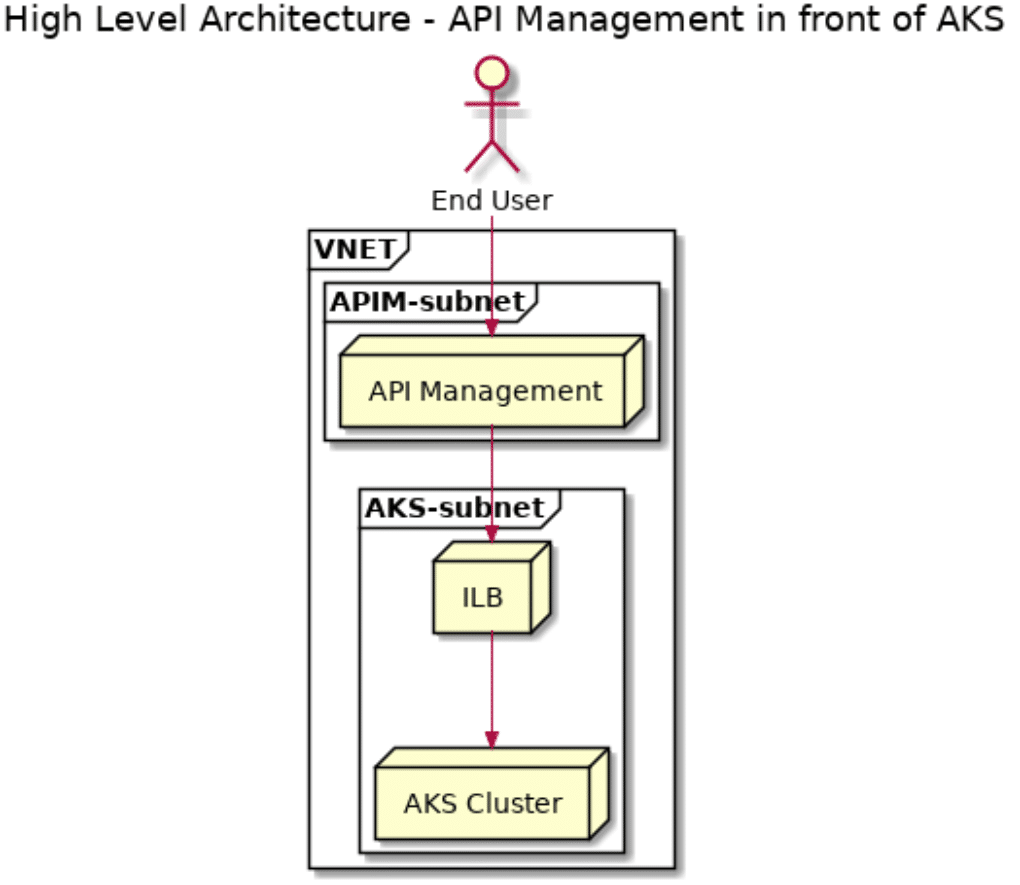
Putting API management in front of our Kubernetes cluster
API management is a managed service in Azure. It provides an API gateway as well as a developer portal. The service itself can be deployed in a VNET, although only the developer and premium SKU support being deployed in a VNET. Because our use case here is just development, and we don’t need an SLA or support, we’ll build this demo using the development SKU. If you’re building this for a production scenario, I highly recommend the premium SKU, as this gives you both an SLA as well as support.
As we’re diving into the deployment, I want to deploy everything with Terraform. In previous posts you might picked up that I’m getting more and more fond of the tool. And I’ve read as well that you can control deployments in your Kubernetes cluster through Terraform, which I have never been able try out, so here goes.
Let’s do this deployment and development iteratively, meaning we’ll want to break things up:
- Create our support infrastructure: a VNET with 2 subnets.
- Deploy an AKS cluster
- Deploy an internal application to that AKS cluster
- Deploy API management
- Deploy our API definition to API management.
Before diving into this however, I did some preparation work, and I discovered that the Terraform Provider for Azure does not yet support VNET deployments for API Management. This PR on Github discusses some of the details. I’m going to be persistent and do as much as possible in Terraform – as I should be able to create the API Management instance and integrate it into a VNET after deployment manually. At least I hope so.
All code for this blog post can be found here.
Step 1: Create a VNET with 2 subnets
Let’s start our deployment with a VNET and 2 subnets in it. This is relatively straightforward Terraform code:
resource "azurerm_resource_group" "apim-aks" {
  name     = "blog-apim-and-aks"
  location = "WestUS2"
}

resource "azurerm_virtual_network" "apim-aks" {
  name                = "apim-aks-vnet"
  address_space       = ["10.10.0.0/16"]
  location            = "${azurerm_resource_group.apim-aks.location}"
  resource_group_name = "${azurerm_resource_group.apim-aks.name}"
}

resource "azurerm_subnet" "aks" {
  name                 = "aks-subnet"
  resource_group_name  = "${azurerm_resource_group.apim-aks.name}"
  virtual_network_name = "${azurerm_virtual_network.apim-aks.name}"
  address_prefix       = "10.10.1.0/24"
}

resource "azurerm_subnet" "apim" {
  name                 = "apim-subnet"
  resource_group_name  = "${azurerm_resource_group.apim-aks.name}"
  virtual_network_name = "${azurerm_virtual_network.apim-aks.name}"
  address_prefix       = "10.10.2.0/24"
}
If you are not familiar with Terraform, you’ll need three commands to start your deployment:
terraform init #this will download the Azure provider, only needed the first time you run terraform on this directory
terraform plan
terraform apply
Step 2: creating an AKS cluster
When creating an AKS cluster, you need a service principal. This SP is used by AKS to create a new RG and deploy the necessary AKS resources (nodes, disks, load balancers …). I decided to give this a try as well in Terraform, instead of re-using an existing one I had. The following code creates a service principal, with a random password. Note: If you’re doing this in a production scenario, be careful with how you manage secret strings in Terraform. My type random_string is actually readable, and stored in the tfstate file. This is not what you would want for a production scenario. Key vault might be a better solution to store the password. As I’m just developing, I don’t care that much – but you should certainly for a production scenario as you don’t want your keys to leak.
resource "random_string" "sp-password" {
  length = 16
  special = true
  override_special = "/@£$"
}

resource "azuread_application" "aksapim" {
  name                       = "nf-aksapim-sp"
  homepage                   = "https://homepage"
  reply_urls                 = ["https://replyurl"]
  available_to_other_tenants = false
  oauth2_allow_implicit_flow = true
}

resource "azuread_service_principal" "aksapim" {
  application_id = "${azuread_application.aksapim.application_id}"
}

resource "azuread_service_principal_password" "aksapim" {
  service_principal_id = "${azuread_service_principal.aksapim.id}"
  value                = "${random_string.sp-password.result}"
  end_date             = "2020-01-01T01:02:03Z"
}
With our SP created (remember, terraform plan, terraform apply) – we can go ahead and spin up our kubernetes cluster with the following Terraform template:
resource "azurerm_kubernetes_cluster" "test" {
  name                = "aks-for-apim"
  location            = "${azurerm_resource_group.apim-aks.location}"
  resource_group_name = "${azurerm_resource_group.apim-aks.name}"
  dns_prefix          = "nfaksapim"

  agent_pool_profile {
    name            = "pool1"
    count           = 1
    vm_size         = "Standard_D2_v2"
    os_type         = "Linux"
    os_disk_size_gb = 30
    type = "VirtualMachineScaleSets"
    vnet_subnet_id = "${azurerm_subnet.aks.id}"
  }

  service_principal {
    client_id     = "${azuread_application.aksapim.application_id}"
    client_secret = "${random_string.sp-password.result}"
  }

}

output "client_certificate" {
  value = "${azurerm_kubernetes_cluster.test.kube_config.0.client_certificate}"
}

output "kube_config" {
  value = "${azurerm_kubernetes_cluster.test.kube_config_raw}"
}
Give this about 5 minutes. We can then get our kubeconfig – and store it on our system, and connect to our cluster.
echo "$(terraform output kube_config)" > ./azurek8s
export KUBECONFIG=./azurek8s
kubectl get nodes
This should show you our one node in the cluster. And with that we can move on to deploy a simple app on our AKS cluster
Step 3: Deploying our app on AKS
Let’s start with testing out the Terraform and Kubernetes integration. We’ll add a new file to our Terraform directory, including a simple pod deployed on Kubernetes.
provider "kubernetes" {

}

resource "kubernetes_pod" "nginx" {
  metadata {
    name = "nginx-example"
    labels = {
      App = "nginx"
    }
  }

  spec {
    container {
      image = "nginx:1.7.8"
      name  = "example"

      port {
        container_port = 80
      }
    }
  }
}
We’ll deploy this using:
terraform init #needed to download kubernetes provider
terraform plan -out kubernetes.out
terraform deploy kubernetes.out
If we do a kubectl get pods, we should see that pod appear. That being said, we won’t be deploying pods, so we’ll remove that part from our Terraform definition. We’ll instead deploy a deployment and a service over an internal load balancer.
As I was developing this, I hit an issue with the service, which was unable to create the load balancer in the subnet. I don’t want to bore you with the investigation – let me share the solution: Our service principal had rights on the managed resource group that AKS created, but not on the VNET that it is deploying in. Add the following snippet of Terraform to your AKS definition to assign those permissions.
resource "azurerm_role_assignment" "test" {
  scope                = "${azurerm_resource_group.apim-aks.id}"
  role_definition_name = "Contributor"
  principal_id         = "${azuread_application.aksapim.application_id}"
}
This will create a role assignment, to give our service principal access to the resource group that contains our VNET.
The following code will then go ahead and create a deployment and a service for you:
provider "kubernetes" {

}

resource "kubernetes_deployment" "example" {
  metadata {
    name = "private-api"
    labels = {
      app = "private-api"
    }
  }
  spec {
    replicas = 2
    selector {
      match_labels = {
        app = "private-api"
      }
    }
    template {
      metadata {
        labels = {
          app = "private-api"
        }
      }
      spec {
        container {
          image = "nginx:1.7.8"
          name  = "private-api"

          resources {
            limits {
              cpu    = "0.5"
              memory = "512Mi"
            }
            requests {
              cpu    = "250m"
              memory = "50Mi"
            }
          }
        }
      }
    }
  }
}

resource "kubernetes_service" "example" {
  metadata {
    name = "private-api"
    annotations = {
        "service.beta.kubernetes.io/azure-load-balancer-internal" = "true"
    }
  }
  spec {
    selector = {
      app = "private-api"
    }

    port {
      port        = 80
      target_port = 80
    }

    type = "LoadBalancer"
  }
}
If you then do a kubectl get svc to show your services, you should see the service appear with a private ip as an external IP.
AME          TYPE           CLUSTER-IP     EXTERNAL-IP   PORT(S)        AGE
kubernetes    ClusterIP      10.0.0.1       <none>        443/TCP        4h9m
private-api   LoadBalancer   10.0.177.167   10.10.1.5     80:30140/TCP   8m14s
So, with that out of the way, we can go ahead and add an API management to our VNET.
Step 4: Add API Management to our VNET
If you remember from earlier, we’ll deploy our API management instance; but then we’ll need to manually add it to our VNET. So, let’s start off with step 1: adding API management to our deployment. This will take a while, so while this is deploying either grab a cup of coffee, or continue with some other the prep steps for the next step.
resource "azurerm_api_management" "apim" {
  name                = "blog-apim"
  location            = "${azurerm_resource_group.apim-aks.location}"
  resource_group_name = "${azurerm_resource_group.apim-aks.name}"
  publisher_name      = "Nills"
  publisher_email     = "nilfran@microsoft.com"

  sku {
    name     = "Developer"
    capacity = 1
  }
}
Disclaimer: Don’t add API Management to your VNET just yet. Doing it now, will be reversed once we add our API through Terraform. This is a bug in the Terraform provider for Azure.
Step 5: Defining our API
The structure within API Management is the following:
- From a technical lens, you define your API as an API in APIM. You define each call with its settings. Within this API, you can define multiple operations.
- You need to define a product, so end-users can subscribe to your API.
- To give those end-users access to your API, you need to link an API to a product.
This looks like this in Terraform:
resource "azurerm_api_management" "apim" {
  name                = "blog-apim"
  location            = "${azurerm_resource_group.apim-aks.location}"
  resource_group_name = "${azurerm_resource_group.apim-aks.name}"
  publisher_name      = "Nills"
  publisher_email     = "nilfran@microsoft.com"

  sku {
    name     = "Developer"
    capacity = 1
  }
}

resource "azurerm_api_management_api" "back-end-api" {
  name                = "example-api"
  resource_group_name = "${azurerm_resource_group.apim-aks.name}"
  api_management_name = "${azurerm_api_management.apim.name}"
  revision            = "1"
  display_name        = "Example API"
  path                = "nginx"
  service_url          = "http://${kubernetes_service.example.load_balancer_ingress.0.ip}"
  protocols           = ["http"]
}

resource "azurerm_api_management_api_operation" "get" {
  operation_id        = "get"
  api_name            = "${azurerm_api_management_api.back-end-api.name}"
  api_management_name = "${azurerm_api_management.apim.name}"
  resource_group_name = "${azurerm_resource_group.apim-aks.name}"
  display_name        = "get"
  method              = "GET"
  url_template        = "/"

  response {
    status_code = 200
  }
}

resource "azurerm_api_management_product" "product" {
  product_id            = "nginx"
  api_management_name   = "${azurerm_api_management.apim.name}"
  resource_group_name   = "${azurerm_resource_group.apim-aks.name}"
  display_name          = "Test Product"
  subscription_required = false
  published             = true
}

resource "azurerm_api_management_product_api" "example" {
  api_name            = "${azurerm_api_management_api.back-end-api.name}"
  product_id          = "${azurerm_api_management_product.product.product_id}"
  api_management_name = "${azurerm_api_management.apim.name}"
  resource_group_name = "${azurerm_api_management.apim.resource_group_name}"
}
We can apply that using a terraform plan -out apim.out and terraform apply apim.out. This shouldn’t take long. What will take long, is finally integrating into our VNET, as we’ll do now.
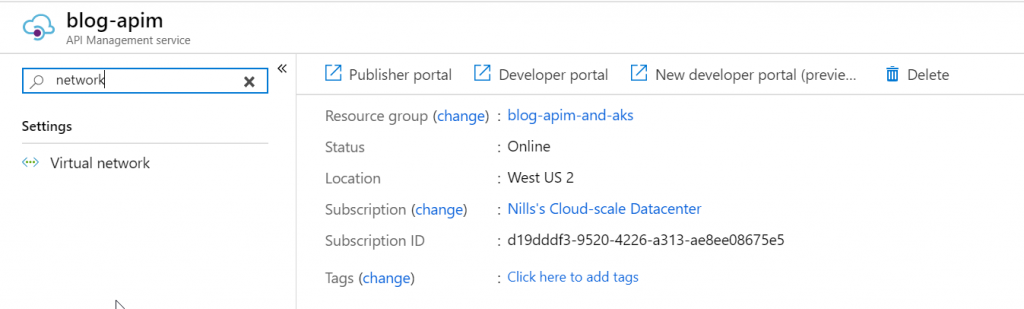
We can integrate APIM manually into the VNET. In the APIM blade, search for ‘network’ and open the VNET blade:
Then go ahead and point the VNET to the VNET we created already:
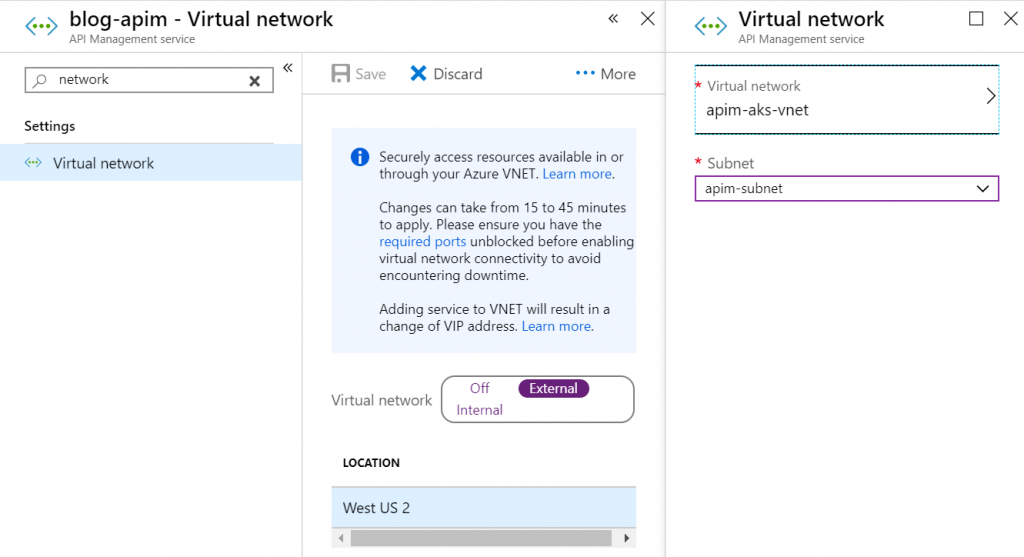
And now, we wait again – as this change will take a while as well.
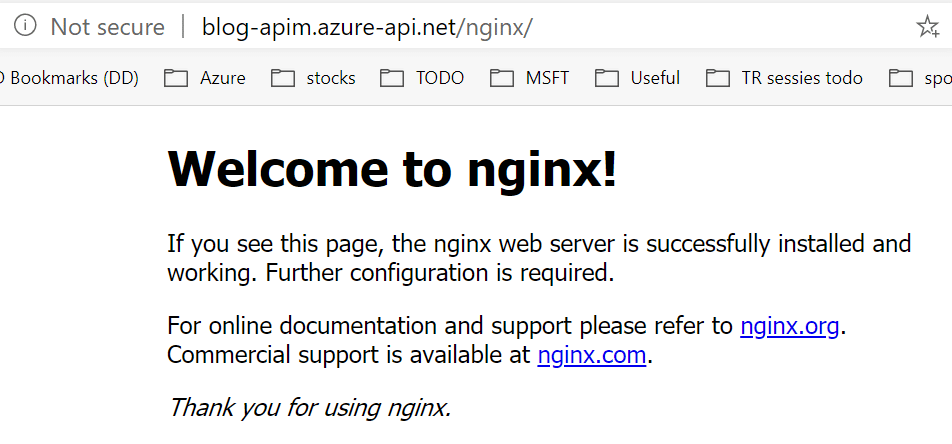
Once this change has been performed, we should be able to access our Nginx page through API Management.
Observations and learning in this experience
I actually learned a couple of things when writing this blog.
- I don’t like defining Kubernetes resources in Terraform. This is the first time I did this, and I actually prefer using the native YAML definition language in Kubernetes to the HCL (json-like) syntax in Terraform. It might be personal, but I found it less productive.
- Using Terraform to deploy API Management doesn’t work with VNETs. Defining APIs and products worked pretty well, but integrating into a VNET doesn’t work as expected. It even reverts manually adding your APIM to a VNET. But this is a bug that is reported, so it can only get better.
- I also learned – although a details – that different services in Azure use different IDs for either the application ID or service principal ID. The templates in this post include the right IDs.
In closing
The goal of this post, was to describe how you can integrate a network appliance in front of an AKS cluster by keeping your Kubernetes deployments private. We demonstrated this using API Management in front of our AKS cluster. We deployed everything using Terraform, and only used the portal once.