I’m presenting at a meetup tonight on the topic of Nodeless and Serverless on Kubernetes. My friend and colleague Richard Spitz is presenting on nodeless kubernetes and the virtual kubelet – while I’ll be taking on the topic of Serverless Kubernetes, with a focus on KEDA.
KEDA (Kubernetes Event Driven Architecture) is a kubernetes component that allows event-driven scale to Kubernetes pods. It is an open-source project, initially developed by Microsoft and Red Hat.
The challenge KEDA solves, is the link between the Kubernetes horizontal pod autoscaler and event sources. I like to think as it as an interface between my event source (e.g. a queue, a bus or HTTP events) and the amount of pods you have running on your cluster. KEDA will act as the scale to 0 or the scale from 0->1, and KEDA will be the event source for the Horizontal Pod Autoscaler for the scaling beyond 1 pod.
From a Microsoft perspective, KEDA is integrated very well with Azure Functions. Azure Functions has the option to run on Kubernetes, but you’d then use the default Kubernetes scaling mechanisms. Combining KEDA with Azure Functions allows you to use different scaling metrics to scale in/out your functions deployment. You don’t have to combine KEDA with Azure Functions, but you can.
So, why don’t we get started? I’ll all of the below on my Ubuntu 18.04 running on WSL.
Prerequisites
First, let’s go ahead and install .net core 3. We’ll use that later when building our testing application.
wget -q https://packages.microsoft.com/config/ubuntu/18.04/packages-microsoft-prod.deb -O packages-microsoft-prod.deb
sudo dpkg -i packages-microsoft-prod.deb
sudo add-apt-repository universe
sudo apt-get update
sudo apt-get install apt-transport-https -y
sudo apt-get update
sudo apt-get install dotnet-sdk-3.0 -y
Although KEDA doesn’t require using Azure Functions, for our demo we’ll be using Azure functions to setup KEDA real easily (single line command). We’ll install the core runtime on our machine.
sudo apt-get install azure-functions-core-tools -yAnother prereq, is to have helm on our kubernetes cluster. To keep things easy, I’ll assume you have a Kubernetes cluster on Azure running in AKS. Depending on how you want to run your demo, you can have a clsuter with or without virtual nodes. I’ll be running this with virtual nodes turned on.
First we’ll get access to our cluster and show our nodes to see if the connection actually works:
az aks get-credentials -n nf-keda -g KEDA
kubectl get nodes
NAME                                STATUS   ROLES   AGE     VERSION
aks-agentpool-32106788-vmss000000   Ready    agent   2d21h   v1.14.6
aks-agentpool-32106788-vmss000001   Ready    agent   2d21h   v1.14.6
aks-agentpool-32106788-vmss000002   Ready    agent   2d21h   v1.14.6
virtual-node-aci-linux              Ready    agent   2d21h   v1.13.1-vk-v0.9.0-1-g7b92d1ee-dev
As you can see, I have a virtual node. More on that later, but let’s go ahead and setup helm on our cluster:
I already had the helm binary on my machine, if you don’t already, go ahead and download the tarbal and move it to a directory that’s on your PATH.
wget https://get.helm.sh/helm-v2.14.3-linux-amd64.tar.gz #look for the latest version here https://github.com/helm/helm/releases
tar -zxvf helm*.tar.gz
sudo mv linux-amd64/helm /usr/local/bin/helm
Next up, we need to setup Tiller (as long as we’re using Helm v2 that is. In v3 there’s no more requirement for Tiller, but that’s still in beta).
If your cluster is RBAC enabled, you’ll need to create a role and rolebinding to make Tiller work correctly. I wrote about this a while ago.
kubectl create serviceaccount --namespace kube-system tiller
kubectl create clusterrolebinding tiller-cluster-rule --clusterrole=cluster-admin --serviceaccount=kube-system:tiller
helm init --service-account tiller
To verify Helm installed correctly, you can run helm version, which should return the following:
Client: &version.Version{SemVer:"v2.14.3", GitCommit:"0e7f3b6637f7af8fcfddb3d2941fcc7cbebb0085", GitTreeState:"clean"}
Server: &version.Version{SemVer:"v2.14.3", GitCommit:"0e7f3b6637f7af8fcfddb3d2941fcc7cbebb0085", GitTreeState:"clean"}
Setting up KEDA on an AKS cluster
There are a couple of ways to setup Keda. The easiest way I found is to the Azure Functions tooling to install KEDA on our cluster.
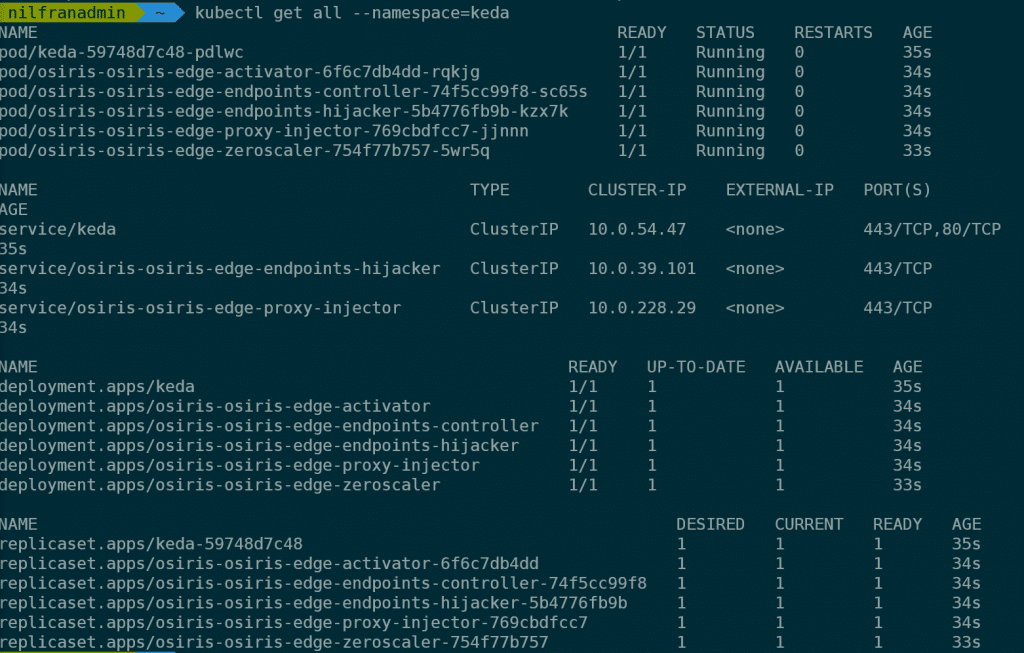
func kubernetes install --namespace kedaThis will install KEDA in our cluster. The installation of KEDA will install KEDA and Osiris in our cluster. To see everything that got installed on our cluster, we can check via kubernetes get all --namespace=keda, which will return the following (screenshot in stead of text as the output is quiet lengthy).
Let’s now go ahead and build a demo app.
Building a demo app
For the demo app, we’ll be using a pre-built C# application that reads from an Azure Service Bus. This demo is following the following quickstart template in the KEDA docs. We’ll do all of this in the keda-bus namespace:
kubectl create namespace keda-busFirst off, we’ll create a Service Bus namespace with a queue and get it’s connection string.
BUSNAMESPACE=nfkedabus
RG=KEDA
QUEUE=orders
AUTH=order-consumer
az servicebus namespace create --name $BUSNAMESPACE --resource-group $RG --sku basic
az servicebus queue create --namespace-name $BUSNAMESPACE --name $QUEUE --resource-group $RG
az servicebus queue authorization-rule create --resource-group $RG --namespace-name $BUSNAMESPACE --queue-name $QUEUE --name $AUTH --rights Manage Send Listen
conn=`az servicebus queue authorization-rule keys list --resource-group $RG --namespace-name $BUSNAMESPACE --queue-name $QUEUE --name $AUTH -o json`
connstring=`echo $conn | jq .primaryConnectionString`
connstring=`echo "${connstring//\"}"`
We’re going to use this connection string and store it as a kubernetes secret for use with our demo.
kubectl create secret generic --from-literal=SERVICEBUS_QUEUE_CONNECTIONSTRING=$connstring --namespace=keda-bus order-secretsNext up, we’ll create the actual application and scaled-object in KEDA. I’ll be pulling the deployment file straight from GitHub, but you can certainly download it and tweak it (which we’ll do later).
kubectl apply -f https://raw.githubusercontent.com/kedacore/sample-dotnet-worker-servicebus-queue/master/deploy/deploy-queue-processor.yaml --namespace keda-busIf we then check everything on our cluster (kubectl get all -n keda-bus), we see 3 resources, but no pods).
- A deployment, with 0/0 ready pods
- A replicaset, with 0 desired pods
- A horizontal pod autoscaler, with 1 minimum and 10 maximum.
Next up, is building some queue messages.
Testing things out
To test things out, Tom Kerkhove built a Service Bus message generator. To get this working, first clone the Github repo and add your connection string to the code:
git clone https://github.com/tomkerkhove/sample-dotnet-worker-servicebus-queue
cd sample-dotnet-worker-servicebus-queue
code .\src\Keda.Samples.Dotnet.OrderGenerator\Program.cs #put your connection string in line 13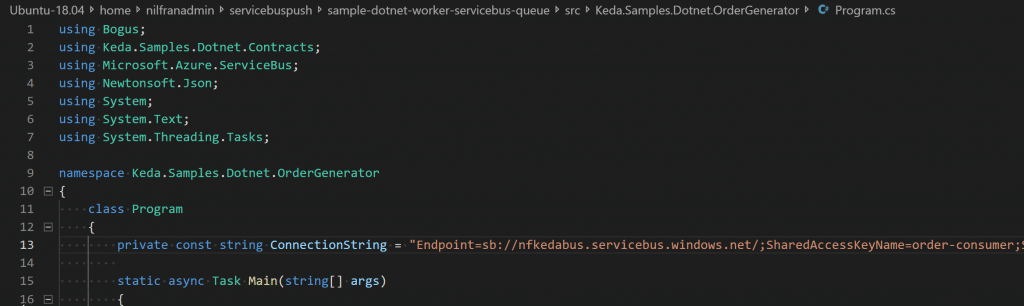
After that, we can build the solution and push a number of messages to our cluster. To see KEDA work, let’s open a second window into our cluster, and setup a watch on pods:
#in second terminal
kubectl get pods --namespace=keda-bus --watch
#in primary terminal
sudo dotnet run --project src/Keda.Samples.Dotnet.OrderGenerator/Keda.Samples.Dotnet.OrderGenerator.csproj
You’ll get a question about how many messages you want to push to ServiceBus. In our demo, let’s just push 1 message to start with. The message will reply with your order, and if you switch to the other terminal window, you should see that a pod was created! There is a default cooldown of 300 seconds, so it will take 300 seconds for that pod to go away.
That was cool, right. Let’s try this again with 10.
In my case, this caused a second pod to be created. Before I move to a larger test, I want to see my pods go away as well without waiting 300 seconds. Let’s change the cooldown time to 10 seconds:
kubectl edit scaledobject order-processor-scaler -n keda-busLook for the line cooldown, and add a small value (I chose 10). Then, let’s push 10 events again (some dotnet run command). In my case, this caused 2 pods to be created, and then after a couple of seconds to die as well. COOL!
order-processor-775f5d5d59-b5h65	0/1	Pending	0	1s
order-processor-775f5d5d59-b5h65	0/1	Pending	0	1s
order-processor-775f5d5d59-b5h65	0/1	ContainerCreating	0	1s
order-processor-775f5d5d59-b5h65	1-Jan	Running	0	5s
order-processor-775f5d5d59-zcndt	0/1	Pending	0	0s
order-processor-775f5d5d59-zcndt	0/1	Pending	0	0s
order-processor-775f5d5d59-zcndt	0/1	ContainerCreating	0	0s
order-processor-775f5d5d59-zcndt	1-Jan	Running	0	4s
]order-processor-775f5d5d59-zcndt	1-Jan	Terminating	0	24s
order-processor-775f5d5d59-b5h65	1-Jan	Terminating	0	31s
order-processor-775f5d5d59-b5h65	0/1	Terminating	0	33s
order-processor-775f5d5d59-zcndt	0/1	Terminating	0	26s
order-processor-775f5d5d59-zcndt	0/1	Terminating	0	27s
order-processor-775f5d5d59-zcndt	0/1	Terminating	0	27s
order-processor-775f5d5d59-b5h65	0/1	Terminating	0	38s
order-processor-775f5d5d59-b5h65	0/1	Terminating	0	38s
Now, let’s bring out the big guns and scale to a 1000 messages in the queue. This quickly makes KEDA scale our deployment to 10 pods (which is the maximum we defined). And before I even knew it, those 10 pods were also deleted. I’m having FUN right now!
order-processor-775f5d5d59-mhlm5	0/1	Pending	0	0s
order-processor-775f5d5d59-mhlm5	0/1	Pending	0	0s
order-processor-775f5d5d59-mhlm5	0/1	ContainerCreating	0	0s
order-processor-775f5d5d59-mhlm5	1-Jan	Running	0	3s
order-processor-775f5d5d59-k6d6z	0/1	Pending	0	0s
order-processor-775f5d5d59-k6d6z	0/1	Pending	0	0s
order-processor-775f5d5d59-kx5s8	0/1	Pending	0	0s
order-processor-775f5d5d59-bhn52	0/1	Pending	0	0s
order-processor-775f5d5d59-kx5s8	0/1	Pending	0	0s
order-processor-775f5d5d59-bhn52	0/1	Pending	0	0s
order-processor-775f5d5d59-k6d6z	0/1	ContainerCreating	0	0s
order-processor-775f5d5d59-bhn52	0/1	ContainerCreating	0	1s
order-processor-775f5d5d59-kx5s8	0/1	ContainerCreating	0	1s
order-processor-775f5d5d59-kx5s8	1-Jan	Running	0	4s
order-processor-775f5d5d59-k6d6z	1-Jan	Running	0	4s
order-processor-775f5d5d59-bhn52	1-Jan	Running	0	5s
order-processor-775f5d5d59-wwcz6	0/1	Pending	0	1s
order-processor-775f5d5d59-wwcz6	0/1	Pending	0	1s
order-processor-775f5d5d59-klzfn	0/1	Pending	0	1s
order-processor-775f5d5d59-k9b2z	0/1	Pending	0	1s
order-processor-775f5d5d59-klzfn	0/1	Pending	0	1s
order-processor-775f5d5d59-k9b2z	0/1	Pending	0	1s
order-processor-775f5d5d59-wwcz6	0/1	ContainerCreating	0	1s
order-processor-775f5d5d59-xmxjj	0/1	Pending	0	1s
order-processor-775f5d5d59-xmxjj	0/1	Pending	0	1s
order-processor-775f5d5d59-klzfn	0/1	ContainerCreating	0	1s
order-processor-775f5d5d59-k9b2z	0/1	ContainerCreating	0	1s
order-processor-775f5d5d59-xmxjj	0/1	ContainerCreating	0	1s
order-processor-775f5d5d59-klzfn	1-Jan	Running	0	4s
order-processor-775f5d5d59-xmxjj	1-Jan	Running	0	4s
order-processor-775f5d5d59-k9b2z	1-Jan	Running	0	5s
order-processor-775f5d5d59-wwcz6	1-Jan	Running	0	6s
order-processor-775f5d5d59-84l5h	0/1	Pending	0	1s
order-processor-775f5d5d59-84l5h	0/1	Pending	0	1s
order-processor-775f5d5d59-rxwgs	0/1	Pending	0	1s
order-processor-775f5d5d59-84l5h	0/1	ContainerCreating	0	1s
order-processor-775f5d5d59-rxwgs	0/1	Pending	0	1s
order-processor-775f5d5d59-rxwgs	0/1	ContainerCreating	0	1s
order-processor-775f5d5d59-rxwgs	1-Jan	Running	0	4s
order-processor-775f5d5d59-84l5h	1-Jan	Running	0	4s
order-processor-775f5d5d59-k9b2z	1-Jan	Terminating	0	3m38s
order-processor-775f5d5d59-klzfn	1-Jan	Terminating	0	3m38s
order-processor-775f5d5d59-xmxjj	1-Jan	Terminating	0	3m38s
order-processor-775f5d5d59-rxwgs	1-Jan	Terminating	0	3m22s
order-processor-775f5d5d59-mhlm5	1-Jan	Terminating	0	4m1s
order-processor-775f5d5d59-84l5h	1-Jan	Terminating	0	3m22s
order-processor-775f5d5d59-bhn52	1-Jan	Terminating	0	3m52s
order-processor-775f5d5d59-wwcz6	1-Jan	Terminating	0	3m38s
order-processor-775f5d5d59-kx5s8	1-Jan	Terminating	0	3m52s
order-processor-775f5d5d59-k6d6z	1-Jan	Terminating	0	3m52s
order-processor-775f5d5d59-kx5s8	0/1	Terminating	0	3m54s
order-processor-775f5d5d59-84l5h	0/1	Terminating	0	3m24s
order-processor-775f5d5d59-klzfn	0/1	Terminating	0	3m40s
order-processor-775f5d5d59-rxwgs	0/1	Terminating	0	3m24s
order-processor-775f5d5d59-k6d6z	0/1	Terminating	0	3m54s
order-processor-775f5d5d59-bhn52	0/1	Terminating	0	3m54s
order-processor-775f5d5d59-xmxjj	0/1	Terminating	0	3m40s
order-processor-775f5d5d59-wwcz6	0/1	Terminating	0	3m40s
order-processor-775f5d5d59-wwcz6	0/1	Terminating	0	3m40s
order-processor-775f5d5d59-k9b2z	0/1	Terminating	0	3m40s
order-processor-775f5d5d59-k9b2z	0/1	Terminating	0	3m40s
order-processor-775f5d5d59-mhlm5	0/1	Terminating	0	4m3s
order-processor-775f5d5d59-mhlm5	0/1	Terminating	0	4m3s
order-processor-775f5d5d59-klzfn	0/1	Terminating	0	3m41s
order-processor-775f5d5d59-klzfn	0/1	Terminating	0	3m41s
order-processor-775f5d5d59-kx5s8	0/1	Terminating	0	3m55s
order-processor-775f5d5d59-kx5s8	0/1	Terminating	0	3m55s
order-processor-775f5d5d59-k6d6z	0/1	Terminating	0	3m55s
order-processor-775f5d5d59-84l5h	0/1	Terminating	0	3m25s
order-processor-775f5d5d59-84l5h	0/1	Terminating	0	3m25s
order-processor-775f5d5d59-xmxjj	0/1	Terminating	0	3m44s
order-processor-775f5d5d59-xmxjj	0/1	Terminating	0	3m44s
order-processor-775f5d5d59-k6d6z	0/1	Terminating	0	3m58s
order-processor-775f5d5d59-k6d6z	0/1	Terminating	0	3m58s
order-processor-775f5d5d59-rxwgs	0/1	Terminating	0	3m28s
order-processor-775f5d5d59-rxwgs	0/1	Terminating	0	3m28s
order-processor-775f5d5d59-bhn52	0/1	Terminating	0	3m58s
order-processor-775f5d5d59-bhn52	0/1	Terminating	0	3m58s
order-processor-775f5d5d59-mhlm5	0/1	Terminating	0	4m13s
order-processor-775f5d5d59-mhlm5	0/1	Terminating	0	4m13s
order-processor-775f5d5d59-wwcz6	0/1	Terminating	0	3m50s
order-processor-775f5d5d59-wwcz6	0/1	Terminating	0	3m50s
order-processor-775f5d5d59-k9b2z	0/1	Terminating	0	3m50s
order-processor-775f5d5d59-k9b2z	0/1	Terminating	0	3m50s
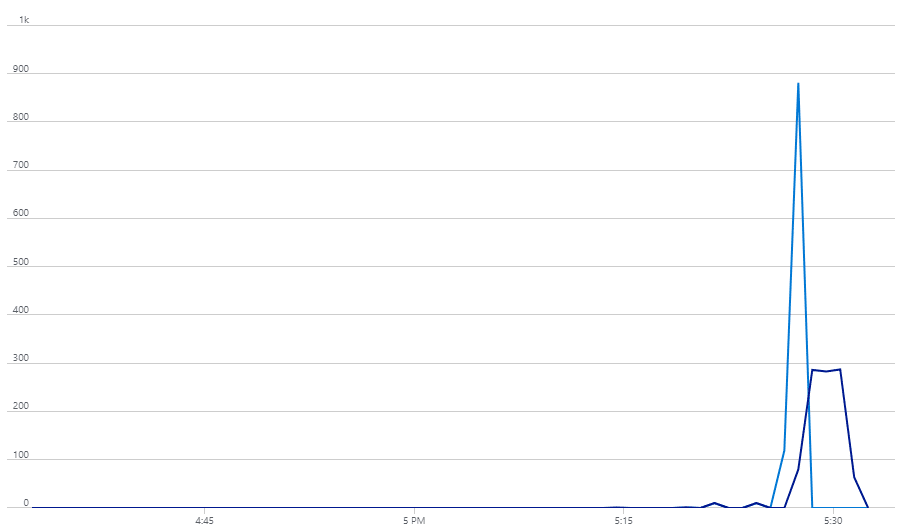
Watching the Azure Monitor graph for my Service Bus is also pretty fun:
Scaling KEDA to the Virtual Kubelet
I was hoping to also see KEDA burst into the virtual kubelet. Right now, the default deployment doesn’t contain any resource constraints. If you do not know what those are, please head on over to this blog post where I explain them.
Let take the deployment file, and add some resource constraints. My cluster has a total of 6vCPUs, so I’ll reserve 500m CPU per pod – and up the amount of replica’s to 20 (making 8 pods (hopefully)) start as virtual nodes. Let’s do this with the following deployment and scaled object:
apiVersion: apps/v1
kind: Deployment
metadata:
  name: order-processor
  labels:
    app: order-processor
spec:
  selector:
    matchLabels:
      app: order-processor
  template:
    metadata:
      labels:
        app: order-processor
    spec:
      containers:
      - name: order-processor
        image: tomkerkhove/keda-sample-dotnet-worker-servicebus-queue
        resources:
          requests:
            cpu: "500m"
        env:
        - name: KEDA_SERVICEBUS_QUEUE_CONNECTIONSTRING
          valueFrom:
            secretKeyRef:
             name: order-secrets
             key: SERVICEBUS_QUEUE_CONNECTIONSTRING
---
apiVersion: keda.k8s.io/v1alpha1
kind: ScaledObject
metadata:
  name: order-processor-scaler
  labels:
    app: order-processor
    deploymentName: order-processor
spec:
  scaleTargetRef:
    deploymentName: order-processor
  # minReplicaCount: 0 Change to define how many minimum replicas you want
  cooldownPeriod: 10
  maxReplicaCount: 10
  triggers:
  - type: azure-servicebus
    metadata:
      queueName: orders
      connection: KEDA_SERVICEBUS_QUEUE_CONNECTIONSTRING
      queueLength: '5'
Let’s update that with:
kubectl apply -f deployment.yaml -n keda-busLet’s now push another 1000 messages and see how the system behaves:
I can see the system scale again, but it doesn’t scale to my virtual node. Looking at a pending Pod, I got the following message:
0/4 nodes are available: 1 node(s) had taints that the pod didn't tolerate, 3 Insufficient cpu.There’s two messages in that one message:
- 1 node had taints that the pod didn’t tolerate
- 3 nodes had insufficient CPU (as expected).
Let me first explain what a node taint is. A taint is a mark you put on a node, and only pods that tolerate that taint should be scheduled on that node. Meaning, that in my case, because I don’t have a toleration for virtual kubelet, my pods wont get scheduled there.
Let’s try to solve this node taint issue. The following deployment file should solve this:
apiVersion: apps/v1
kind: Deployment
metadata:
  name: order-processor
  labels:
    app: order-processor
spec:
  selector:
    matchLabels:
      app: order-processor
  template:
    metadata:
      labels:
        app: order-processor
    spec:
      containers:
      - name: order-processor
        image: tomkerkhove/keda-sample-dotnet-worker-servicebus-queue
        resources:
          requests:
            cpu: "500m"
        env:
        - name: KEDA_SERVICEBUS_QUEUE_CONNECTIONSTRING
          valueFrom:
            secretKeyRef:
             name: order-secrets
             key: SERVICEBUS_QUEUE_CONNECTIONSTRING
      tolerations:
      - key: virtual-kubelet.io/provider
        operator: Equal
        value: azure
        effect: NoSchedule
---
apiVersion: keda.k8s.io/v1alpha1
kind: ScaledObject
metadata:
  name: order-processor-scaler
  labels:
    app: order-processor
    deploymentName: order-processor
spec:
  scaleTargetRef:
    deploymentName: order-processor
  # minReplicaCount: 0 Change to define how many minimum replicas you want
  cooldownPeriod: 10
  maxReplicaCount: 10
  triggers:
  - type: azure-servicebus
    metadata:
      queueName: orders
      connection: KEDA_SERVICEBUS_QUEUE_CONNECTIONSTRING
      queueLength: '5'
Again, we can apply this:
kubectl apply -f deployment.yaml -n keda-busAnd let’s try again with 1000 objects. My observations:
- Kubernetes immediately scheduled pods across “real” nodes and virtual nodes. Not prioritizing the “real nodes”. I ended up with 7 virtual pods and 3 “real” pods. I was actually expecting the real nodes to be prioritized
- It took some time for the virtual nodes to come live. This makes a little sense, as the image needs to be downloaded. But I was still thinking it to scale a little faster.
I believe we can solve number 1 by adding yet another scheduling mark to our pods. Let’s try adding a nodeAffinity preference to our deployment. And in the meanwhile, let’s also go wild in scaling and scale to 15 pods in total.
  apiVersion: apps/v1
  kind: Deployment
  metadata:
    name: order-processor
    labels:
      app: order-processor
  spec:
    selector:
      matchLabels:
        app: order-processor
    template:
      metadata:
        labels:
          app: order-processor
      spec:
        containers:
        - name: order-processor
          image: tomkerkhove/keda-sample-dotnet-worker-servicebus-queue
          resources:
            requests:
              cpu: "500m"
          env:
          - name: KEDA_SERVICEBUS_QUEUE_CONNECTIONSTRING
            valueFrom:
              secretKeyRef:
              name: order-secrets
              key: SERVICEBUS_QUEUE_CONNECTIONSTRING
        tolerations:
        - key: virtual-kubelet.io/provider
          operator: Equal
          value: azure
          effect: NoSchedule
        affinity:
          nodeAffinity:
            preferredDuringSchedulingIgnoredDuringExecution:
            - weight: 100
              preference:
                matchExpressions:
                - key: agentpool
                  operator: In
                  values:
                  - agentpool
  ---
  apiVersion: keda.k8s.io/v1alpha1
  kind: ScaledObject
  metadata:
    name: order-processor-scaler
    labels:
      app: order-processor
      deploymentName: order-processor
  spec:
    scaleTargetRef:
      deploymentName: order-processor
    # minReplicaCount: 0 Change to define how many minimum replicas you want
    cooldownPeriod: 10
    maxReplicaCount: 15
    triggers:
    - type: azure-servicebus
      metadata:
        queueName: orders
        connection: KEDA_SERVICEBUS_QUEUE_CONNECTIONSTRING
        queueLength: '5'
And again, this should do the job:
kubectl apply -f deployment.yaml -n keda-busAnd again, let’s send 1000 messages to our queue. This time, I still noticed pods getting scheduled on both AKS-nodes and the virtual kubelet, but there were more pods in the cluster than on the virtual nodes early on. So my affinity had some effect – not all that I was hoping for. But, I’m fairly happy with the result to be honest.
Conclusion
This was a cool demo to build, and the play around with. I liked that this demo focused on Keda, without needing me building a function in Kubernetes. I am not fully satisfied with the outcome of the nodeaffinity, but decided to call this done – and keep that topic for another day.