I am working with a customer that is looking to deploy Windows containers from Azure Kubernetes Service (AKS) to Azure Container Instances (ACI) nodes. In this blog post, I’ll explain how this can be done.
We’ll start with a quick why somebody would want to do this, how this can be done and then transition into the setup.
Why?
When running a workload on AKS, there are two scale dimensions:
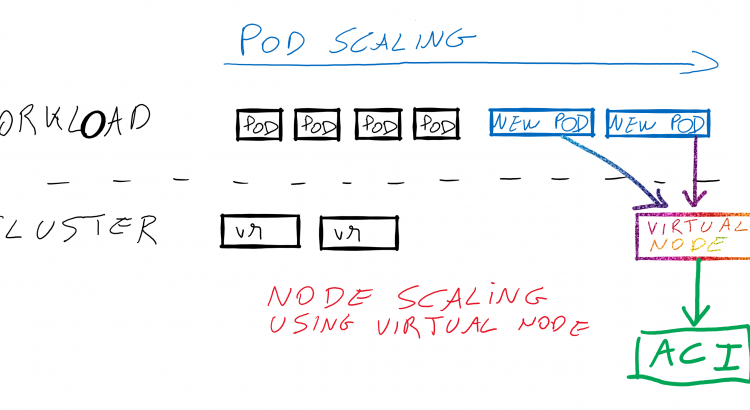
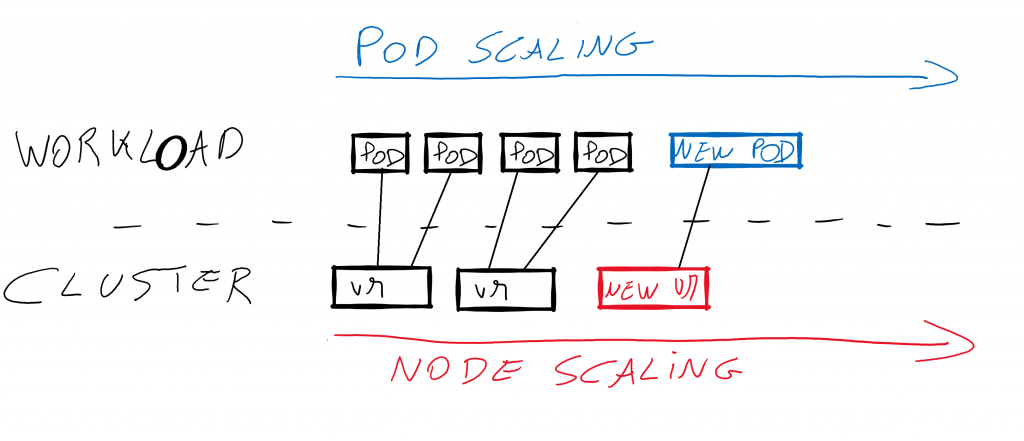
- Pod scaling: when you’re running a workload on AKS, you’ll typically run multiple pods with the same functionality. If you need more resources for a certain deployment, you simply add more pods. Pods get distributed on different nodes. This can be auto-scaled using the Horizontal Pod Autoscaler (HPA). Please note that this is workload scaling, not infrastructure scaling.
- Node scaling: when you’re running an AKS cluster, you run that on VMs. The amount of VMs determines how much compute power (CPU/RAM) is available for different workloads on your cluster to consume. If you need more compute power, you can add nodes. This can also be autoscaled using the Cluster Autoscaler.
Also, note that pod and node scaling are independent of each other, to a certain degree. You can add more pods to a certain deployment, without adding more nodes. Multiple pods can be scheduled on the same node. Typically, you add a new node to a cluster the moment you cannot schedule pods to any node in the cluster anymore.
Adding a node to a cluster takes some time (let’s say about 5 minutes). This is a time that you’re not able to meet your workload demands. Typically, you keep nodes around for a while after demand scales down. This could potentially lead to wasted resources since the nodes are not used to their full capacity.
There is a way in which you can schedule containers on infrastructure outside of your Kubernetes cluster, for example on Azure Container Instances. Those start faster than a new node and are billed per second. This means that you can get access to compute faster, and only get billed for actual utilization.
(why not run everything on ACI? Well, as a base for 24/7 runtime, ACI is more expensive than regular VMs. Certainly with reservations running regular VMs will be more cost-effective. ACI can be a great strategy for burst workloads.)
Now that we understand why let’s look into how:
How?
To make Kubernetes schedule pods on ACI infrastructure you can make use of the open-source Virtual Kubelet project. The Virtual Kubelet is a piece of software that enabled you to schedule Kubernetes pods on infrastructure that is not part of the cluster. Since this is open-source, you can have the Virtual Kubelet schedule workloads on more than only ACI, for instance, both Alibaba cloud and AWS has support for scheduling workloads using the Virtual Kubelet.
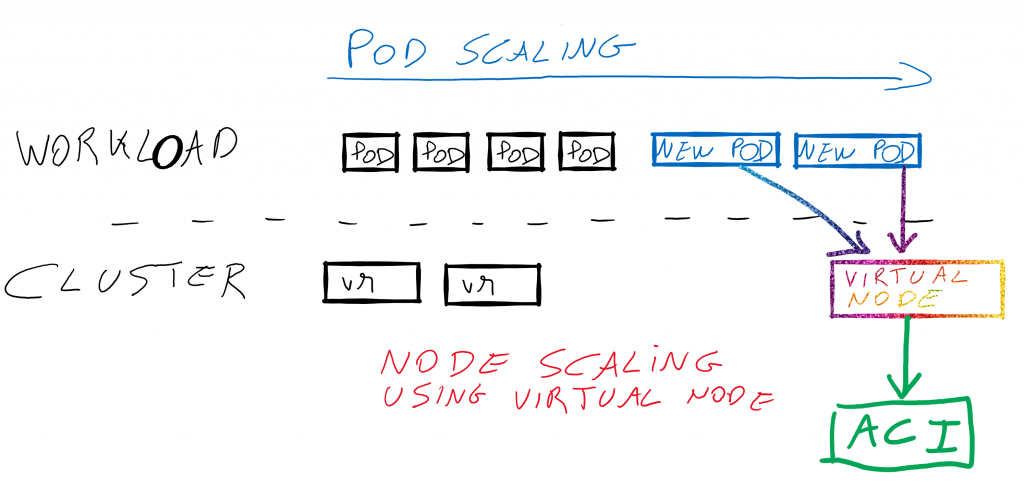
In Azure, there is enhanced support for the Virtual Kubelet. The Azure Kubernetes Service has support for a functionality called “virtual nodes”. This is an AKS built-in and supported way of running the Virtual Kubelet project. It is built-into the service, and it can be enabled/disabled easily using the CLI or an ARM template.
The virtual nodes functionality however does not support creating Windows containers on ACI. The open-source Virtual Kubelet does support creating Windows containers: which is why we will have a look at the open-source version here.
One thing I learned in doing the research/deployment of this is that Virtual Kubelet right now does NOT support deploying Windows ACI containers in a VNET. There’s an open GitHub issue tracking this.
We’ll explore the setup in this post. All code shown can be found on GitHub.
Practical steps involved for setup
Before diving into the individual steps, let’s have a quick look at the steps required:
- Create base infrastructure
- Create a service principal
- Create a network
- Create an AKS cluster
- Deploy Virtual Kubelet add-on
- Create Windows containers on ACI
For the purpose of this blog, I’ll be setting everything up using the Azure CLI. Deployment of the Virtual Kubelet will be done using helm (v3).
Let’s start with the base infrastructure
Setting up the base infrastructure
In terms of base infrastructure for this, we’ll create the following:
- A VNET, with 2 subnets. One for the AKS cluster, one for ACI.
- A Service principal, used by AKS
- An AKS cluster
To do this, either run the base-infra script or execute these steps:
First, set a number of variables:
# Set env-variables
export VNET_RANGE=10.0.0.0/8
export CLUSTER_SUBNET_RANGE=10.240.0.0/16
export ACI_SUBNET_RANGE=10.241.0.0/16
export VNET_NAME=AKS-win-ACI-vk
export CLUSTER_SUBNET_NAME=AKS
export ACI_SUBNET_NAME=ACI
export AKS_CLUSTER_RG=AKS-win-ACI-vk
export KUBE_DNS_IP=10.0.0.10
export AKS_CLUSTER_NAME=AKS-win-ACI-vk
export LOCATION=westus2
Then, create the resource group, the network, and get the subnet ID.
# create RG
echo "### Creating RG ### "

az group create -o table \
--name $AKS_CLUSTER_RG \
--location $LOCATION

# create network
echo "### Creating network ### "

az network vnet create -o table \
    --resource-group $AKS_CLUSTER_RG \
    --name $VNET_NAME \
    --address-prefixes $VNET_RANGE \
    --subnet-name $CLUSTER_SUBNET_NAME \
    --subnet-prefix $CLUSTER_SUBNET_RANGE

export VNET_ID=`az network vnet show --resource-group $AKS_CLUSTER_RG --name $VNET_NAME --query id -o tsv`

az network vnet subnet create -o table \
    --resource-group $AKS_CLUSTER_RG \
    --vnet-name $VNET_NAME \
    --name $ACI_SUBNET_NAME \
    --address-prefix $ACI_SUBNET_RANGE
export VNET_SUBNET_ID=`az network vnet subnet show --resource-group $AKS_CLUSTER_RG --vnet-name $VNET_NAME --name $CLUSTER_SUBNET_NAME --query id -o tsv
`
Then, create the service principal. Give it some time to propagate:
# create sp
echo "### Creating service principal ### "

export SP=`az ad sp create-for-rbac -n "vk-aci-win" `
export AZURE_TENANT_ID=`echo $SP | jq .tenant | tr -d '"'`
export AZURE_CLIENT_ID=`echo $SP | jq .appId | tr -d '"'`
export AZURE_CLIENT_SECRET=`echo $SP | jq .password | tr -d '"'`
echo "Staring 30 seconds sleep to make sure SP propagates in all databases"
sleep 30
echo "Done sleeping."
And finally, create the AKS cluster, get the config loaded and get the master URI.
# create AKS cluster
echo "### Creating AKS cluster ### "

az aks create -o table \
    --resource-group $AKS_CLUSTER_RG \
    --name $AKS_CLUSTER_NAME \
    --node-count 1 \
    --network-plugin azure \
    --service-cidr 10.0.0.0/16 \
    --dns-service-ip $KUBE_DNS_IP \
    --docker-bridge-address 172.17.0.1/16 \
    --vnet-subnet-id $VNET_SUBNET_ID \
    --client-secret $AZURE_CLIENT_SECRET \
    --service-principal $AZURE_CLIENT_ID

# get AKS credentials
echo "### Get AKS credentials and master URI ### "

az aks get-credentials \
    --resource-group $AKS_CLUSTER_RG \
    --name $AKS_CLUSTER_NAME

export MASTER_URI=`kubectl cluster-info | grep "Kubernetes master" | awk '{print $6}'`
And with that done, we can move ahead and deploy the Virtual Kubelet:
Deploying Virtual Kubelet
Deploying the Virtual Kubelet itself is pretty straightforward. Please note that in the code snippet below we do have to specify which operating we need the virtual nodes to support. This means that if you want to add both Linux and Windows virtual nodes to the same cluster, you’d have to create two Virtual Kubelets, one for Windows, one for Linux. In this case, we’ll only deploy a Windows one:
export RELEASE_NAME=virtual-kubelet-windows
export NODE_NAME=virtual-kubelet-windows

export CHART_URL=https://github.com/virtual-kubelet/azure-aci/raw/master/charts/virtual-kubelet-latest.tgz

helm install "$RELEASE_NAME" $CHART_URL \
  --set provider=azure \
  --set providers.azure.targetAKS=true \
  --set providers.azure.vnet.enabled=false \
  --set providers.azure.vnet.clusterCidr=$CLUSTER_SUBNET_RANGE \
  --set providers.azure.masterUri=$MASTER_URI \
  --set nodeName=$NODE_NAME \
  --set nodeOsType="Windows"
This will create a new node in Kubernetes, which you can see by running kubectl get nodes. You will also see a pod in the default namespace with the Virtual Kubelet as a name:

And now, we can create a pod on there:
Create Windows containers on ACI
When creating Windows containers in Kubernetes, you need to select the OS specifically. You do this using the following special node selector:
     nodeSelector:
      kubernetes.io/os: windows
To schedule pods on a virtual node or on the Virtual Kubelet, you need to set a node toleration on the deployment/pods:
     tolerations:
     - key: virtual-kubelet.io/provider
       operator: Exists
     - key: azure.com/aci
       effect: NoSchedule
Altogether, you can create the following deployment that will create an IIS server on Azurecontainer instances.
apiVersion: apps/v1
kind: Deployment
metadata:
  labels:
    app: win-webserver
  name: win-webserver
spec:
  replicas: 2
  selector:
    matchLabels:
      app: win-webserver
  template:
    metadata:
      labels:
        app: win-webserver
      name: win-webserver
    spec:
     containers:
      - name: windowswebserver
        ports:
        - containerPort: 80
          name: http
          protocol: TCP
        - containerPort: 443
          name: https
        image: mcr.microsoft.com/windows/servercore/iis:windowsservercore-ltsc2019
     nodeSelector:
      kubernetes.io/os: windows
     tolerations:
     - key: virtual-kubelet.io/provider
       operator: Exists
     - key: azure.com/aci
       effect: NoSchedule
Which we can deploy using kubectl create -f deploy.yaml.

And if we surf to one of those IP addresses, we can see a running IIS server.

And that’s how you can run Windows containers on Azure Container Instances using the Virtual Kubelet.
Summary
In this post, we explored how to run Windows containers on Azure Container Instances using the Virtual Kubelet. There’s one limitation we discussed, which is that Windows ACI isn’t yet supported to be deployed in a VNET. Outside of that limitation, it was pretty straightforward to run Windows containers on ACI using the Virtual Kubelet.